Sega Model 3, SR2 plug n play PC project

Kev A

Active member
vacBacker
Feedback
8 (100%)
Credits
744CR
Been collecting parts for a little while now to try and build a PC based setup that I can swap into my SR2 cab, now all the important parts have arrived am going to document the progress here.

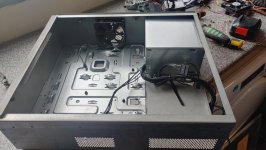
Aiming to keep this project as OEM as possible with minimal modifications to the cab, want to fit all the PC internals into a M3 cage so it can be mounted in the original position and can be swapped out for an original PCB easily.

Parts collected so far....

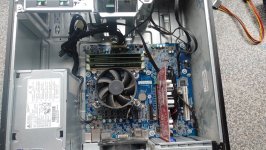
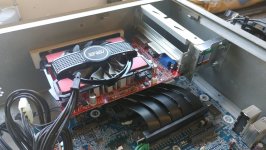
PC - old HP Z230 Xeon and 1g R7 250 graphics card ready ( Supermodel Emulator runs SR2 with the new lighting model with no slowdown)

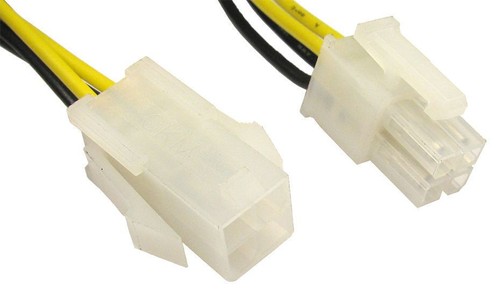
ATX extension cables


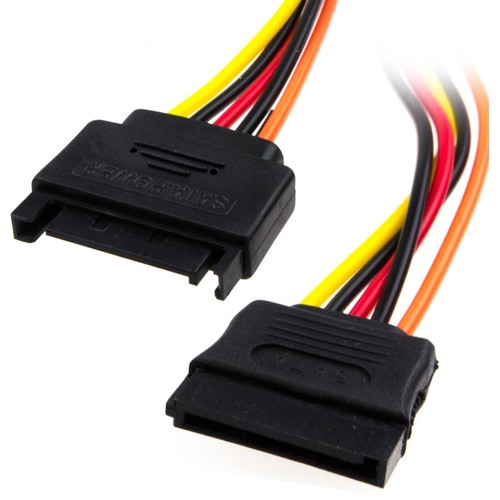
SATA extension cables
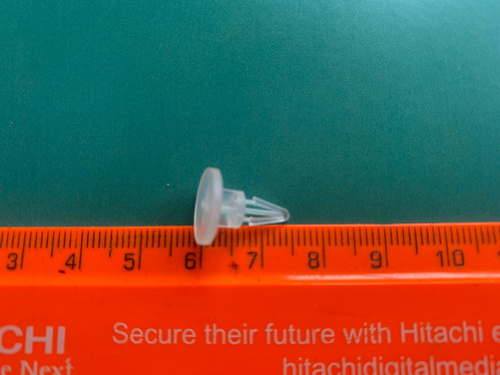

Plastic PCB spacers


PCIE extension cable (card is too high to be mounted vertically in the M3 cage)


M3 Mega adapter from Tibal over on Gamoover with preconfigured Mega 2560 to handle the FFB integration


Video adapter PCB from Bandicoot and NJZ3


Honestly can't say enough nice things about the guys over on Gamoover, really helpful with advice and getting the parts sorted for me :D
Tibal has done a great job of spacing and mainly using thru hole components.
The M3 Mega has a separate input to accept signals directly from the video amp so should be easy to wire up.
I ordered the M3 mega unassembled, so the first job it to get it all put together...


20230603_130658.jpg

I had worried about the little surface mount resistors, but they went on without too much fuss.

20230603_143238.jpg

20230603_151702.jpg

That's where I'm up to at the moment, next step is to start mounting the PC hardware into the M3 cage and start configuring the software.
 

Kev A

Active member
vacBacker
Feedback
8 (100%)
Credits
744CR
Bit more progress over the weekend, getting the PC all mounted inside the PCB cage.
Had been planning to remove the motherboard and just mount it on plastic spacers, but on closer inspection the heatsink screws into the metal base beneath, in the end decided it would be best cut around the mounting points are attach the base inside the PCB cage

PC Parts....
20230610_122133(1).jpg


Took apart the PC case by drilling out the rivets.

20230610_140632.jpg


Cut the mounting area out with a jigsaw and filed all the sharp edges.

20230610_154928.jpg


After trial fitting, decided on this layout as it provides plenty of room to mount the video card, also the CPU is close to the extractor fan.

Mounted the plate with rivets, strong enough but removable in future should the need arise.

20230610_173729_HDR.jpg


Next challenge was mounting up the video card, as its too tall for the case it needs to lay horizontally with a long extension cable.
Reused the rear area of the PC case where the cards secure,

20230611_115735.jpg


How the card looks in place, mounted further forward to allow room for the vga cable to plug in.

20230611_140425.jpg


Also mounted up the motherboard, video amplifier and HDD holder.
The M3 mega adapter mounted on the front so the connectors are in a similar location to the original PCB.

20230611_191431.jpg


That's how it stands at the moment, waiting on some right angle USB and audio connectors as standard ones won't fit in the space that's left, also need some new thermal paste for the CPU, hopefully it should all be here this week so I can continue the build next weekend.


Copying and installing apps....

Install mega USB driver
Install Vjoy
Install backforce feeder
Download config files
Paste control sets into backforce feeder
Download and install the videoamp companion app


Emulator and Roms......

Download Supermodel and roms


If roms dont have the FFB eproms unzip the rom sets, paste the ffb roms and re zip
Download the preconfigured supermodel.ini file (for me I needed to have powerpcfrequency=100 to make SR2 work correctly
Create batch files to run supermodel games e.g.

As I want SR2 to be the defualt I made this batch file and added it to the startup folder,
I added a pause of 15 seconds to make sure backforcefeeder has time to start before launching the game. This also gives time to cancel with CTRL + C if you want to chose another game.

timeout /t 15 /nobreak
cd c:\supermodel03\
run supermodel srally.zip -res=496,384 -fullscreen -force-feedback

open run and type shell:startup to open the startup programs folder and copy the batch file

(other batch files for D2 and Scud Race)

cd c:\supermodel03\
run supermodel scud.zip -res=496,384 -fullscreen -force-feedback

cd c:\supermodel03\
run supermodel dayto2pe.zip -res=496,384 -fullscreen -force-feedback

run each game and go into the service menu to select free play etc you may have to change the resolution initially to something mode LCD friendly eg, 1024,768 then revert to EGA later (button 6 is test, button 5 is service) Daytona2 and Scud will also need to be put into single from twin.
 
Last edited:

Kev A

Active member
vacBacker
Feedback
8 (100%)
Credits
744CR
Installing the PC in the cab

Connect up the connections to the M3 Mega but leave the RGB connector disconnected for now, and connect an external LCD

20240406_144328_HDR.jpg20240407_140402.jpg

open VJoy config and select the inputs needed, in my case they were..

X axis, Y axis, and RZ axis, not sure why my brake pedal appears as RZ as that's rotational but still seems to work and accepted by supermodel, I also needed to change from the default 8 buttons to 14, go into vJoy monitor and try each button, see what number button they appear as and write down

eg start = button1
Handbrake = button 3
etc

enter this information into the supermodel.ini file

Go back into BackForceFeeder and select the driveboard your using (eg SR2 in my case)

The control schemes should have been imported earlier but you may want to adjust settings, I believe the imported ones are for use with a new Driveboard not the OG I found the FFB effects to be very weak. This is what I settled on....

20240407_142200.jpg

Enabling EGA resolutions


#This is where I encountered MAJOR problems with getting the PC to output EGA resolution, after MANY hours turned out to be a dodgy VGA cable#

I will document what I did but im not really sure CRTEmuDriver is needed.
Install Calamity ATI drivers
Run vmmaker and chose 25khz modelines and install
Run the videoamp companion app and select the 25khz EDID and select the 25khz filter, dips ON,OFF,OFF,OFF
 
Last edited:

Sbdesign

SEGA collector
vacBacker
Feedback
13 (100%)
Credits
1,646CR
finally ...
Been waiting for someone on here to do this...
Hopefully I can replicate while keeping my forum loyalty.

Fingers crossed for you KEV!

what special time sensitive (available now and maybe not soon) items do I need and how much?
I assume just the - M3 mega adapter?
 

Kev A

Active member
vacBacker
Feedback
8 (100%)
Credits
744CR
Thanks Dude (y)

Yeah just the M3 Mega adapter and the video amp, I guess you could use a J-pac to filter out any non 24k signals, but this one is smaller and can be powered via the adapter board, both boards with the Mega 2560 plus shipping came in around the £110 mark.

My aim is to try and play SR2/Scud Race/D2, there are options to add a replacement gear shifter that does the 4 speeds and functions as up/down that could be added in the future, but I'm trying to keep it simple and hoping to keep the whole project sub £200
 

Kev A

Active member
vacBacker
Feedback
8 (100%)
Credits
744CR
Moved to tidy up thread
 

Attachments

  • 20230610_122133(1).jpg
    20230610_122133(1).jpg
    183.8 KB · Views: 196
  • 20230610_140632.jpg
    20230610_140632.jpg
    63.4 KB · Views: 193
  • 20230610_154928.jpg
    20230610_154928.jpg
    153.8 KB · Views: 194
  • 20230610_173729_HDR.jpg
    20230610_173729_HDR.jpg
    121.8 KB · Views: 193
  • 20230611_115735.jpg
    20230611_115735.jpg
    69.4 KB · Views: 186
  • 20230611_140425.jpg
    20230611_140425.jpg
    134.9 KB · Views: 188
  • 20230611_191431.jpg
    20230611_191431.jpg
    155.7 KB · Views: 189
Last edited:

Eight-Bit

Newbie
vacBacker
Credits
15CR
Good work, I am following with interest!

Co-incidentally I have just picked up some cards from Aganyte on the Gamoover forums to do something similar to you, but in a model 2 cab. I'm after a solution to play other games that I can flip between the original board stack without too much hassle. The guys at Gamoover I agree are very helpful and seem to have cracked getting ffb working with emulation in sega cabs.
 

Kev A

Active member
vacBacker
Feedback
8 (100%)
Credits
744CR
Good work, I am following with interest!

Co-incidentally I have just picked up some cards from Aganyte on the Gamoover forums to do something similar to you, but in a model 2 cab. I'm after a solution to play other games that I can flip between the original board stack without too much hassle. The guys at Gamoover I agree are very helpful and seem to have cracked getting ffb working with emulation in sega cabs.
Thanks dude, yeah the guys have been really helpful so far.

Done a little bit more this weekend (just finishing up the PC) so hopefully moving onto the software and config side soon.

Would be intrested hearing how you get on with your M2 project too.
 

Tibal

Newbie
Feedback
2 (100%)
Credits
106CR
Hi! I just found this thread!
Very good job with the integration (y):)
You're the first one I see using a Mega Adapter on an actual M3 cage, that's great!
I'll follow your work :)

I'm after a solution to play other games that I can flip between the original board stack without too much hassle
Mega Adapters exist for all M2, M3 and F355 racing cabinets at this time. They were designed precisely for that, to swap the original stack with a PC and vice versa in a matter of minutes
 

Kev A

Active member
vacBacker
Feedback
8 (100%)
Credits
744CR
Hi! I just found this thread!
Very good job with the integration (y):)
You're the first one I see using a Mega Adapter on an actual M3 cage, that's great!
I'll follow your work :)


Mega Adapters exist for all M2, M3 and F355 racing cabinets at this time. They were designed precisely for that, to swap the original stack with a PC and vice versa in a matter of minutes
Thanks Dude,

I figured mounting all the PC internals into the cage would make mounting it up, or swapping out for OG boards easier in the future, have had a busy few weeks, but hoping to get back to this project soon ;)
 

Kev A

Active member
vacBacker
Feedback
8 (100%)
Credits
744CR
Once I have finally got it up and running might look into adding more, not against it or anything, not too sure how the newer stuff would look on 24khz though 🤔
 

Kev A

Active member
vacBacker
Feedback
8 (100%)
Credits
744CR
Thinking back now, as its been a while, the emu side was really easy, the backforcefeeder app looks pretty straightforward, theres tweaks and options for more games but just getting it running with a few M3 games looks ok and its quite well documented.

My main concern is the modelines and refresh rates for running on a CRT, I know thats been covered before but it just confuses me.

Really need to get it all working with an external LCD then install CRTemudriver and set up the CRT.
 

Bods

Senior Member
vacBacker
Feedback
3 (100%)
Credits
4,556CR
That's what I do setting up, LCD and then load the stuff for CRT and works well that way, always have issues with 15khz monitor connected even with Ultimarc cards, sure XP would fail to install even
 

Tibal

Newbie
Feedback
2 (100%)
Credits
106CR
My main concern is the modelines and refresh rates for running on a CRT, I know thats been covered before but it just confuses me.

Really need to get it all working with an external LCD then install CRTemudriver and set up the CRT.
Hi,
@njz3 will correct me if I'm wrong, but if I remember well, with your version of the VideoAmp, it's just about selecting 1024x384p in the VideoAmp's companion app (on any PC, not necessarily on the one that will be used in the Cab), and then add the argument "-stretch" in the command line (or .bat file) to launch your Supermodel game.

With your VideoAmp you don't need to bother with CRTemudriver
 
Top