Here is a dance machine I got from a raid recently, an Amuseworld EZ2Dancer which seems to be fairly rare and worth keeping running. I'de never had a dance machine before but as I worked in the video games industry for a while and had once been tasked with making a dance game then I thought it would be interesting to play with and maybe do a restore on, and also do a resto thread as there's not many dance machine threads.
Currently in bits with the collective parts near each other so I could hook everything up to test. It's a bit of a beast of a machine!

First up was making sure the various bits work and investigating any issues. I started with the computer section that drives the game, a bog standard Pentium 3 on a generic motherboard running at about 600mhz with 128mb or ram, and a 20gig HD with a hacked up Windows 98 booting straight into the game program which is security protected with a dongle on the parallel port.
I backed up the hard drive and then cloned it onto another HD, tested that in the original PC and it worked fine so now I know I can keep the program safe. Then I tried running the game on a different old PC, and sure enough it seems to work fine provided I kept the specs similar and transferred the graphics card to the replacement PC (purely due to not having drivers installed for any other graphics cards, but that should be fixable also).
Running off a different PC:

While looking at the original PC, I immediately noticed a load of the capacitors were about to burst on the motherboard so I took this opportunity to replace them and give it a good recap. These particular motherboards go for about £100 on ebay now, I was shocked! All beige box PC parts appear to have gone up in value now due to the retro gaming scene, that's another thing to moan about")

Next up, I knew the bases would need a good looking at as they were bound to be filthy and there were foot pad sensing issues, with some stuck on and others not sensing at all. Also, the LEDs had gone quite dim with time and were not doing a good job of light your feet up, so I decided I'de have fun replacing all 480 of them with new ones.
Sure enough, pretty grimy in there:


Stripped the bases down and gave them a good wash, next was to sand all the rust spots down and prime and respray.


While my brother was painting one of the bases, I started working on replacing the dim leds which were looking like this:

So took out the individual panels, gave them a clean and started the mass desoldering and replacement:


Testing the panels to make sure they all light up now:

Installing the panels and setting the bases up, but found some lines were missing due to bad ULN2803 driver chips, so I've got some of those on order now. While looking at the IO board in the center of the base I discovered that some of the chips have been killed by either leaky caps or spilled drinks penetrating the base area. Always going to be a hazard with these I guess.
The missing inputs were a combination of broken wires crushed by the mounting plate, and dead 74LS245 chips on the IO board. All the rubber sensors were tested okay by me making a little test jig and seeing the output on an oscilloscope.

Bro having a dance, testing the pad functionality:

Put the painted bases back together temporarily for testing, still need a bit more working doing tracing a few faulty lines on the LEDs and the inputs, but looking better already.

There's still quite a bit of work to go, the sound amplifier seems a bit flaky with missing channels. It looks like a fun challenge removing that due to the way the middle section is constructed. The hand sensors were not functioning on one side, largely thanks to dust blocking the IR sensors. They also seemed to be quite sticky and clearly had enjoyed a drink or two.
The projection screen could do with a re-tubing, something with a little less burn which on a white screen looks like this:
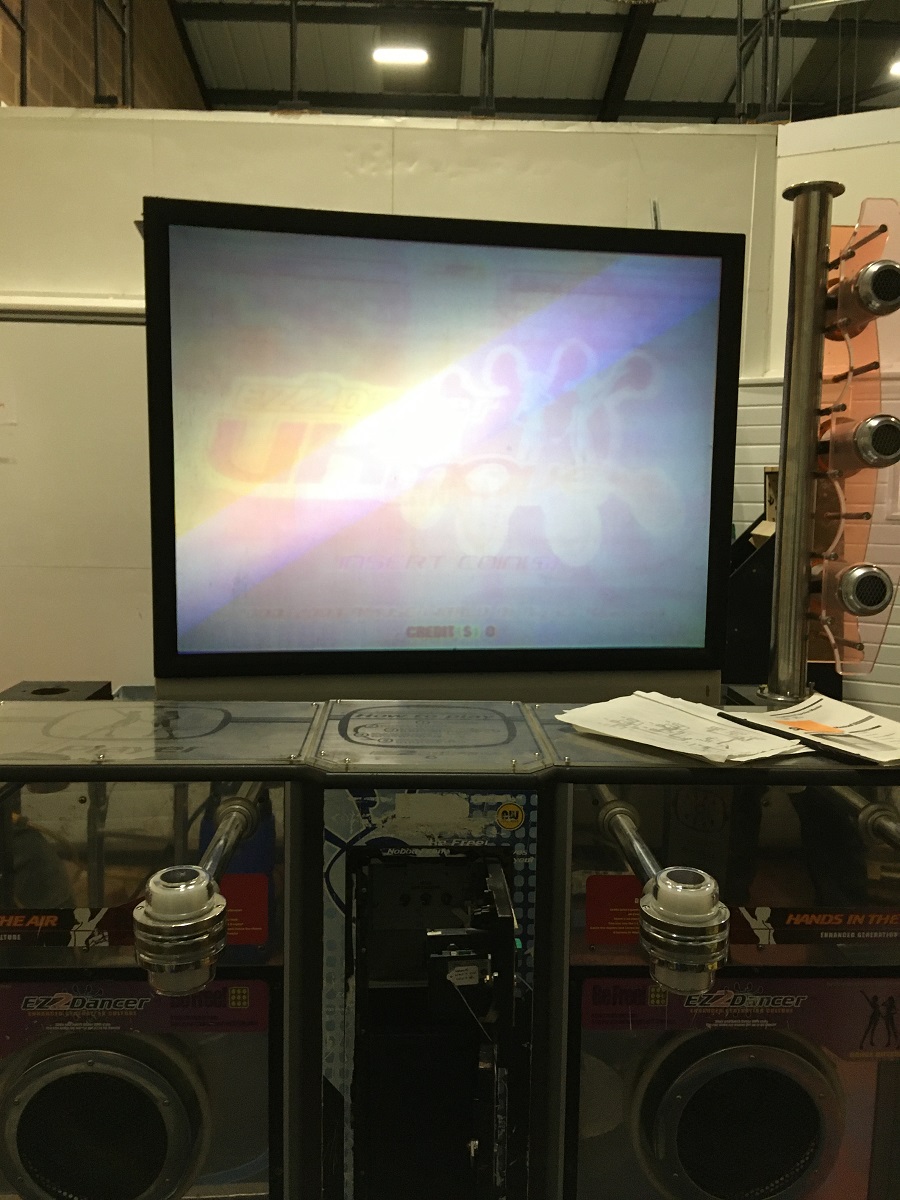
It's perfectly playable at the moment though, purely cosmetic burn. The projection monitor power supply has one large bulging capacitor though, so I'll be working my way through that as well next. I'de also like to replace the projection screen due to various scratches and damage. Thanks kids, for taking the sharp end of a toy and scratching it back and forth across the screen! Little b-stards!
I'll keep you posted!
Currently in bits with the collective parts near each other so I could hook everything up to test. It's a bit of a beast of a machine!
First up was making sure the various bits work and investigating any issues. I started with the computer section that drives the game, a bog standard Pentium 3 on a generic motherboard running at about 600mhz with 128mb or ram, and a 20gig HD with a hacked up Windows 98 booting straight into the game program which is security protected with a dongle on the parallel port.
I backed up the hard drive and then cloned it onto another HD, tested that in the original PC and it worked fine so now I know I can keep the program safe. Then I tried running the game on a different old PC, and sure enough it seems to work fine provided I kept the specs similar and transferred the graphics card to the replacement PC (purely due to not having drivers installed for any other graphics cards, but that should be fixable also).
Running off a different PC:
While looking at the original PC, I immediately noticed a load of the capacitors were about to burst on the motherboard so I took this opportunity to replace them and give it a good recap. These particular motherboards go for about £100 on ebay now, I was shocked! All beige box PC parts appear to have gone up in value now due to the retro gaming scene, that's another thing to moan about
Next up, I knew the bases would need a good looking at as they were bound to be filthy and there were foot pad sensing issues, with some stuck on and others not sensing at all. Also, the LEDs had gone quite dim with time and were not doing a good job of light your feet up, so I decided I'de have fun replacing all 480 of them with new ones.
Sure enough, pretty grimy in there:
Stripped the bases down and gave them a good wash, next was to sand all the rust spots down and prime and respray.
While my brother was painting one of the bases, I started working on replacing the dim leds which were looking like this:
So took out the individual panels, gave them a clean and started the mass desoldering and replacement:
Testing the panels to make sure they all light up now:
Installing the panels and setting the bases up, but found some lines were missing due to bad ULN2803 driver chips, so I've got some of those on order now. While looking at the IO board in the center of the base I discovered that some of the chips have been killed by either leaky caps or spilled drinks penetrating the base area. Always going to be a hazard with these I guess.
The missing inputs were a combination of broken wires crushed by the mounting plate, and dead 74LS245 chips on the IO board. All the rubber sensors were tested okay by me making a little test jig and seeing the output on an oscilloscope.
Bro having a dance, testing the pad functionality:
Put the painted bases back together temporarily for testing, still need a bit more working doing tracing a few faulty lines on the LEDs and the inputs, but looking better already.
There's still quite a bit of work to go, the sound amplifier seems a bit flaky with missing channels. It looks like a fun challenge removing that due to the way the middle section is constructed. The hand sensors were not functioning on one side, largely thanks to dust blocking the IR sensors. They also seemed to be quite sticky and clearly had enjoyed a drink or two.
The projection screen could do with a re-tubing, something with a little less burn which on a white screen looks like this:
It's perfectly playable at the moment though, purely cosmetic burn. The projection monitor power supply has one large bulging capacitor though, so I'll be working my way through that as well next. I'de also like to replace the projection screen due to various scratches and damage. Thanks kids, for taking the sharp end of a toy and scratching it back and forth across the screen! Little b-stards!
I'll keep you posted!