
I am now the new custodian and taking over the restoration of this Original Bally/Midway Pacman Mini machine. This was originally started by @Vamino back in 2015, you can read his original thread here
Back in 2015 the machine was in a pretty bad state. Internally it was covered in white mould. Thankfully Vamino has taken one for the team and cleaned the nastiness out
He’s also added some MDF to the original rotten base.
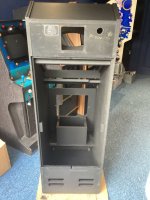
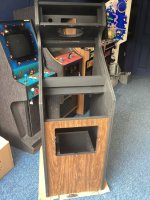
When I received the machine it was basically the shell with the parts stripped out.
Here is what it all looked like when I picked it up and unloaded in my garage arcade...


The Good
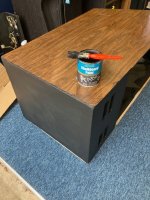
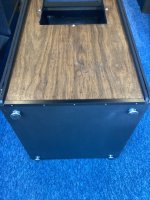
Looking more closely at the machine, the condition of the wood vinyl is not too bad. There is a bit of damage and some scratches, but I think it is salvageable. It’s a unique pattern and I actually quite like it. My aim is to try and keep it.
The monitor has been recapped and looks in a real nice condition, so hopefully there will not be too much to worry about there.
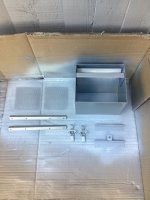
A quick glance at the main power supplies (that are currently stored in the white box with the black lid) and they don’t look too bad. I think these will clean-up and be good.
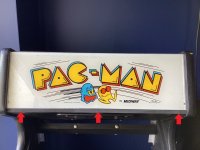
The marquee is in fantastic condition – a definite keeper.
The black back door “bubble” is there with no cracks. It’s near on impossible to get a replacement or even a reproduction, so I am pleased about that.
The inner black bezel monitor surround and smoked coloured monitor filter all look in good condition.
All the metal work marquee and control panel brackets look in decent shape, they just need re-spraying.
There is also what looks like a NOS replacement control panel overlay in the box – perfect!
The Bad
No back door. I was told it disintegrated so I will need to get a sheet of wood cut to size.
The bezel glass. A lot of the artwork has peeled off from behind the glass. The clear glass itself is ok and not cracked. I will have to get either a replacement bezel, get the artwork reprinted on the original glass or purchase a reproduction artwork sticker that sticks to the inside of the glass. I’ll probably go for the latter option.
The coin door. It’s badly rusted. There are also some additional holes drilled into the door, (probably by a previous operator installing a security bar/lock). Some wiring has also been cut and removed. The Price of Play decal legends are permanently damaged. Two bolts that hold the outer frame to the machine have snapped off due to the heavy rust. It will be easier to source a replacement Midway door than trying to fix this.
The silkscreen artwork on the control panel. Unfortunately rust is bubbling behind the blue ghost characters at the front of the panel. A real shame as I would have preferred to save the original artwork. Thankfully, you can get clear reproduction artwork of just the characters which stick onto a freshly painted black surface, so it should look just like the original.
The marquee lights. The white plywood board that sits behind the marquee is missing a couple of wedge bulb holders that are glued/secured into the plywood and the wiring is damaged. The plywood bulb holder is also splitting/delaminating. I’ve also no idea where I can obtain the unique bulb holders. I’ll have to find or work out a solution to this.
The base. The side edges of the particle board are crumbling at the bottom and it really needs a neater solution than the current MDF.
The Unknown
The main harness wiring. I have no idea if it is complete or if it is damaged. It will also need shoving in a bucket of hot soapy water to clean it all up and hopefully I can see where I am at with it.
The Base
First job is to remove the recently added MDF from the bottom and inside of the machine. Once the old base is exposed, I’ll remove that as well and fit a brand new piece of 18mm Plywood for the new base. I’ll glue it in place and add some additional batten supports inside the machine to make sure it is structurally sound.
Ripping off the MDF exposes the old rotten plywood base which is very soft.


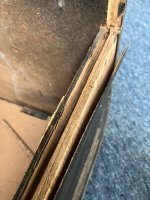
The old plywood base was fitted using a tongue and groove method and also held in place using nails inserted in from the sides.

Here is the old base completely removed. No additional damage was done to the existing side panels with the vinyl.
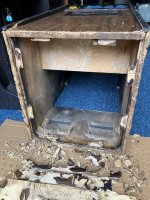
After cleaning up the mess and removing the metal vent grilles, I measured the area needed for a new piece of plywood. I need to cut a piece measuring 548mm x 470mm.

There is now a cut out groove all around the side edge from where the old plywood base sat. The new piece of plywood fits perfectly onto that and can be glued and nailed in securely.

Inside the machine at the bottom there are (were) some triangular noggins that helped secure the original base. Most of these were soft (rotten) so I removed all of them and added new battens to give additional support the new base and beef up the structure of the cabinet. The battens were nailed and glued.

(Continued in next post)
Back in 2015 the machine was in a pretty bad state. Internally it was covered in white mould. Thankfully Vamino has taken one for the team and cleaned the nastiness out
He’s also added some MDF to the original rotten base.
When I received the machine it was basically the shell with the parts stripped out.
Here is what it all looked like when I picked it up and unloaded in my garage arcade...
The Good
Looking more closely at the machine, the condition of the wood vinyl is not too bad. There is a bit of damage and some scratches, but I think it is salvageable. It’s a unique pattern and I actually quite like it. My aim is to try and keep it.
The monitor has been recapped and looks in a real nice condition, so hopefully there will not be too much to worry about there.
A quick glance at the main power supplies (that are currently stored in the white box with the black lid) and they don’t look too bad. I think these will clean-up and be good.
The marquee is in fantastic condition – a definite keeper.
The black back door “bubble” is there with no cracks. It’s near on impossible to get a replacement or even a reproduction, so I am pleased about that.
The inner black bezel monitor surround and smoked coloured monitor filter all look in good condition.
All the metal work marquee and control panel brackets look in decent shape, they just need re-spraying.
There is also what looks like a NOS replacement control panel overlay in the box – perfect!
The Bad
No back door. I was told it disintegrated so I will need to get a sheet of wood cut to size.
The bezel glass. A lot of the artwork has peeled off from behind the glass. The clear glass itself is ok and not cracked. I will have to get either a replacement bezel, get the artwork reprinted on the original glass or purchase a reproduction artwork sticker that sticks to the inside of the glass. I’ll probably go for the latter option.
The coin door. It’s badly rusted. There are also some additional holes drilled into the door, (probably by a previous operator installing a security bar/lock). Some wiring has also been cut and removed. The Price of Play decal legends are permanently damaged. Two bolts that hold the outer frame to the machine have snapped off due to the heavy rust. It will be easier to source a replacement Midway door than trying to fix this.
The silkscreen artwork on the control panel. Unfortunately rust is bubbling behind the blue ghost characters at the front of the panel. A real shame as I would have preferred to save the original artwork. Thankfully, you can get clear reproduction artwork of just the characters which stick onto a freshly painted black surface, so it should look just like the original.
The marquee lights. The white plywood board that sits behind the marquee is missing a couple of wedge bulb holders that are glued/secured into the plywood and the wiring is damaged. The plywood bulb holder is also splitting/delaminating. I’ve also no idea where I can obtain the unique bulb holders. I’ll have to find or work out a solution to this.
The base. The side edges of the particle board are crumbling at the bottom and it really needs a neater solution than the current MDF.
The Unknown
The main harness wiring. I have no idea if it is complete or if it is damaged. It will also need shoving in a bucket of hot soapy water to clean it all up and hopefully I can see where I am at with it.
The Base
First job is to remove the recently added MDF from the bottom and inside of the machine. Once the old base is exposed, I’ll remove that as well and fit a brand new piece of 18mm Plywood for the new base. I’ll glue it in place and add some additional batten supports inside the machine to make sure it is structurally sound.
Ripping off the MDF exposes the old rotten plywood base which is very soft.
The old plywood base was fitted using a tongue and groove method and also held in place using nails inserted in from the sides.
Here is the old base completely removed. No additional damage was done to the existing side panels with the vinyl.
After cleaning up the mess and removing the metal vent grilles, I measured the area needed for a new piece of plywood. I need to cut a piece measuring 548mm x 470mm.
There is now a cut out groove all around the side edge from where the old plywood base sat. The new piece of plywood fits perfectly onto that and can be glued and nailed in securely.
Inside the machine at the bottom there are (were) some triangular noggins that helped secure the original base. Most of these were soft (rotten) so I removed all of them and added new battens to give additional support the new base and beef up the structure of the cabinet. The battens were nailed and glued.
(Continued in next post)