You are using an out of date browser. It may not display this or other websites correctly.
You should upgrade or use an alternative browser.
You should upgrade or use an alternative browser.
Evolving Drift - Initial D Restoration/Conversion
- Thread starter whitecomet
- Start date
Chihiro, I'm a huge collector and I'm looking to complete my Initial D (1) artwork cabinet. If you are interested in exchange some material, I can offer some artwork that your cabinets haven't.
Example:
Original "Initial D Topper" ( 頭文字D(イニシャル・ディー) Hepburn: Inisharu Dī?) artwork in foam core board (photo 1).

Other example:

I have more!
I need Marquee and Marquee sides for to complete all my set.
I have all small stickers of Sega Cabinets, of course!
Example:

Tell me!
Cheers!
Example:
Original "Initial D Topper" ( 頭文字D(イニシャル・ディー) Hepburn: Inisharu Dī?) artwork in foam core board (photo 1).
Other example:
I have more!
I need Marquee and Marquee sides for to complete all my set.
I have all small stickers of Sega Cabinets, of course!
Example:
Tell me!
Cheers!
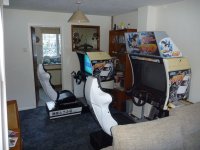
wow! lolI sold some of the parts from one half of this over 10 years ago to the guy who started this thread & converted the other half into OR2.
The above photo is from then.
Well, that just said, I'm looking for decorations for initial D (1) too!
")
Cheers!
whitecomet
Active member
thats the one that started it offMaybe get some new feet prob easier not a fan of these myself after catching a bare toe on one ouch!
But you should defiantly sell the cab once its done "again"
I've still got the receipt from the ID twin when I got it from Tom & Tandy, £700.
whitecomet
Active member
UPDATE...PLANS FOR THE WEEK:
So this week we are:
Dropping some of the remain Black Semi-Gloss parts off to be either shot blasted/acid dipped and then powder coated. The pictures below is what I sent to the company so will put them here for reference.
View attachment 2654
Find out the size c-clips I need for the leg levellers feet, but replacements.
GOT: Base powder coated, NOS casters, replacement locknuts and bolts.
All 9 parts have been taken to the powder-coaters (should be 2 weeks), hopefully they understood what SEMI BLACK is.
we have one leg leveller in a jar full of vinegar, give this a week of shaking and see how it cleans up!!

Also bought an assortment of Circlips so we should be covered as can't find any guide to actual size. Will post sizing when compared.
whitecomet
Active member
ok so finally got round to the first episode for the restoration...
whitecomet
Active member
wow its been over 3 years since I did something on this!! Well thing shave moved in the background slowly... but progress finally was started on a couple of smaller items...
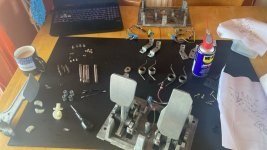
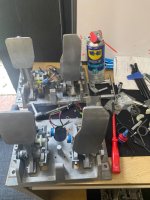
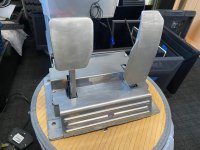
so we been trying to source and clean the foot pedals for the a while we finally got round this, we had to strip 3 pedals (in various condition), we then built one with the worst parts for a test fit.
Then reordered replacement screws for hex heads as we want to be able to replace parts when needed without fear or round the heads of the screws.
So the top one is the working example and the lower one is being built.
We just need to get the covers cleaned and I think were finished with the pedals, next on the list is the speakers!
Attachments
whitecomet
Active member
AndyGeezer
Active member
How many decades you been doing this?? I swear you bought ID stuff from me what almost 20 years ago
whitecomet
Active member
haha... its been a long process... in my defence this is the 3rd cabinet. The last one I had litterally regretted selling it as soon as the delivery van pulled away... so then hunted another and bought one.How many decades you been doing this?? I swear you bought ID stuff from me what almost 20 years ago
I still got I think the last set of complete ID1 art from you and as you said various other parts!!
And I've still got that first cab when we basically got three iD1 cabs for the price of one.. those were the days! That was 2010.
Thinking about it though, you already had part of a cab in the shed prior to this, so Andy's 20 year estimate is pretty close!
Thinking about it though, you already had part of a cab in the shed prior to this, so Andy's 20 year estimate is pretty close!
what you going to do with speakers to refurb them?ok so pedals are now complete and all ready to go... next part of the project is the restoring and rebuilding of the gull speakers, subwoofer and side speakers (which use the same speakers as a blast city) so little modification needed on these
whitecomet
Active member
almost done with the speakers waiting for a part to arrive then, pictures to followwhat you going to do with speakers to refurb them?
whitecomet
Active member
ok so we have finally got the parts and fixed these side speakers up. (if this didnt work we have a set of SEGA RALLY speakers spare which are different so we really wanted to restore/use these if possible.)

So anyone with a BLAST CITY cabinet will be familiar with these speakers, from what you can find online these speakers are over 20+ years old and obviously finding them NOS is impossible and Ive only seen them once a while back in USA for like $100+ years per speaker (obviously need 4). Also the original company no longer make these so its a bit of a mission. Now people have used various LCD tv speakers and wedged them in and fitted them in some kind of format. Basically the rubber seems to perish and there is no fixing.

So while looking into how to restore these speakers I found a guide printables which was an idea to clean the exisitng speakers and then redo the rubber surround. The guide even gave you the STL to make a mould. So this is where we started.

We had left this a while and asked a friend who was into audio and about if this would work and with what kind of results.
But thats when I found a guide here from @Spanky UKVAC on a speakers on aliexpress which where the same width but slightly shorter and he had glued a blanking plate into the gap and seemed to do the job.

This gave me a start and I ordered these speakers for around £20, on the original speakers there is a black plate surround which allows you to screw the speakers into the black plastic surround. On Spanky guide, he had screwed new holes and then used a blanking plate, but as I always like to restore parts as original as I can and also in the hope one day the original parts come available I like to make sure I dont damage any original parts. So I got fusion360 and a ruler and started to CAD.
After a while I had a new plate to fit the current speaker, we then added the blanking plate to the plate. We then made hole where the original screw holes would line up and for the 2 new holes to hold the speaker we used pins to hold them in place. So after a few test prints also adding a SEGA logo (which we scrapped), we came up with a working plate which used existing holes to hold speaker.

As you can see on the finished image, it looks all ok and if I ever found originals then can always put them in and I haven't damaged the original mounting case.

So that now just has to be repeated again and the speakers are completed and can be mounted back onto the side panels.
Next up we will look to restore the dashboard.
So anyone with a BLAST CITY cabinet will be familiar with these speakers, from what you can find online these speakers are over 20+ years old and obviously finding them NOS is impossible and Ive only seen them once a while back in USA for like $100+ years per speaker (obviously need 4). Also the original company no longer make these so its a bit of a mission. Now people have used various LCD tv speakers and wedged them in and fitted them in some kind of format. Basically the rubber seems to perish and there is no fixing.
So while looking into how to restore these speakers I found a guide printables which was an idea to clean the exisitng speakers and then redo the rubber surround. The guide even gave you the STL to make a mould. So this is where we started.
We had left this a while and asked a friend who was into audio and about if this would work and with what kind of results.
But thats when I found a guide here from @Spanky UKVAC on a speakers on aliexpress which where the same width but slightly shorter and he had glued a blanking plate into the gap and seemed to do the job.
This gave me a start and I ordered these speakers for around £20, on the original speakers there is a black plate surround which allows you to screw the speakers into the black plastic surround. On Spanky guide, he had screwed new holes and then used a blanking plate, but as I always like to restore parts as original as I can and also in the hope one day the original parts come available I like to make sure I dont damage any original parts. So I got fusion360 and a ruler and started to CAD.
After a while I had a new plate to fit the current speaker, we then added the blanking plate to the plate. We then made hole where the original screw holes would line up and for the 2 new holes to hold the speaker we used pins to hold them in place. So after a few test prints also adding a SEGA logo (which we scrapped), we came up with a working plate which used existing holes to hold speaker.
As you can see on the finished image, it looks all ok and if I ever found originals then can always put them in and I haven't damaged the original mounting case.
So that now just has to be repeated again and the speakers are completed and can be mounted back onto the side panels.
Next up we will look to restore the dashboard.