Hi all,
Thought I had best add my 2 most recent repair logs, both of which are Bubble Bobble bootleg pcbs...
2!!!
I hear you shout!! Yes, I bought 1 fixed it then needed to tax my car
so sold it and bought another faulty one! It didn't pay for my car tax
but made up the difference I needed... Anyway...
PCB 1...
2 Layer bootleg with Taito pinout...
Quite
a well made board this one basically as close as probably possible to
an original without it actually being Taito and having the customs, etc.
However it was bought as faulty and when plugging it in yes it was...
Sounds were all there it was just the picture (ignore it being upside down that's a dip switch)
The
good thing about Bubble Bobble/Bobble Bobble boot pcbs is they are
usually 2 layer and the top pcb is the cpu stuff and the bottom is the
graphics/display. As it was running it basically means its the bottom
pcb as its a display problem. I won't go into to much tech about the fix
as tbh I don't 100% understand it myself, only to say that basically
the pcb generates a display and sends it to a chip it then sends out the
picture in turn... If that chip craps out then the display basically
argues with itself and appears like in the video above. I was massively
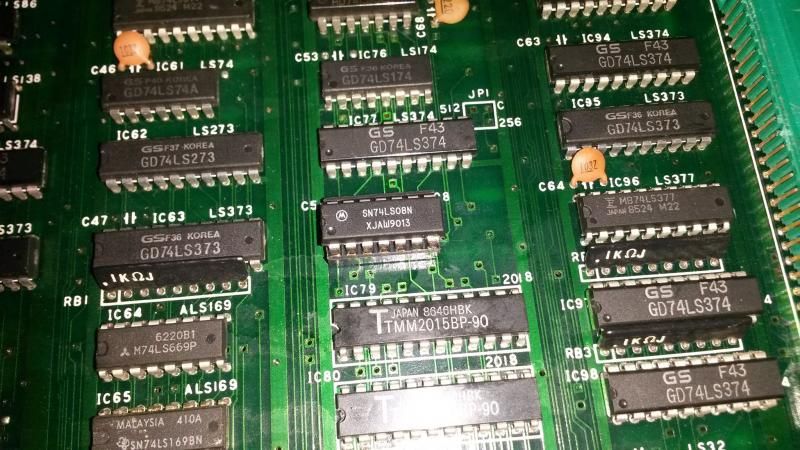
helped on this pcb by the fact the chip in question (74LS08 at IC78 on
this boot pcb) got a little warm so to speak


Removed and a replacement socketed....
Switched on and....

Sorted

Anyway as said before I had to sell this as I am mainly skint these days

I spotted another for sale and a quick pm and its mine!
Here is both pcbs next to each other, before they parted ways


The one on the left is BB pcb number 1
The replacement was again faulty (bought that way!) one nice thing about it is that it is actually JAMMA

This
had a sort of similar fault and again as its a dual layer pcb,
graphics/display problem... straight to look at the bottom pcb!!!
Here is how it looked pluuged in.

Now
this type of problem is either ram or rom (it obviously can be a lot of
other stuff but they're the usual and easiest to check imo) I checked
the roms and all verified ok so it was onto the ram... I had a spare ram
so began piggybacking it to see if any difference occurred. On one chip
it did so it was time to change it out... I forgot to take more pics
for this one but in this pic it is the one to the right that is now
socketed lol

Anyway plugged in and....

Result
Onto
the cab to test it, and it all worked fine except for if you added a
credit player 1 automatically started. So it looked like the player 1
switch was stuck on. On as in High as when you press a button on a cab
9/10 times it drops the voltage to 0v and then registers the change if
you get me? Anyway I traced the Player 1 start input to a 74LS253 chip
on the top pcb and removed it. Dropped a socket in and went to test...
To my horror it would credit up but not start...
I then began checking the socket for continuity and in the end I found 4
broken traces. I have to say it was quite possibly the cleanest chip
removal I have ever done but the tracks had gone bad somewhere (it could
have been before I started on it for all I know) Anyway using my
expensive repair stuff I followed the tracks to repair any bad traces
(read multimeter, permanent marker and desk lamp) and fixed where
needed...

Anyway all fixed now hopefully this one will stay for a bit...
One last thing.. the chip I removed to fix the Player 1 start problem had been soldered in like this...

I sometimes amazes me how some pcbs ever worked
- Ben
Thought I had best add my 2 most recent repair logs, both of which are Bubble Bobble bootleg pcbs...
2!!!
I hear you shout!! Yes, I bought 1 fixed it then needed to tax my car
so sold it and bought another faulty one! It didn't pay for my car tax
but made up the difference I needed... Anyway...
PCB 1...
2 Layer bootleg with Taito pinout...
Quite
a well made board this one basically as close as probably possible to
an original without it actually being Taito and having the customs, etc.
However it was bought as faulty and when plugging it in yes it was...
Sounds were all there it was just the picture (ignore it being upside down that's a dip switch)
The
good thing about Bubble Bobble/Bobble Bobble boot pcbs is they are
usually 2 layer and the top pcb is the cpu stuff and the bottom is the
graphics/display. As it was running it basically means its the bottom
pcb as its a display problem. I won't go into to much tech about the fix
as tbh I don't 100% understand it myself, only to say that basically
the pcb generates a display and sends it to a chip it then sends out the
picture in turn... If that chip craps out then the display basically
argues with itself and appears like in the video above. I was massively
helped on this pcb by the fact the chip in question (74LS08 at IC78 on
this boot pcb) got a little warm so to speak

Removed and a replacement socketed....

Switched on and....

Sorted
Anyway as said before I had to sell this as I am mainly skint these days
I spotted another for sale and a quick pm and its mine!
Here is both pcbs next to each other, before they parted ways


The one on the left is BB pcb number 1
The replacement was again faulty (bought that way!) one nice thing about it is that it is actually JAMMA
This
had a sort of similar fault and again as its a dual layer pcb,
graphics/display problem... straight to look at the bottom pcb!!!
Here is how it looked pluuged in.

Now
this type of problem is either ram or rom (it obviously can be a lot of
other stuff but they're the usual and easiest to check imo) I checked
the roms and all verified ok so it was onto the ram... I had a spare ram
so began piggybacking it to see if any difference occurred. On one chip
it did so it was time to change it out... I forgot to take more pics
for this one but in this pic it is the one to the right that is now
socketed lol

Anyway plugged in and....

Result
Onto
the cab to test it, and it all worked fine except for if you added a
credit player 1 automatically started. So it looked like the player 1
switch was stuck on. On as in High as when you press a button on a cab
9/10 times it drops the voltage to 0v and then registers the change if
you get me? Anyway I traced the Player 1 start input to a 74LS253 chip
on the top pcb and removed it. Dropped a socket in and went to test...
To my horror it would credit up but not start...
I then began checking the socket for continuity and in the end I found 4
broken traces. I have to say it was quite possibly the cleanest chip
removal I have ever done but the tracks had gone bad somewhere (it could
have been before I started on it for all I know) Anyway using my
expensive repair stuff I followed the tracks to repair any bad traces
(read multimeter, permanent marker and desk lamp) and fixed where
needed...

Anyway all fixed now hopefully this one will stay for a bit...
One last thing.. the chip I removed to fix the Player 1 start problem had been soldered in like this...

I sometimes amazes me how some pcbs ever worked
- Ben


