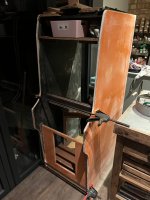
Had a Junior cab that was looking very sorry for itself and tried to sell as a project for peanuts. Well there were no takers at the time and I decided I’d just sort it myself when I found the time.
A fellow member contacted me about a DK I previously had for sale that he had missed out on. So I suggested I could make this one a DK game in blue as I was having to restore from ground up anyway.
So verrrry slowly I stripped every nut and bolt and completely dismantled it down to make it as solid as possible while maintaining the original look inside and out. Didn’t want to add a heap of blocking timbers and brackets etc. so disassembling it to its bare bones made sure I could be confident in the sturdiness and use the same glue and pin method of construction it had from the factory.
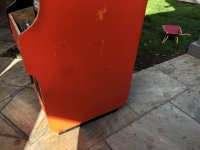
Once I took it apart I stripped the woeful paint from the cab with nitromors and vigorous sanding to get to a stable base.
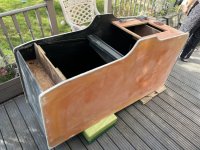
It being a particle cab, I knocked off any loose material and used an epoxy instead of a traditional wood hardener. I was toying with the idea of cutting chunks out and matching with new timber but the damage was isolated pretty much to the corners so decided the tried and tested bondo method would be best.
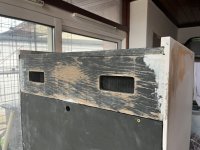
Before that though, I tidied all the original edges and slots (the particle board cabs used rebated slots to piece the cab together instead of a load of blocking as per the ply cabs) to make nice connections and used plenty of strong wood glue and a pin gun to reassemble the whole thing. Clamped it up and left for a while to really set strong.
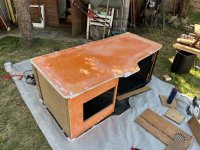
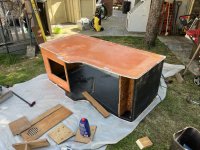
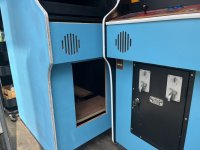
The base was kaput so built new from scratch. I deviated a little with the blocking for the base as the original method has proven to be a bit substandard and is a common weak point. Plenty of blocking and countersunk screws with glue of course, made for a really solid base.
I used a slurry like bondo mix to completely plug the original T slot and cut a new one from scratch. This was surprisingly much easier than anticipated and the bit I was most nervous about.
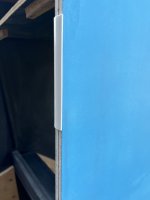
The thickness of the particle cabs is slightly thicker than the ply cabs. 21/32nds of an inch plus paint which is approx 16.5mm in metric. Ply cabs are 9/16ths plus a gel coat totalling approx 15mm. So the standard tru flat moulding for ply cabs will not fit. I decided on a 19mm t moulding and using a trimmer tool which takes just over 1mm off each edge about to get a slightly thicker look on the t moulding edge. This gives it a look nearer to the tru flat aesthetically.
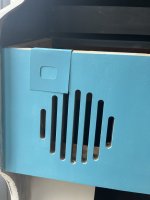
I sanded the whole cab to within an inch of its life with ever finer grain discs until it was glass like and applied primer to help identify any blemishes to fill and recoat with primer before colour paint.
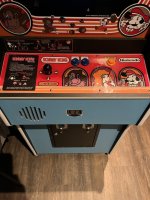
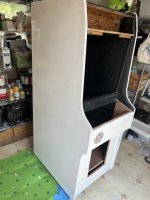
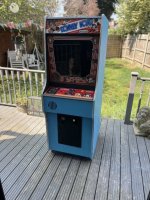
I found an off the shelf Valspar Blue Grotto paint that was as near as the eye to my other original blue cab. I even put them side by side in the kitchen and if there’s a closer match, I haven’t seen it!
I have finished the first coat only which will be 320 sanded between another 2 coats to finish.
Just mocked it up to see how it looked after first coat and very pleased.
I also need to touch up the black inside edges of at the front of the cab and install the t moulding completely.
Should just be a case of refitting all the original parts topped off with Olly’s fine art and a TKG3 board I’ve been saving and this one is done!
A fellow member contacted me about a DK I previously had for sale that he had missed out on. So I suggested I could make this one a DK game in blue as I was having to restore from ground up anyway.
So verrrry slowly I stripped every nut and bolt and completely dismantled it down to make it as solid as possible while maintaining the original look inside and out. Didn’t want to add a heap of blocking timbers and brackets etc. so disassembling it to its bare bones made sure I could be confident in the sturdiness and use the same glue and pin method of construction it had from the factory.
Once I took it apart I stripped the woeful paint from the cab with nitromors and vigorous sanding to get to a stable base.
It being a particle cab, I knocked off any loose material and used an epoxy instead of a traditional wood hardener. I was toying with the idea of cutting chunks out and matching with new timber but the damage was isolated pretty much to the corners so decided the tried and tested bondo method would be best.
Before that though, I tidied all the original edges and slots (the particle board cabs used rebated slots to piece the cab together instead of a load of blocking as per the ply cabs) to make nice connections and used plenty of strong wood glue and a pin gun to reassemble the whole thing. Clamped it up and left for a while to really set strong.
The base was kaput so built new from scratch. I deviated a little with the blocking for the base as the original method has proven to be a bit substandard and is a common weak point. Plenty of blocking and countersunk screws with glue of course, made for a really solid base.
I used a slurry like bondo mix to completely plug the original T slot and cut a new one from scratch. This was surprisingly much easier than anticipated and the bit I was most nervous about.
The thickness of the particle cabs is slightly thicker than the ply cabs. 21/32nds of an inch plus paint which is approx 16.5mm in metric. Ply cabs are 9/16ths plus a gel coat totalling approx 15mm. So the standard tru flat moulding for ply cabs will not fit. I decided on a 19mm t moulding and using a trimmer tool which takes just over 1mm off each edge about to get a slightly thicker look on the t moulding edge. This gives it a look nearer to the tru flat aesthetically.
I sanded the whole cab to within an inch of its life with ever finer grain discs until it was glass like and applied primer to help identify any blemishes to fill and recoat with primer before colour paint.
I found an off the shelf Valspar Blue Grotto paint that was as near as the eye to my other original blue cab. I even put them side by side in the kitchen and if there’s a closer match, I haven’t seen it!
I have finished the first coat only which will be 320 sanded between another 2 coats to finish.
Just mocked it up to see how it looked after first coat and very pleased.
I also need to touch up the black inside edges of at the front of the cab and install the t moulding completely.
Should just be a case of refitting all the original parts topped off with Olly’s fine art and a TKG3 board I’ve been saving and this one is done!
Attachments


Last edited:


")