Herrrrres Johnny!

chunksin

Active member
vacBacker
Feedback
21 (100%)
Credits
731CR
stegrey said:
nice work rich.. you didnt happen to take a recording of the sound before and after the new speaker did you?

I didn't I'm afraid Ste, I took a video but it doesn't pick up the sound very well. I was really impressed with the improvement though, really worthwhile upgrade for not much outlay.
 

chunksin

Active member
vacBacker
Feedback
21 (100%)
Credits
731CR
Started the ramp swap, there are a few metal brackets and supports pop riveted to the old ramp, they are a bit tricky to remove but patience and a dremel are working well. Just one more piece to remove and then I can transfer the artwork over and reattach everything. The decals should come off with hairdryer heat, hopefully the adhesive will stay intact otherwise I'll replace it with new 3M stuff.

Old ramp - the flasher holder at the bottom will have to be replaced as it's been epoxied to the main ramp
smiley7.gif


oldramp.jpg


Bits I've managed to remove so far, just the switch assembly in the pic above to remove

rampbits.jpg


Shiny new ramp ready to go, it will need some plastic removing from the ramp flap end as it's 5mm out on the mounting holes. Hope to get this all done by the weekend and back in the game, will also take the opportunity to give the playfield a good clean and wax.

newramp.jpg
 

FinalFight

Active member
vacBacker
Feedback
73 (97%)
Credits
720CR
Chunksin said:
stegrey said:
nice work rich.. you didnt happen to take a recording of the sound before and after the new speaker did you?

I didn't I'm afraid Ste, I took a video but it doesn't pick up the sound very well. I was really impressed with the improvement though, really worthwhile upgrade for not much outlay.

cheers Rich ill look into replacing mine in the summer :)
 

FinalFight

Active member
vacBacker
Feedback
73 (97%)
Credits
720CR
when i got my first pin one of my first questions was how do you clean/wax the playfield.. never seen so many arguments on whats best to use from cleaning sprays ,novus, pledge to car wax .. my head was battered
smiley36.gif


heard stuff like:
cleaning sprays damage the artwork
novus sands the pain down
pledge has water in so warps the table
wax makes the ball too fast so plastics take a beating

I just hoover any little bits off the pf and use little bit of the weaker novus
what you thinking of doing?
stegrey2019-02-05 14:11:32
 

chunksin

Active member
vacBacker
Feedback
21 (100%)
Credits
731CR
Hoover, then wipe with kitchen towel with a tiny little bit of isopropyl, novus 2 on the ball swirls and trails if needed and one coat of wax with carnauba. I read the massive thread on pinside I think you're on about, the way I read it was as long as you avoid using anything water based or has silicones in it you can't go wrong!
 

ben76

Hunts Spies
Feedback
7 (100%)
Credits
1,136CR
Chunksin said:
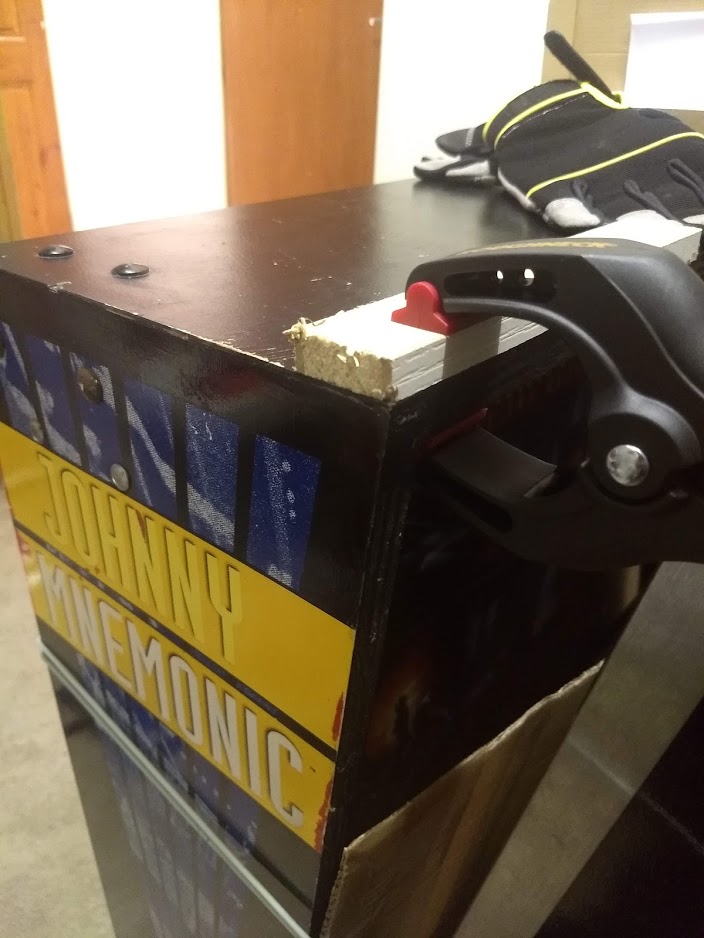
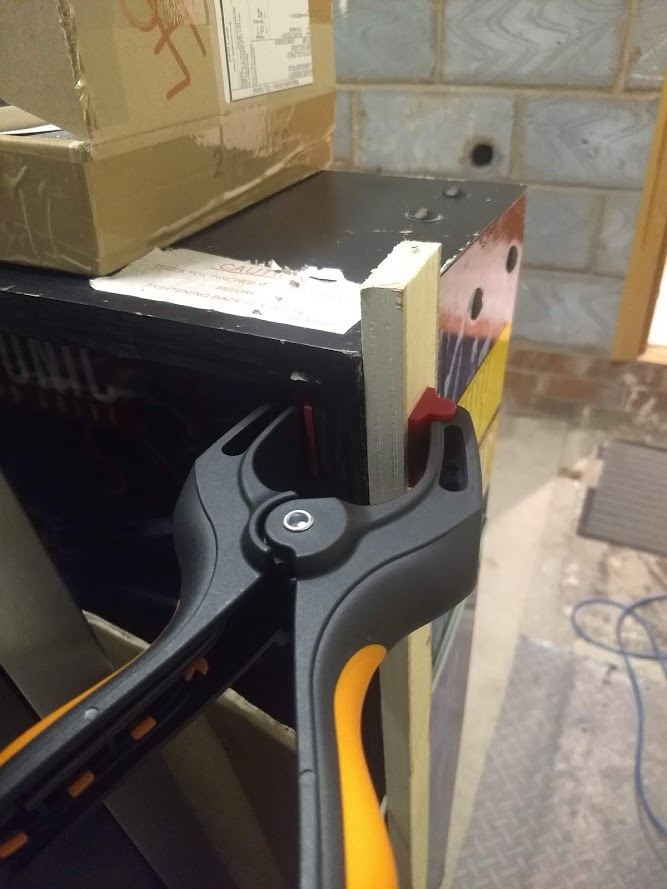
First job on, the top corners of the backbox had taken a knock at some point and the wood was ever so slightly coming apart. Filled with wood glue and clamped to fix, nice and sturdy now. Had some frosted white LEDs turn up for the backbox, the playfield ones should turn up today. Just waiting on new leg parts to arrive before getting it set up properly, come on postie, hurry up!

Found it's also missing the large wing bolts that attach the backbox to the main body of the pin, if you don't use these it's only held up by a feeble clamp at the back, a few hard nudges and it could come crashing down so these are critical. Searched around but can't find them in stock in the UK at a decent price, the threaded t-nuts are imperial 3/8-16 thread so I asked virtvic's expert opinion, I'll switch them to M10 metric and get new bolts for a couple of quid 
smiley4.gif


The red marks you can see on the sides of the backbox is actually paint - the cab originally came with bright red decals that over time fade to yellow. It's touchup paint that must have been applied early in the cab's life and comes off easily enough with a magic eraser. One side of the cab is yellow, the other fades to a nice orange colour! Not sure I'll go the whole way and get new decals, it's a hell of a lot of work as I found out doing my Judge Dredd virtual pin a couple of years ago.

backbox1.jpg


backbox2.jpg
tbh the clip on the back is usually good enough and for the thread being imperial you can use a leg bolt and a washer... If you want a leg bolt I can send you one for free I honestly wouldn't change it to metric as the haters will hate...

- Ben
 

chunksin

Active member
vacBacker
Feedback
21 (100%)
Credits
731CR
Been working really hard on the ramp replacement, a lot of trial an error is involved because the new ramp isn't an exact 1:1 replica of the original, well my original at least! I guess these plastic ramps maybe deform over time after getting a bashing anyway but I've had to modify a few holes and carefully sand the plastic back in several spots. I decided to replace the pop rivets with 8mm M3 allen bolts after reading a thread on pinballinfo as the heads look very similar and the hardware won't be visible during play and will be way easier to remove if need be in future, I used washers above and below to protect the plastic plus nylock nuts to keep everything tightly together. The exception is the metal flap where the ball enters the ramp, the button heads on the bolts would have been too high and affect the way it plays. For that I used semi hollow rivets, I couldn't source the exact 1/8" size but I found some 5/32" used for Landrover roofs were a great substitute.

The most stressful part of the swap was the decals, they are printed on thin plastic film and stuck face up to the bottom of the ramp. It was very messy getting them off, the old adhesive had clung to the film in a few places and was quite stubborn! I used my usual trick of soaking in WD40 which worked fine with some elbow grease. To remount them you need to use a super thin adhesive film, code named 3M 467M which comes on a roll or by the sheet and works just like double sided sticky tape. Stick the decals face down very carefully, cut around the artwork then remove the backing and line it up as best you can. I used a soft wallpaper seam roller to get rid of any air bubbles. I did a few practice runs on the old ramp to get the hang of it before biting the bullet yesterday. The finished ramp looks great and I'm really pleased how it's turned out
smiley1.gif
probably not a job I'd like to repeat, I've probably spent close to £150 on just that job but the difference is really noticeable so a worthwhile improvement.

Ramp flap post riveting keeping the stock look and feel:

flap.jpg


Working on the decals:

decals.jpg


Decals and all hardware back on after a few adjustments with a dremel:

ramp_complete.jpg


Back in the game and looking good:

back_in_the_game.jpg
 

robotech

Active member
vacBacker
Feedback
4 (100%)
Credits
823CR
Great job on that ramp swap rich it looks factory i hate doing anything with decals

Most plastic repro parts need some fettleing before they will fit
Have you got lexan washers fitted to protect your bottom slingshot plastics ?
I can see the ones in the right hand side
 
Top