
Jamma to Scart Prototype

Jon-A-Tron

Active member
Feedback
2 (100%)
Credits
330CR
I've mocked up a prototype JAMMA-to-SCART adapter. I've seen a few of these things available for about £20 on ebay, but I had these bits lying around and the circuit isn't very difficult.

J2S_Board.jpg


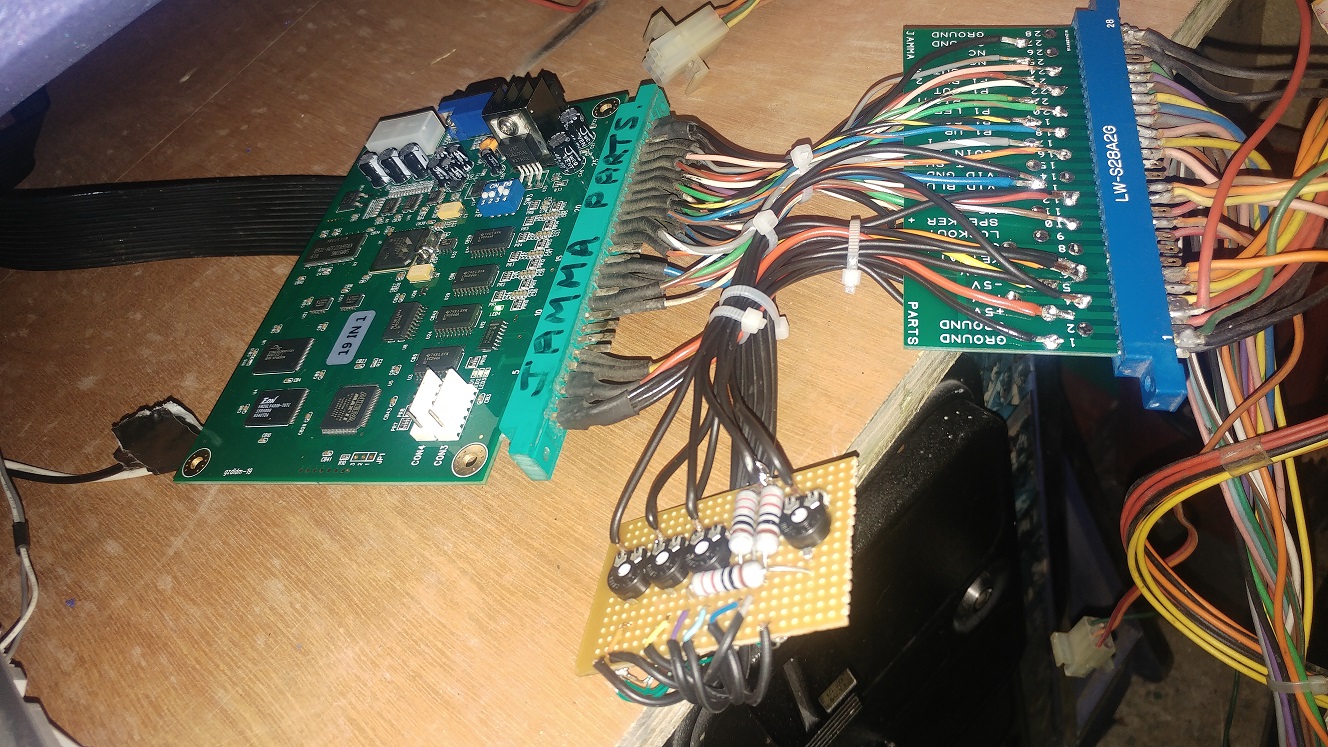
500ohm Pots for RGB. Each set to approx. 220ohm.

500ohm Pot (all I had) inline with 220ohm resistor for Sync.

2 x 220ohm Resistors in parallel for 110ohm to pin 16 for auto switching to SCART.

Runs off to a Male SCART Connector on one end and a JAMMA Finger Board on the other. Finger board passes other connections through to JAMMA connector.

Here it is connected to the 19-in-1 Board.
J2S_connected.jpg


Here's the result so far.

Silverline_1.jpg


Display is a little small. I think this is the SCART Tv set to 16/9 with black bars top and bottom. Don't have ability to change this but I have ordered a remote to see if that fixes it.

Slight flicker on the screen which might be linked to the Sync Pot/Resistor line. Need to order a 1k Pot and replace in my next build. I've seen both 330ohm and 1k ohms used in the circuit diagrams I've used. Playable as is though.

Does anyone have a link to a PCB prototype manufacturer to get a proper PCB made for this? Anyone know who made the JAMMA fingerboards that I used here?

JT
 

Fantazia2

Active member
vacBacker
Feedback
13 (100%)
Credits
2,246CR
I think you can switch the Widescreen using one of the scart connections.

From Wikipedia

Pin 8
Status & Aspect Ratio up[sup][c][/sup]
  • 0–2 V ? off
  • +5–8 V ? on/16:9
  • +9.5–12 V ? on/4:3
 

Jon-A-Tron

Active member
Feedback
2 (100%)
Credits
330CR
Just checked. I had the 12v line to pin 8 for the auto switching to 4:3 aspect. Strangely though, I'm getting 5v at the actual SCART connector. Don't know what is bringing this down. Must have a crossed connection somewhere. I've disconnected this wire and tested again.

scart_pic_pos.jpg


Better. Not perfect but at least it's the correct aspect ratio. Picture is slightly too high and not wide enough. Still playable so I'll stick with this for now. Can't see any adjustments on the TV chassis like you get with a monitor. Maybe something I can do when the remote comes.

JT
 

Fantazia2

Active member
vacBacker
Feedback
13 (100%)
Credits
2,246CR
Modern TVs tend to have hidden technician menus instead of pots, usually you can get access by pressing certain key combinations on the remote, might be worth a google search for the model/brand you have to see.
 

robotech

Active member
vacBacker
Feedback
4 (100%)
Credits
823CR
Hi jon

i always ran that tv in 4:3 don't think it did 16:9 i still have the remote somewhere ill dig it out for you if you want it
some of the sonys have a hidden menu where you can change geometry and stuff

i made one of those jamma to scart converters a while back
i seem to remember that it worked ok with most of my pcbs but wouldent sync with one or two of them

but those small super guns are cheap enough and do the same thing so i just bought one of those

the pcb finger boards were i think made by phillmurr i have some somewhere in my shed

nice to see the cab getting played
smiley20.gif
 

Jon-A-Tron

Active member
Feedback
2 (100%)
Credits
330CR
Cheers Shane
smiley20.gif


It'll get some play alright. My kids love the games on the 19-in-1 and this is the perfect cab for it. I've now added a Jamma switcher in there too playing Football Champ (Taito). 20-in-1.

You were right, the screen is great!

The screen was set to 16:9 because of my adapter. Somehow it was feeding 5v to pin 8 instead of 12v.

Sorted now.

I've ordered a cheap remote for it from ebay so no probs.

I got 4 of those fingerboards too. I was wondering what company made the boards. Quotes I've got before were too expensive for a run of less than 100. Even at 100 it would work out at £10/unit even for a small PCB unpopulated. I've ordered another type of double fingerboard that was quite cheap so we will see what I can do with that.

JonTron2017-10-29 00:21:11
 

Jon-A-Tron

Active member
Feedback
2 (100%)
Credits
330CR
I know, its what i had spare. I'll be puting in an order for some controls and button soon. Olly does the Silverline Control Panel Overlay as well so he'll be getting an order soon.

Just re-arranged my garage/game room to give me more space to get these games that are playable all tidied up. Long term projects (Moon Alien and Golden Tee) have been moved out the way for now. This gives me;
Space Fever Cocktail - fully working
Silver Strike Bowling - working with screen issue. Playable though.
Taito Top Speed - screen required
Silverline with 19-in-1 & Football Champ - panel rebuild.
Happy if i can get this list done by xmas holidays for the kids.
 

John Bennett

Senior Member
vacBacker
Feedback
10 (100%)
Credits
5,332CR
I ran with a TV in my old cabinet for many years. If you just put in small resistors (and forget the pots), you can do fit it all inside the scart plug, so no need for a PCB.
The only downside to the TV was that it didn't run 24kHz games.
 

Jon-A-Tron

Active member
Feedback
2 (100%)
Credits
330CR
Was thinking of that but some tv's are too bright and need adjusting. The pots give the adjustment. Thats what happened with this tv too. Started with the pots set to 220ohms. Had to tweak'em slightly to compensate some overly bright colours.
 

John Bennett

Senior Member
vacBacker
Feedback
10 (100%)
Credits
5,332CR
To begin with, I had no resistance in there. Everything was fine, except Rolling Thunder 2, which was totally saturated. I can't remember what R value I ended up with (or if I put in capacitors), but it was fine for everything I tried, which I'd figured was possible as I think 'true' monitors have a fixed impedance and no fancy auto-brightness features. Perhaps I might've used the TV remote to set the brightness on the odd game, though.
 

Jon-A-Tron

Active member
Feedback
2 (100%)
Credits
330CR
From what I've read each TV may have a different resistance required to produce a nice RGB output. Genuine arcade monitors would have a set value, like you say, that would be well documented. If I knew I was putting in the same TV every time I could do a resistor only adapter. Because I want to make a few of these and I don't know what TV I'm going to put them with, I went for the potentiometers.

Some TV's might work fine without any resistors, some might be over exposed on one or all colours. Making the adapter adjustable means I don't have to make a new one each time I buy a SCART TV and I don't have to wait for a particular model to become available.
 

John Bennett

Senior Member
vacBacker
Feedback
10 (100%)
Credits
5,332CR
Ah, sorry, I didn't think of it from the multiple-TV perspective.

Have you looked at PCB Train for prices? The on-line quote is instant and lets you muck on with sizes.
If you went for very compact potentiometers, 0805 surface mount resistors and put a scart socket on the PCB (Farnell 1280720), you could probably get it in around 5cm x 5cm, which is around £6 per bare PCB (when buying 20).
 

Jon-A-Tron

Active member
Feedback
2 (100%)
Credits
330CR
I did look at PCB train, but at the time I was thinking of getting 2 Jamma finger boards on the same PCB as well as my circuit. This made it about 12cmx12cm and the prices went through he roof.

I've got an order in for these instead. Double Fingerboard Adapter

They have a section of board off to the side to mount the Pots. I'll order that Scart Socket though, thanks. That's perfect. I'll see if it can mount in the gaps in-between.

JonTron2017-10-30 22:28:55
 

Jon-A-Tron

Active member
Feedback
2 (100%)
Credits
330CR
Panel update.
Silverline CPO from Olly at Arcade Art Shop.
New sticks and buttons from Arcade World UK.

Screenshot_2017-12-08-13-33-49.png


Screenshot_2017-12-08-13-34-55.png


Got an update on the adapter too but need to get another picture when i get home.
 

Jon-A-Tron

Active member
Feedback
2 (100%)
Credits
330CR
Thanks.
smiley20.gif


The screws for the sticks should be there. I did paint them black but the paint cam off when i screwed it back in.

The other screws were my mistake. I removed the panel hold down plates from the inside when i was sanding and painting tbe panel. I forgot to put them back on before applying the overlay. I plan to either paint them blue or get some of those plastic screw covers to press into them.

1st time doing a full size panel overlay so happy it turned out as good as it did, even though i messed up with the screws. JonTron2017-12-09 10:22:09
 
Top