So way back about four years ago a Space Fever cocktail popped up on FB market place for free! Now it was free for a very good reason, no internals, so missing CRT, game boards etc. and it was not in great shape, but hey it was 10 minutes around the corner and free, so I thought hey what the hell I could maybe Jamma it or something, I have a colour crt that I could get in it and maybe create something from it, but it sat in the line of projects waiting.


Fast forward about a two years or so and I decided to do something with it, posted on here for ideas and amazingly someone spotted the contents of a Space Fever cocktail on fleabay, someone was changing it to LCD and Jamma multi game, so I got straight on and did a deal which gave me pretty much all the contents I needed.
CRT
Gameboards
110v isolation transformer
240v to 110v step down transformer
Wiring looms
Joystick assembly
So first thing was to get it all powder coated as close to original as possible.

While waiting for that to be completed I got artwork on the go, Tony Temple kindly shared his CP art work etc. with me so after a discussion with Olly at Arcade artwork I had all the bits needed.
I also needed a few other bits including the glass chrome brackets and the fire buttons, these are avaiable from the US, so as a colleague was travelling to our US office I had them delivered to our office and couriered back 😉.
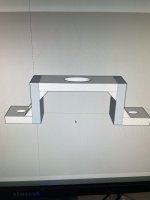
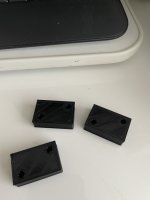
The fire button brackets were missing that the switch mounted on and so was one of the brackets that hold the tinted blue screen Perspex on And the spacers for the joystick micro switches. So onto the PC and a quick design and 3D print for each was made.


The top was a mess so I sanded it back and got a piece of formica that was a real close colour match, this was glued with contact adhesive and then using my router got it nicely trimmed. Also added new wood grain effect iron on strips to the sides, sprayed with lacquer, new foam edging added and the artwork. Also a new piece of toughened glass.
The monitor was recapped as was the original power supply, but this had been hacked into, and when tested I could not get the correct voltages from it so I swapped out with a switcher, there is a 24v supply for the counter but I was not going to refit this and everything else works with the standard 5,-5 and 12v.
I rebuilt everything and tested the board set, it did not work, I also had the Ninty Minty kit, Phil had a look and found the CPU board had a failed IC, but could not test the IO board, I spent a long time working through this with John at JBTech, he was super helpful, as it’s the B&W version the colour schems can be used as a guide, at this time I have replaced some 10 ICs and got close to it working when the opportunity came to get a spare set, so I managed to pic up a board set and crt.
The board set was plugged in and fully working! Happy days. I will look at the other board set as soon as I finish doing the garage workshop floor 😁
There were issues with player one button and also A&B not working, I stripped this down and cleaned up the contacts on them.
So a final complete rebuild, and it is now fully up and working and l am loving it, really enjoyed this restore and have another Universal cocktail in the queue to do after the Firefox.
So below is the list of all those that helped with this restore in some way or another.
The local guy who put this on FB marketplace…..cheers 😂
Olly at ArcadeArt for doing an excellent job on the artwork as always
Tony Temple for sharing the artwork files and also the blog I followed as a guide when working out what goes where and any questions I fired at him.
The UKVAC community who spotted the parts on Fleabay which meant I could get this back to near original.
John at JBTech.com for endless support on the boards, being literally on the other side of the world it shows how this is a great supported hobby
Sergio (meyer980k) from Klov who created a fake id plate for me
Mylstar from Klov who I got the coin mech from, albeit it was to wide so I had to cut it down width wise
Fast forward about a two years or so and I decided to do something with it, posted on here for ideas and amazingly someone spotted the contents of a Space Fever cocktail on fleabay, someone was changing it to LCD and Jamma multi game, so I got straight on and did a deal which gave me pretty much all the contents I needed.
CRT
Gameboards
110v isolation transformer
240v to 110v step down transformer
Wiring looms
Joystick assembly
So first thing was to get it all powder coated as close to original as possible.
While waiting for that to be completed I got artwork on the go, Tony Temple kindly shared his CP art work etc. with me so after a discussion with Olly at Arcade artwork I had all the bits needed.
I also needed a few other bits including the glass chrome brackets and the fire buttons, these are avaiable from the US, so as a colleague was travelling to our US office I had them delivered to our office and couriered back 😉.
The fire button brackets were missing that the switch mounted on and so was one of the brackets that hold the tinted blue screen Perspex on And the spacers for the joystick micro switches. So onto the PC and a quick design and 3D print for each was made.
The top was a mess so I sanded it back and got a piece of formica that was a real close colour match, this was glued with contact adhesive and then using my router got it nicely trimmed. Also added new wood grain effect iron on strips to the sides, sprayed with lacquer, new foam edging added and the artwork. Also a new piece of toughened glass.
The monitor was recapped as was the original power supply, but this had been hacked into, and when tested I could not get the correct voltages from it so I swapped out with a switcher, there is a 24v supply for the counter but I was not going to refit this and everything else works with the standard 5,-5 and 12v.
I rebuilt everything and tested the board set, it did not work, I also had the Ninty Minty kit, Phil had a look and found the CPU board had a failed IC, but could not test the IO board, I spent a long time working through this with John at JBTech, he was super helpful, as it’s the B&W version the colour schems can be used as a guide, at this time I have replaced some 10 ICs and got close to it working when the opportunity came to get a spare set, so I managed to pic up a board set and crt.
The board set was plugged in and fully working! Happy days. I will look at the other board set as soon as I finish doing the garage workshop floor 😁
There were issues with player one button and also A&B not working, I stripped this down and cleaned up the contacts on them.
So a final complete rebuild, and it is now fully up and working and l am loving it, really enjoyed this restore and have another Universal cocktail in the queue to do after the Firefox.
So below is the list of all those that helped with this restore in some way or another.
The local guy who put this on FB marketplace…..cheers 😂
Olly at ArcadeArt for doing an excellent job on the artwork as always
Tony Temple for sharing the artwork files and also the blog I followed as a guide when working out what goes where and any questions I fired at him.
The UKVAC community who spotted the parts on Fleabay which meant I could get this back to near original.
John at JBTech.com for endless support on the boards, being literally on the other side of the world it shows how this is a great supported hobby
Sergio (meyer980k) from Klov who created a fake id plate for me
Mylstar from Klov who I got the coin mech from, albeit it was to wide so I had to cut it down width wise
Attachments

Last edited:


")