Undoing an LCD monitor upgrade back to CRT

Mr Matt

Active member
Credits
64CR
Retroman839 said:
dremmel or bosh multi tool or equivilant. cut the whole belzel out up to the inside edge

and get a 25" polo hanterex or any 25/26"

with bezel..

if you where local to me i would help

Love the idea and I did just get myself a Dremel on Black Friday so I'm looking for anything to carve up with a small cutter, but this small plastic cab barely has space for a 20" tube and PCB. I've also been blasted so many times by this PCB now that I cannot give up and let it win.

I've just taken the PCB out and re-soldered pretty much everything I could see for 1 hour in case the issue was caused by dry joints but the brightness issue and the snowy pixels are the same.

I notice that this monitor has the discolouration at the corners you can get when you move or re-orientate a tube. This has been installed like this for over a week and the discolouration is just as bad as day1. Could any of this this be anything to do with the tube not degaussing?
 

Mr Matt

Active member
Credits
64CR
Just spent another hour re-soldering and re-flowing everything on the PCB plus removing all caps and checking them, only for the issue to remain exactly the the same: I turn it on from cold and the screen slowly dims until black, I increase the Flyback Screen pot and it looks great for a few minutes and then continuously keeps getting brighter slowly. The pixels are always snowy and not crisp though.

One thing I just noticed is there are 3 selectable inputs; AV, SVHS and aerial TV. I'm using AV for the SCART (but SVHS looks similar, slightly brighter). When the brightness has increased, if I select the TV input so it just shows static and then go back to the AV input then the brightness has gone back to normal, it looks great but then it slowly increases again. I can keep reseting the brightness back to normal by selecting TV and then back to AV.

So is this actually a tube problem? Is it holding and increasing a charge which is corrupting the picture?

For some reason the tube holds static for ages. Even after I've discharged the flyback I still get shocked off of the side of the tube several times. After working on the PCB for an hour, when I re-connect the anode cap it sparks to the tube.
 

Purity

The Oracle
vacBacker
Feedback
17 (100%)
Credits
2,999CR
Can you try this on another CRT? To rule out whether its an issue with the adaptor or an issue with the TV?
Purity2020-12-01 15:02:23
 

Mr Matt

Active member
Credits
64CR
Purity said:
Can you try this on another CRT?  To rule out whether its an issue with the adaptor or an issue with the TV?

Yeah this is something I've already tried with another CRT TV and it looked perfect.

I'm now thinking about getting an 20" arcade chassis as a replacement but I need to make sure the chassis is the problem.
 

Kev A

Active member
vacBacker
Feedback
8 (100%)
Credits
744CR
This is a pure guess, but seeing as it works ok when the dreamcast connected, could there be something with the signal that the TV just isn't happy with and is trying to compensate/adjust for automatically?
 

Mr Matt

Active member
Credits
64CR
Kev A said:
This is a pure guess, but seeing as it works ok when the dreamcast connected, could there be something with the signal that the TV just isn't happy with and is trying to compensate/adjust for automatically?

I connected the DC again last night and the brightness/Screen issue does also happen with the Dreamcast. I guess it's just not so moticiable as it on predominantly black games like Galaga and DK which is why I thought it was ok before.

I'm going to try this chassis with another tube to see if the fault moves. Then try another chassis with this TV tube.
 

Retroman839

Senior Member
vacBacker
Feedback
12 (100%)
Credits
7,246CR
when you power on
watch the neck glow

see if neck glow dims as pictured dims...

have you changed caps on the chassi?

double check that the caps are all correct.
size and - + is the right way round...
( it sounds condescending but it’s easy to make simple mistakes.
 

Mr Matt

Active member
Credits
64CR
Retroman839 said:
when you power on
watch the neck glow

see if neck glow dims as pictured dims...

have you changed caps on the chassi?

double check that the caps are all correct.
size and - + is the right way round...
( it sounds condescending but it’s easy to make simple mistakes.

What does neck glow mean?

I did check all caps etc but when trying to swap chassis and tubes for testing I found one of the pins from the neck was bent out of place and not inserting into the neckboard socket. It's a 7pin+1 pinout and the 4th pin was crushed, which I think is a 5v ref or level, would like to find out what it does.

Anyways, straightened that pin and put it all back together again and no more brightness Screen issues (I think, I spoke way too soon last time but it's been left on a few hours and the black level is staying black now).

I still have the snowy or not crisp pixels, but that could just be how this TV shows 15kHz. It's an Orion tube so I thought it would be high quality but maybe I can find some settings in an expert menu to improve something.

My last problem (hopefully) is that the chassis powers into standby mode. Can I bypass the relay that I hear energise when I press the button to power the screen so that this TV always powers on when the cab is turned on?
 

Mr Matt

Active member
Credits
64CR
In case anyone has the same issues I had, I did manage to resolve everything in the end.

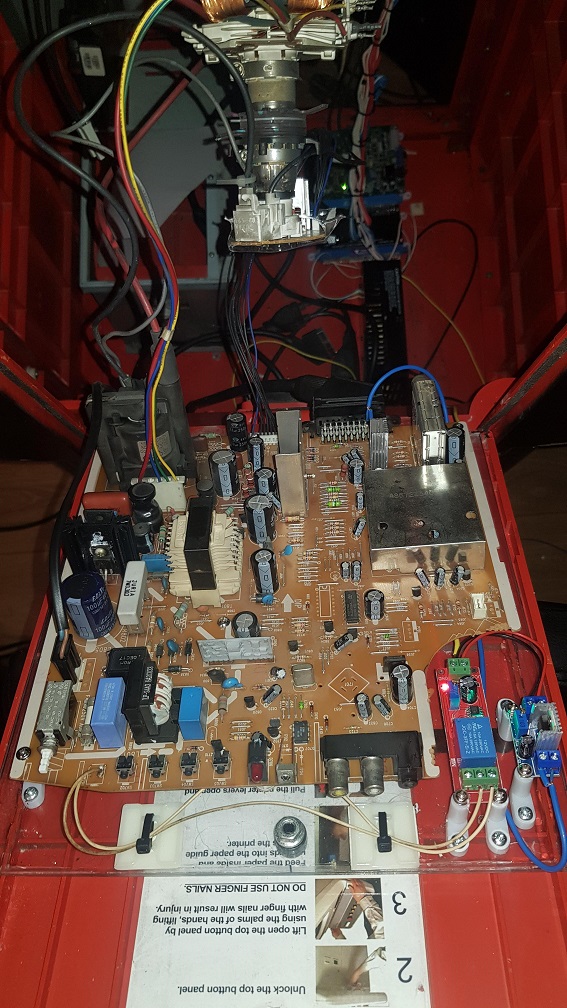
The poor quality picture was because the R2Tronik JAMMA2Scart adapter I bought is putting 13v on pin 16 of the Scart connector, which means my TV chassis isn't switching into RGB mode as it has to be between 1v and 3v otherwise it will be in composite mode, which is what I had. I emailed R2Tronik but they ignored me so I cut pin 16 out of the Scart cable and installed one a 12V DC - DC convertor to send 2.5v to pins 16 (+ve) and pin 18 (gnd) on the Scart pins on the chassis.

The PCB cost me £6.79 for 5 of them from Amazon.co.uk

I resolved the TV not auto-powering on with a delayed startup relay, using the NC output to open after a few seconds and connected this to the pins of the AV button as this will power the chassis upon release.

This was £3.88 from eBay.co.uk.

Both PCBs are on the bottom right of this photo of the opened back door.

4c.jpg


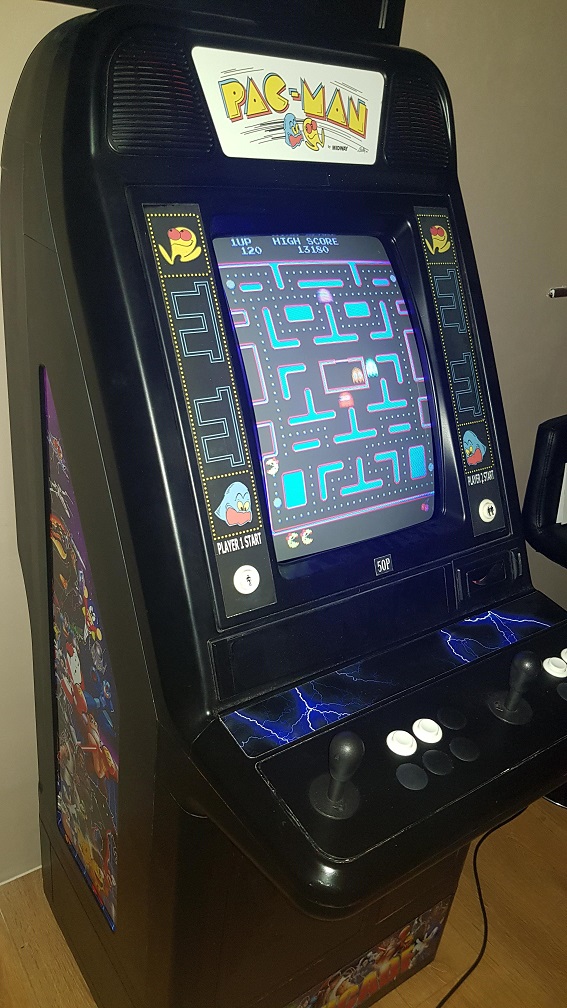
So now my cab auto-powers on the CRT when I turn on the mains to the cab, and activates RGB mode so it is full quality arcade CRT display.

The only minor thing I need to figure out is how to adjust the H-Position because the display is a little bit to the right. There are no pots on the chassis and there are definitely no secret menus that do it digitally! If anyone has any ideas how to adjust this please let me know.

I think having a curved CRT in there looks much better just for that, but also the viewing angle is perfect as you could not watch anyone playing on the LCD from the side.

I also put a couple of leaf buttons on each side too.
smiley1.gif


3c.jpg


2c.JPG


1c.jpg
 
Top