
Asteroids Cabaret Restore

P-Man

International man of mystery
Feedback
4 (100%)
Credits
1,272CR
Equites said:
Thanks for the feedback, you got me thinking now and I know what you are getting at. If the monitor is not receiving a Z input the screen will appear dead. So, potentially still a PCB problem here. Still, if I turn the brightness up all the way on the monitor I should still see something on the monitor even with bad Z input right??

I will hook up the scope later tonight as you suggested and let you know what I find, Im not sure if the scope has a Z input, do not recall seeing one to be honest but will check.

You are correct, if the monitor doesn't see a Z signal, the spot killer will be on, and you wont see anything.

With no signal applied to the monitor, and if you turn up the brightness pot you should indeed see a bright white dot.

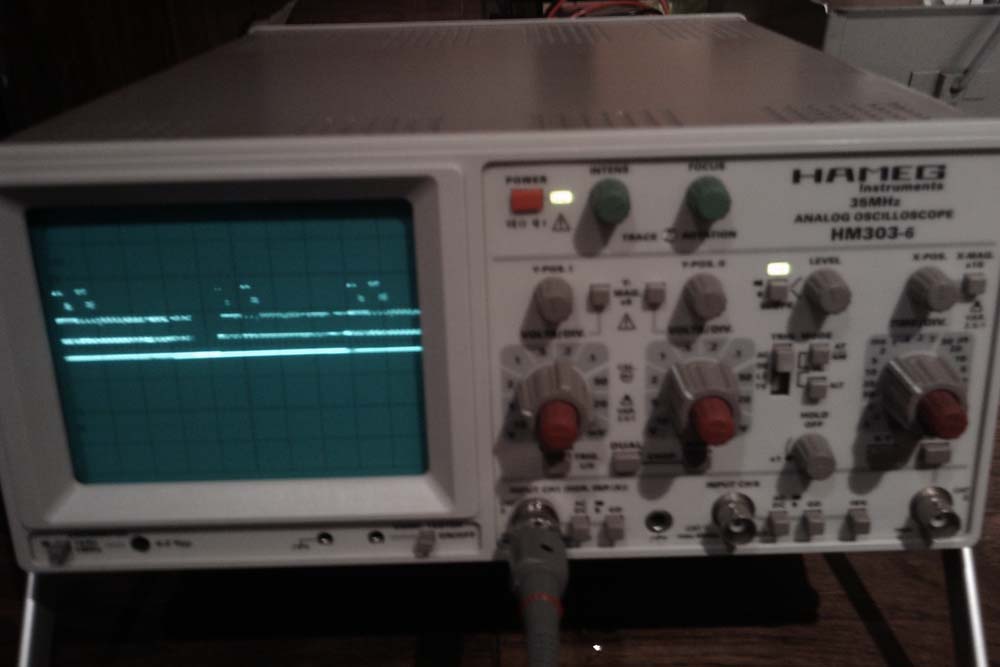
Not all scopes have Z input, or a Z input that is even compatible, hence i would suggest just probing the Z signal with your scope in regular mode and looking at it (and taking a photo for us), it will look a lot like a TTL composite video signal, i can eyeball it and declare it good or not :)

I would assume (as most would) that you also have monitor problems too... but congrats on the pcb work so far! Sounds like you are game to learn for yourself as well as taking instructions and advice from us, so i would think that you might stand a chance of fixing the monitor too! be prepared to wait to order parts, but ask us first, i'm sitting on a large pile of spares and monitors myself, nothing is unobtainable..
 

Equites

Chief Sheesher®
vacBacker
Feedback
35 (100%)
Credits
3,318CR
P-Man said:
You are correct, if the monitor doesn't see a Z signal, the spot killer will be on, and you wont see anything.

With no signal applied to the monitor, and if you turn up the brightness pot you should indeed see a bright white dot.

Not all scopes have Z input, or a Z input that is even compatible, hence i would suggest just probing the Z signal with your scope in regular mode and looking at it (and taking a photo for us), it will look a lot like a TTL composite video signal, i can eyeball it and declare it good or not :)

I would assume (as most would) that you also have monitor problems too... but congrats on the pcb work so far! Sounds like you are game to learn for yourself as well as taking instructions and advice from us, so i would think that you might stand a chance of fixing the monitor too! be prepared to wait to order parts, but ask us first, i'm sitting on a large pile of spares and monitors myself, nothing is unobtainable..

Thanks Andy for the encouragement and support, it's all really appreciated :)

Anyway, I setup the scope as you suggested, 2v/div and 2ms/dv with the probe set to x1 connected to the Z out on the PCB and the probe grounded, here is what I saw;

IMAG0120s.jpg


IMAG0122s.jpg


I also dialled the brightness pot on the deflection board fully clockwise, but still saw no life in the monitor tube.
Equites2011-01-27 23:57:49
 

guddler

Busting vectors like it's 1982!
vacBacker
Feedback
10 (100%)
Credits
4,055CR
I'm not going to comment on that Z signal as I've never looked at one on a scope, but just for the record, NEVER turn your monitor onto full brightness until you get a dot in the middle of the monitor. It can and will burn a hole in the phosphor, potentially within literally seconds. I never used to believe this until it happened on my Asty Deluxe. Thankfully I have the upright and so it has a mirror and backlights so the burnt in dot is not visible.

Obviously under normal circumstances the spot killer comes on and turns the beam off. In my case the spot killer had failed. But that can happen at any time. A little care needs to be exercised when it comes to B/W vectors. Don't know why, they're just really prone to burn in. More so than colour monitors.
 

Equites

Chief Sheesher®
vacBacker
Feedback
35 (100%)
Credits
3,318CR
guddler said:
I'm not going to comment on that Z signal as I've never looked at one on a scope, but just for the record, NEVER turn your monitor onto full brightness until you get a dot in the middle of the monitor. It can and will burn a hole in the phosphor, potentially within literally seconds. I never used to believe this until it happened on my Asty Deluxe. Thankfully I have the upright and so it has a mirror and backlights so the burnt in dot is not visible.

Obviously under normal circumstances the spot killer comes on and turns the beam off. In my case the spot killer had failed. But that can happen at any time. A little care needs to be exercised when it comes to B/W vectors. Don't know why, they're just really prone to burn in. More so than colour monitors.

Thanks Martin

That never even occured to me, I have now dialled it back down dude. After all, thats the whole point of the spot killer circuitry as you say.
 

P-Man

International man of mystery
Feedback
4 (100%)
Credits
1,272CR
I've never seen an instantaneous burn from cranking the screen brightness on a b/w tube, usually it happens after a good hour or more. heck, have you seen how bright you can make the asteroidsfire dots?!? enough to leave streaky lines inthe tube as it is :)

Simply turn the brightness up, go to front of cab, assess if its there or not and walk to the back and turn it down... you don't have to panic and do it within microseconds.

As for your Z signal, that looks absolutley fine, i would deem your pcb to be fully working, you now need to work on the monitor... do you have a paper manual? (not a PDF, that will just waste your time) you will want a G05 issue 2 manual at least.

P-Man2011-01-28 12:03:37
 

Equites

Chief Sheesher®
vacBacker
Feedback
35 (100%)
Credits
3,318CR
P-Man said:
As for your Z signal, that looks absolutley fine, i would deem your pcb to be fully working, you now need to work on the monitor... do you have a paper manual? (not a PDF, that will just waste your time) you will want a G05 issue 2 manual at least.

Thanks Andy - thats good to know. So the problem is definately monitor related, as you said earlier it was likely. I should also check the connectivity between the PCB and the monitor harness for Z.

I do have an Electrohome G05-802/805 manual (Issue 3) but it was a downloaded PDF which I have printed off, will this do?

I think this weekend, I will remove the monitor and have a good look. I will report on my findings and post some images of the boards.

This Asteroids cab, although physically in great shape, seems to have multiple issues. The PCB for a start, someone has attempted to fix it and just made a mess of it (tied RAM address lines on Vector ROM socket). I did honestly think that it would either be one or the other problem, PCB or monitor but not both.

Still, Im learning loads and enjoying it. I've read an awful lot, stuff like Guddler's Repair Logs give great insight into the methods required to troubleshoot. I've not even scratched the surface yet and have been lucky so far, I think my common sense, knowledge of how things work and support from you guys is getting me by.
Equites2011-01-28 13:03:10
 

P-Man

International man of mystery
Feedback
4 (100%)
Credits
1,272CR
Working from a physical manual is always beter than trying to work off a screen, so you're good.

When people mess up soldering, or are repairing bad traces or thru-holes the only way to fix is to wire patch to the next nearest suitable node. This explains your wire patch, while its not ideal sometimes its unavioidable if you don't know what you're doing, or you slip or have to much heat etc..

XY monitor deflection pcbs are simple beasts to troubleshoot, the HV is a little harder to understand and test, but see ow you go, the manual has the correct voltages all marked around the circuit so see what you can see..
 

DanP

Administrator
Staff member
vacBacker
Feedback
5 (100%)
Credits
2,192CR
Hiya, couple of things. With G05 802/5's it's usually best to just do a quick reflow of the solder o all the header pins and other connector points on the deflection PCB. I've seen this fix about 75% of all the "dead" deflection boards I've had. Secondly, whilst Pman is right that damage doesn't usually happen - I can confirm that it is possible to burn the phospor in a matter of seconds cos I've done it. ymmv

Cheers,

Dan
 

Equites

Chief Sheesher®
vacBacker
Feedback
35 (100%)
Credits
3,318CR
DanP said:
With G05 802/5's it's usually best to just do a quick reflow of the solder o all the header pins and other connector points on the deflection PCB. I've seen this fix about 75% of all the "dead" deflection boards I've had.

Thanks Dan - Thats a great tip, I will do just that this weekend.
 

Equites

Chief Sheesher®
vacBacker
Feedback
35 (100%)
Credits
3,318CR
I decided that since I had a spare hour, I would remove the monitor from the cab. As stated by P-Man, the monitor shroud needed to come off first so I could access the bolts holding the monitor in. The shroud was stapled in at three points on each side, but these had perished badly with rust, still it made my job easier;

DSC00812.jpg


The shroud was in good shape considering its age;

DSC00807.jpg


The monitor as expected had some screen burn, but I was not expecting two small chip marks to the glass surface of the tube;

DSC00809.jpg


Once I had unbolted the monitor housing, the complete unit lifted out quite easily from the front of the cab, although removing the control panel does help;

DSC00814.jpg


DSC00816.jpg


Transistors bolted to the chassis;

DSC00822.jpg


The dag on the top of the monitor has really suffered, it is literally flaking off;

DSC00815.jpg


A light dust off just made matters worse;

DSC00830.jpg


Luckily, I do have a new tube with is waiting to go into the Asteroids cab (Many thanks to Dave Spicer for his assitance);

DSC00821.jpg


Can anyone advise if the flaking dag on the electrohome tube is a problem, what would the effect be? I want to leave the original tube in until I have resolved all issues concerning the monitor and do the tube swap last.

Equites2011-01-28 23:04:48
 

P-Man

International man of mystery
Feedback
4 (100%)
Credits
1,272CR
well, I can't say specifically what the exact results would be, but los of dag is loss of tube capacitace in theory. I have seen people get 'spray dag' and restore the covering on the back of the tube. For a vector monitor, yours does not look too bad at all!

If i were you, just make sure the flaking dag is not touching any metalwork on the deflection pcb, maybe brush it off so that it can't cause problems and continue as normal. I've had a b/w monitor with half the dag flakey, i brushed it off and got it running, i did not later sort the missing dag out becasue i couldn't find the spray stuff, you might have to look stateside for it. I think its worth doing as your tube is not that heavily burned.

The chips in the glass wont be at all noticeable during gameplay...
 

Equites

Chief Sheesher®
vacBacker
Feedback
35 (100%)
Credits
3,318CR
I decided this morning to pull off the deflection board from the monitor chassis;

DSC00836.jpg


At first glance it seemed to be in good order, except a bit dusty but then this is 30 years of dust accumulatiion, not too bad I think in that respect.

First thing I did was to check the fuses, and found that fuses F100 and F101 were open;

DSC00838.jpg


The only thing that concerns me is to why these fuses blew, I have yet to read the manual to determine what these fuses are for.

I then remembered what DanP said about the header pins suffering from cold solder joints, he was absolutely correct. In fact, I was suprised to how bad these actually were, the HV header pins were particularly bad but all had suffered;

DSC00841.jpg


DSC00842.jpg


So, I fired up the soldering station, and reflowed the solder on all the header pins;

DSC00843.jpg


DSC00844.jpg


DSC00845.jpg


The header pins look sooo much better now, there was no way the board would ever run in the condition it was in before.

I have yet to replace these fuses, Im not sure if I should just replace them and see if the board now fires up??
 

Equites

Chief Sheesher®
vacBacker
Feedback
35 (100%)
Credits
3,318CR
Just checked my Slow Blow Fuses arsenal, and do not appear to have 5A of which I need two, looks like MAPLINs stock them though so may make a trip there in the morning.
 

Purity

The Oracle
vacBacker
Feedback
17 (100%)
Credits
2,999CR
Equites said:
Just checked my Slow Blow Fuses arsenal, and do not appear to have 5A of which I need two, looks like MAPLINs stock them though so may make a trip there in the morning.

I may just have some spare dude. I'll check for you tonight
 

Equites

Chief Sheesher®
vacBacker
Feedback
35 (100%)
Credits
3,318CR
Since I had to remove the control panel in order to remove the monitor chassis from the cab, I thought my attentions would turn to this.

Although in fairly good shape, some rust has attacked the control panel after 30 years and the result was some flaking and bubbling paint, so I rubbed these areas down ready for re-painting;

DSC00831.jpg


DSC00832.jpg


I masked off the area's which I did not want to re-paint (graphics) and set about painting using Hammerite Hammered Black for the initial coat (to create the texture) and then finish off with Hammerite Smooth Black which is a truer black than the Hammered variant;

DSC00835.jpg


Because I wanted to save the graphics, the painting had to be done in stages, now the final stage is completed and waiting for it to dry;

DSC00865.jpg
 

Equites

Chief Sheesher®
vacBacker
Feedback
35 (100%)
Credits
3,318CR
I decided to totally strip the monitor section down and clean it up, while I was there I also replaced the deflector transistors courtesty of Bob;

DSC00854.jpg


DSC00856.jpg


DSC00855.jpg


Then, Ben popped round, whilst I was finishing off the deflector transistors with some 5A SB fuses for the deflection board (Thanks Ben). Ben convinced me it was time to re-assemble the monitor and fire her up, this is what we saw;

DSC00859.jpg


DSC00860.jpg


Next up is to install the new tube;

DSC00862.jpg


Equites2011-01-30 19:32:22
 

guddler

Busting vectors like it's 1982!
vacBacker
Feedback
10 (100%)
Credits
4,055CR
Nice work!
smiley32.gif


Don't ditch that "old" tube though. Wrap it up nicely and put it in your loft if you need to, but there's nothing wrong with it so don't get rid of it. CRTs are going to be hard enough to get as it is, let alone B/W ones.
 

Equites

Chief Sheesher®
vacBacker
Feedback
35 (100%)
Credits
3,318CR
guddler said:
Nice work!
smiley32.gif


Don't ditch that "old" tube though. Wrap it up nicely and put it in your loft if you need to, but there's nothing wrong with it so don't get rid of it. CRTs are going to be hard enough to get as it is, let alone B/W ones.

Thanks dude - I will do just that and pack it into the loft! Let me know if anyone needs it.

Anyway, swapped the yolk from the old tube onto the new tube;

DSC00866.jpg


Re-assembed the new tube into the chassis and fired her up, expecting some yolk adjustment but none needed!

DSC00867e.JPG

Equites2011-01-31 12:43:49
 
Top