
You are using an out of date browser. It may not display this or other websites correctly.
You should upgrade or use an alternative browser.
You should upgrade or use an alternative browser.
Atari Star Wars Cockpit *UKVAC Exclusive*
- Thread starter Jodo
- Start date


Jodo said:This will now NOT be chopped
Cool! So I take it "The Force Is With You", young Jedi??
Did you sort a Fuse Holder? I may have bought 2 when I bought one for my SW... I'll have a look.

The Deliveryman
Newbie
Equites said:tb lilley said:Can't you just stand it one end?
That's what RGP did, stripped the canopy, and stood it on one end.
Thing is, this is not the first SWCP Phil has had, clearly the first one never made it anywhere near the house lol.
This was the plan last week, but the original height becomes the width and the new width is too wide to fit down the path to the front door.
The next option was to take it up the path ends ways but still on it's end and then twist it into the doorway.
Alas the diagonal dimension (still with me?) is too big for the turn, therefore we would literally hit a brick wall, well three in fact.
JUST CHOP IT UP.........


Great thread and resto
Good luck getting it in
Good luck getting it in
Powder Coating the Metal: July 2014
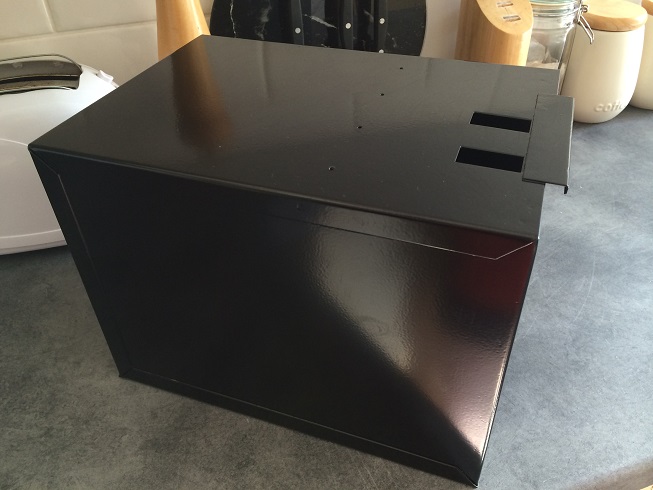
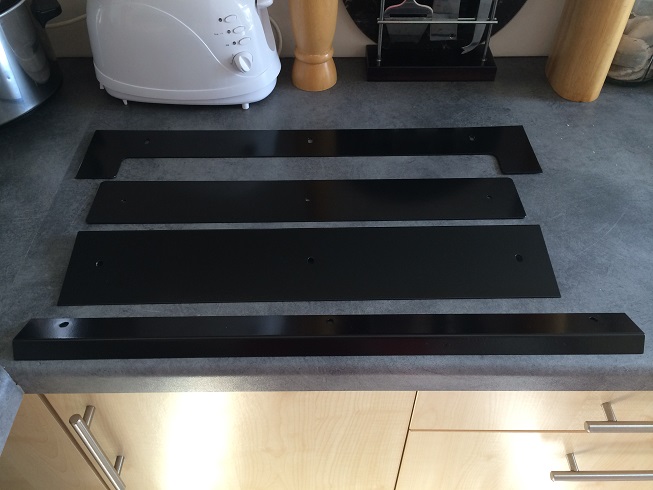
A small but important update.
After an unexpected delay in getting the metalwork back from the powder coating company I use, they arrived this week
 The finish is excellent as always and this lot, along with all the metal from my Firefox too, was only £40. The sunlight plays havoc with the colour and finish but I assure you the black is deep and rich.
The keen eyed amongst you will spot that there is no control panel but as this had a ToG overlay applied by the previous owner, I'm not in any hurry to rip that off just to powder coat the metal; another solution is needed for that.
Next up: Time to polish the rear marquee glass, Novus the sh*t out of the smoked canopy pieces and prepare for reassembly!

Jodo2014-07-29 12:18:44
A small but important update.
After an unexpected delay in getting the metalwork back from the powder coating company I use, they arrived this week
The keen eyed amongst you will spot that there is no control panel but as this had a ToG overlay applied by the previous owner, I'm not in any hurry to rip that off just to powder coat the metal; another solution is needed for that.
Next up: Time to polish the rear marquee glass, Novus the sh*t out of the smoked canopy pieces and prepare for reassembly!
Jodo2014-07-29 12:18:44

Phil, I sincerely empathise with your problem on getting an SWCP into your house.
When mine arrived, I thought i'd done everything right, measured the lift, it should go on end - arrrrrgh, I didn't count for the canopy.
I will one day release the videos shot of that machine being collected from its secret hiding place of 15 years only 3 miles from my house - Nad had actually been generous enough to go verify it was complete and in reasonable condition before purchase, it was in November 2011 around the time I was having my eye operated on.
It got to the apartment building no problem but wouldn't go in the lift, we had to strip absolutely everything out of it; monitor, PSU, marquee glass everything, to make it light enough to carry up the 3 flights of stairs - no go.
Just wouldn't go around the corner.
It sat in the communal hallway for 8 hours with people passing saying "what you want one of those for in your flat?" (uncouth yobbo's that don't know the difference between apartment and flat!).
We were trying everything to get the canopy off by removing the original screws, sadly they were rusted beyond anything we could remove, only one original square keyed screw came out in tact, the rest snapped off at the first turn.
We had to snap out the rest in a way that would only make collectors cringe but not one bit of the wood or canopy was damaged in the process.
The canopy was removed and the cockpit base then went on-end in the lift, up 3 floors in a few seconds and then into its resting place for over a year. Mine still needs some restoration work doing on it but is fully re-assembled and working thanks to the tireless efforts of Mr Equites.
I really hope you can get it in, I would definitely remove the canopy, it is definitely designed to be removed but as described, the cockpit, although seeming like it, is not designed to be split in half - a Pole Position ATARI cockpit can be but not an SW.
If you take the canopy off the machine gets a hell of a lot lighter, you should be able to turn it on side and pass it through any window that is 65cm high or more by about 1.3m wide. If you have UPVC style double glazing, its a very easy procedure to remove the glass panels and put them back.
Still get about 4 people to handle it though just for the safety of the machine.
Do consider the room you first get it into though, will it be that room it lives in? Make sure it'll go round any corners before you go through this.
And as always, your writeups are epic.
When mine arrived, I thought i'd done everything right, measured the lift, it should go on end - arrrrrgh, I didn't count for the canopy.
I will one day release the videos shot of that machine being collected from its secret hiding place of 15 years only 3 miles from my house - Nad had actually been generous enough to go verify it was complete and in reasonable condition before purchase, it was in November 2011 around the time I was having my eye operated on.
It got to the apartment building no problem but wouldn't go in the lift, we had to strip absolutely everything out of it; monitor, PSU, marquee glass everything, to make it light enough to carry up the 3 flights of stairs - no go.
Just wouldn't go around the corner.
It sat in the communal hallway for 8 hours with people passing saying "what you want one of those for in your flat?" (uncouth yobbo's that don't know the difference between apartment and flat!).
We were trying everything to get the canopy off by removing the original screws, sadly they were rusted beyond anything we could remove, only one original square keyed screw came out in tact, the rest snapped off at the first turn.
We had to snap out the rest in a way that would only make collectors cringe but not one bit of the wood or canopy was damaged in the process.
The canopy was removed and the cockpit base then went on-end in the lift, up 3 floors in a few seconds and then into its resting place for over a year. Mine still needs some restoration work doing on it but is fully re-assembled and working thanks to the tireless efforts of Mr Equites.
I really hope you can get it in, I would definitely remove the canopy, it is definitely designed to be removed but as described, the cockpit, although seeming like it, is not designed to be split in half - a Pole Position ATARI cockpit can be but not an SW.
If you take the canopy off the machine gets a hell of a lot lighter, you should be able to turn it on side and pass it through any window that is 65cm high or more by about 1.3m wide. If you have UPVC style double glazing, its a very easy procedure to remove the glass panels and put them back.
Still get about 4 people to handle it though just for the safety of the machine.
Do consider the room you first get it into though, will it be that room it lives in? Make sure it'll go round any corners before you go through this.
And as always, your writeups are epic.

RGP said:I really hope you can get it in, I would definitely remove the canopy, it is definitely designed to be removed but as described, the cockpit, although seeming like it, is not designed to be split in half - a Pole Position ATARI cockpit can be but not an SW.
And as always, your writeups are epic.
Thanks James for taking the time to post; I know you are a busy chap


Installing the internals: Part 1! August 2014
It's time to start what is both the most enjoyable part of the hobby for me but also the most stressful; putting the cab back together! I've been surrounded by boxes full of Star Wars cockpit parts for months now in my games room. Poor old Indiana Jones and the Temple of Doom has not been switched on for the same period; mostly because there was a 25" Amplifone tube sat right in front of him.
You never 100% know if a machine is going to play nice when reassembled; I've read stories from other members who swore that on the test bench a game ran beautifully but when reinstalled in the cab it crapped out. I've been able to offset the potential for this scenario, at least to a certain point, in that the cockpit internals were purchased from a reputable member (two actually) and have been soak tested by our own Mitchell Gant. In short, we've done the best we can and I've found my enthusiasm again after the 'it won't fit in my house' pantomime.
I have decided that in true OCD style, everything is going to get a damn good cleaning before the cab goes back together. For the perspex canopy, only a strict diet of Novus 3, 2 and then 1 will suffice and there will be no slacking.
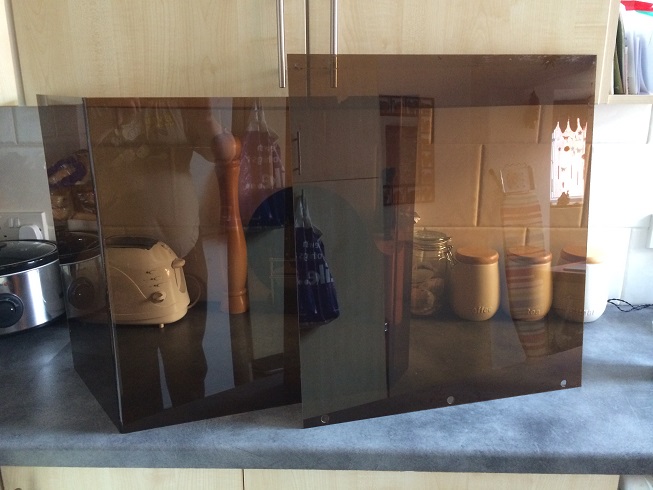
I think it turned out OK! There are 3 panels there by the way but the one on the left is almost invisible for some reason.

First the power brick went into the base of the cab, once it had been swept out and made ready of course. (Neil had kindly transported this, along with a few other bits to my storage as my car was, embarrassingly, full.
 Next up was the High Voltage PCB.
"Pass me a screw. We don't want that falling out. That would be bad." said Neil.
I pondered for a moment on what 'bad' could mean when applied to a Star Wars cockpit. I had spares of most of the PCBs neatly wrapped in anti-static bubble-wrap at home but I didn't have a spare game board stack and I certainly didn't have a spare 25" Amplifone tube; we had already decided that we would put that baby in last. Mainly because the thought of dropping it was f**king terrifying. Yeah, let's put that off for as long as possible

The main PCB cage went in without any hassle, with only a smidgen of "To me, to you, to me...which way does it go in again?" Similarly the AR-II; this one freshly repaired and tested by Neil, slid into place and was secured accordingly with an Atari screw. I noticed as I put the Deflection PCB in its guide rail that both it and the HV PCB were beige:
"Those are the earlier revision aren't they? Nice!"
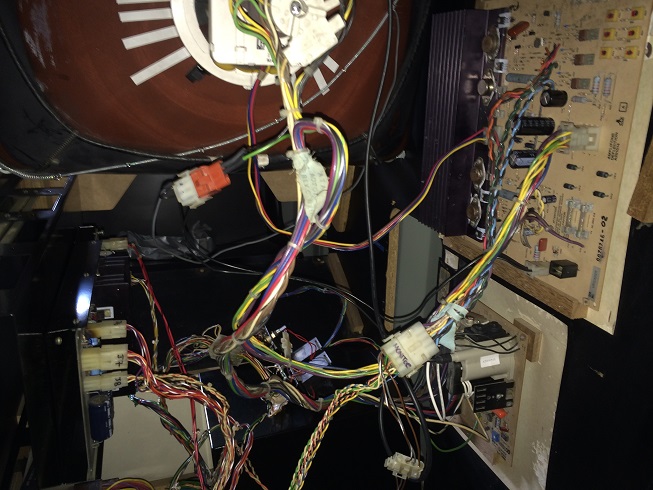
As the loom had been neatly labelled up by a previous owner, actually getting everything plugged in went fairly smoothly. Star Wars cockpit was never the neatest and most cable-tidied cab, even from the factory though and the end results were not surprising!
I am missing an Atari coin door set, the mech and the associated cable unfortunately, so that particular plug is for now left dangling.
 I will set the PCB on Free Play so that the cab is usable until I find one. *cough* Alpha1 *cough*
It was now time to carefully install the Amplifone tube. If anyone had turned up at the storage unit at this point, they would have seen 2 men carrying what looked like a TV v-e-r-y v-e-r-y s-l-o-w-l-y You would think that we were transporting radioactive material, such was the level of care and concentration we were applying to the situation.
"A bit quicker, otherwise I'm going to drop it!" said Neil.
This line reminded me of a conversation I'd had with Muddymusic when we were negotiating the sale. It went something like...
"I nearly necked the damn tube tonight trying to fit it in the cab. I've had enough. I need to sell it before I break it!"
Was it really that difficult to install?
I'd removed the top hatch from the cockpit to give Neil and myself as much access as possible but it was still really tight in there.
"It's really tight in there." said Neil.
In actuality, it only took 2 attempts to get the tube snugly and firmly in situ; the reproduction brackets that I purchased from Troy on KLOV were absolutely perfect
I'd be lying if I said that was it though; I still need to fit a connector for the rear speakers before it's time to flick the ON switch; no way I'm playing Star Wars with no sound! I've also tested the calibration of the flight yoke on my SW upright cab and it's off by a few inches to one side but that is easy enough to sort. Those are stories for another time though!
Next up: The big switch on!
It's time to start what is both the most enjoyable part of the hobby for me but also the most stressful; putting the cab back together! I've been surrounded by boxes full of Star Wars cockpit parts for months now in my games room. Poor old Indiana Jones and the Temple of Doom has not been switched on for the same period; mostly because there was a 25" Amplifone tube sat right in front of him.
You never 100% know if a machine is going to play nice when reassembled; I've read stories from other members who swore that on the test bench a game ran beautifully but when reinstalled in the cab it crapped out. I've been able to offset the potential for this scenario, at least to a certain point, in that the cockpit internals were purchased from a reputable member (two actually) and have been soak tested by our own Mitchell Gant. In short, we've done the best we can and I've found my enthusiasm again after the 'it won't fit in my house' pantomime.
I have decided that in true OCD style, everything is going to get a damn good cleaning before the cab goes back together. For the perspex canopy, only a strict diet of Novus 3, 2 and then 1 will suffice and there will be no slacking.
I think it turned out OK! There are 3 panels there by the way but the one on the left is almost invisible for some reason.
First the power brick went into the base of the cab, once it had been swept out and made ready of course. (Neil had kindly transported this, along with a few other bits to my storage as my car was, embarrassingly, full.
"Pass me a screw. We don't want that falling out. That would be bad." said Neil.
I pondered for a moment on what 'bad' could mean when applied to a Star Wars cockpit. I had spares of most of the PCBs neatly wrapped in anti-static bubble-wrap at home but I didn't have a spare game board stack and I certainly didn't have a spare 25" Amplifone tube; we had already decided that we would put that baby in last. Mainly because the thought of dropping it was f**king terrifying. Yeah, let's put that off for as long as possible
The main PCB cage went in without any hassle, with only a smidgen of "To me, to you, to me...which way does it go in again?" Similarly the AR-II; this one freshly repaired and tested by Neil, slid into place and was secured accordingly with an Atari screw. I noticed as I put the Deflection PCB in its guide rail that both it and the HV PCB were beige:
"Those are the earlier revision aren't they? Nice!"
As the loom had been neatly labelled up by a previous owner, actually getting everything plugged in went fairly smoothly. Star Wars cockpit was never the neatest and most cable-tidied cab, even from the factory though and the end results were not surprising!
I am missing an Atari coin door set, the mech and the associated cable unfortunately, so that particular plug is for now left dangling.
It was now time to carefully install the Amplifone tube. If anyone had turned up at the storage unit at this point, they would have seen 2 men carrying what looked like a TV v-e-r-y v-e-r-y s-l-o-w-l-y You would think that we were transporting radioactive material, such was the level of care and concentration we were applying to the situation.
"A bit quicker, otherwise I'm going to drop it!" said Neil.
This line reminded me of a conversation I'd had with Muddymusic when we were negotiating the sale. It went something like...
"I nearly necked the damn tube tonight trying to fit it in the cab. I've had enough. I need to sell it before I break it!"
Was it really that difficult to install?
I'd removed the top hatch from the cockpit to give Neil and myself as much access as possible but it was still really tight in there.
"It's really tight in there." said Neil.
In actuality, it only took 2 attempts to get the tube snugly and firmly in situ; the reproduction brackets that I purchased from Troy on KLOV were absolutely perfect
I'd be lying if I said that was it though; I still need to fit a connector for the rear speakers before it's time to flick the ON switch; no way I'm playing Star Wars with no sound! I've also tested the calibration of the flight yoke on my SW upright cab and it's off by a few inches to one side but that is easy enough to sort. Those are stories for another time though!
Next up: The big switch on!


Jodo said:Mainly because the thought of dropping it was f**king terrifying.
"A bit quicker, otherwise I'm going to drop it!" said Neil.
Yes I was crapping it thinking of the ease with which the precious could be totally destroyed if we messed up.
Much happier once it was bolted in there.

Nice work as usual dude, looking forward to the next step, it's a big one!

Awesomeness!!