FINISHED!!! My main spring project…
“TRIGGER” lives again … I know this is not video and it’s Nintendo Switch 2 release day so maybe a few people will be occupied elsewhere??? But here is the final 3 weeks summary..
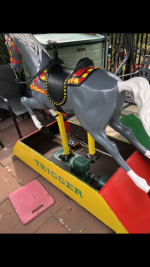
It took about 5/6 weeks on & off but mainly throughout May while the sun shone but our horse ride is solid and rockin’ to the music each time he gets fed 20p
Nice timing about 4 weeks ahead of estimate and as my birthday is mid June, just right for the younger grandchildren to try out this and also the car I did at Easter, assuming we get nice weather to have a garden bbq and family gathering.
Almost 50 years in amusement repairs and operations I have taken on some challenging tasks but never have I faced a 35 year sea-water drowned and subsequent 30+ years of it laying in the garden exposed to the elements , untouched as it was already growing mushrooms or other fungus in the polluted plywood base . The wood crumbled completely on moving it, a decaying mess of a machine first used in around 1960 .
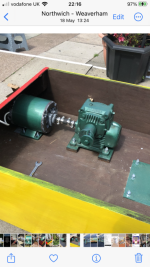
As mentioned before the motor was solid , seized with rust and time and took several hours to free off , strip down service , paint and rebuild and test with a new wire fitted also.
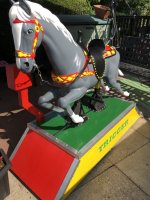
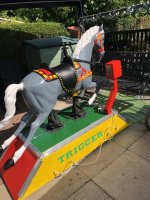
This was possibly my most challenging and if you have followed the previous posts above you can look back and ‘maybe’ see a difference? A batch of final pictures follow.
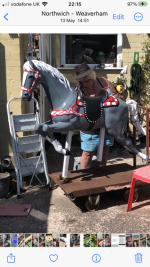
The wife has been great painting the horse and treating the wood panels while I measured up and got all the technical stuff sorted out which was no mean feat! It had 2-3 coats of paint on top of priming undercoat. Team work ! Just as we have always worked… pooltable reclothing and moving machines from site to site pubs & arcades etc. for over 4 decades. Also in puppet machine manufacture.
Once painted the horse was again ready to be mounted on the new base but before that , the base had to be tipped on its side each way to give it the re-naming lettering, which was a slight short cut cheat as it’s in car-wrap prepared for just £13 the pair, not bad!
So…. Once fitted back on its firm plated chassis and movement checked ahead of power wring it up all goes well … so we gave it a direct to motor powered run …. All good!
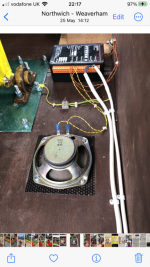
I had fitted the coin tower and the top covering halves were ready to go in place so we gave them a fitting check and happy they required just a meagre routing trim down the join to accommodate the chrome T moulding , which eventually would hide the joint, I set to and mounted and wired in the speaker and the sound and timer control box. This again was a slight short cut cheat as I found the old timer too far gone with flood rust and capacitors just falling off, to get the ride finished on schedule.
Below the speaker a 13 hole diamond shape sound vent is hidden under the 4” speaker grill, then the speaker itself is mounted on spacers to suspend it up off the base a bit.
I robbed a timer/sound unit off one of our redundant dancing puppet show cabinets and decided that the ‘old McDonald had a farm’ tune would be ok ? ( with a neigh neigh here and an neigh neigh there - he probably had a horse? ) The alternative was a place in Taiwan sells them with Bonanza or Lone Ranger tune chip for $259 plus $20 handling fee then $48 DHL shipping …. Not to mention customs import duty when it arrives? Too much … I will repair another to replace the one I have permanently borrowed! There is enough space access via the coin box to get a hand inside to adjust the volume or length of desired ride time per coin .. and the coin box locks in place with two matching A444 keys (often found on Neo / Taito / Electrocoin cabs) which I had on hand
Several parts were found among new old stock in the worship to save on cost a bit , castors, wiring , paints, leather strap , some screws and M8 bolts though a few were new also.. Self servicing the motor etc also saved an enormous amount of cash too! .
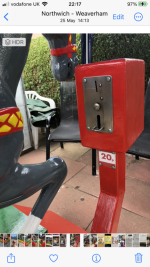
The S1 mech was rusty , cobwebbed solid so half a day in the workshop cleaning that up, shiny now and same wires still soldered on its fitted and all wiring completed and fastened down, including earthing wire. A 20p price label mounted under the original plastic window which previously just held some well rotted paper in place but the screws, rusty as they were all undid and got replaced.
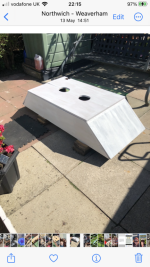
Now it came to fitting the two halves of the box base top. Some of the trickiest tasks were still ahead and it’s last week of May. The weather forecast was changeable to breezy and showers so cautiously we went to our local auction clearing centre where 3mx3m gazebo party tents with sides were just £22 and they had just 5 left … wow nice timing as next day it absolutely rained most of the day…. The end was in sight , so close and the weather lets you down !!
No matter… into the workshop and manufacture the mouth bit fro a 10mm threaded rod and seek out an upcycle handbag shoulder strap for reins…. , along with a couple of hooky clips I knew I had somewhere , so the leather strap can be un-clipped while the ride is not used , save it going mouldy in damper times .
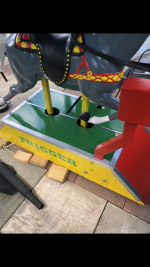
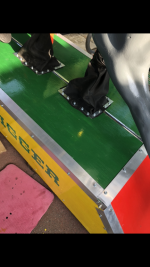
Working under the gazebo the edge trim aluminium was measured for the two ends which also anchors the ends of the T moulding. Hex drill screws strategically positioned keep the top relatively flat and shiny, tailored to the corners with some careful cutting as it’s expensive stuff . (No room for error at this stage). The sun came out again on June 2nd ( this Monday and only one major - very awkward task to do) I had to think out and manufacture the horse frame safety gaiters , one of which moves up and down while one rocks forwards and backwards . Not a good place to allow small hands to get into and trapped or worse? I have seen quite a number of these over the years which should have failed ADIPS ride testing due to the danger.
If you recall , before I even had the wood a month ago, on the first May bank holiday, I visited my friend in Stoke? He, just last summer dug out a huge fish pond in his garden and lined it with 2mm lifetime pond liner which has a degree of stretch elasticity and I spotted a 2foot by 8foot off cut from one end just laying on a pallet in his garden ….. (waste not want not, I picked that up). I must have had a light bulb moment? Try to buy a 7” pair of gaiters anywhere … ? Good luck as they don’t exist. So time to get really inventive… I did have the upper part of previously ‘home made’ replacements to give me a clue guide, on pattern, however it was rough cut to size on 5 sides to overlap and seal the flap . 8 x 90 degree wood joint brackets and it’s fastened down sealing the open holes in the box cover. With a slight conical cut pattern it’s drawn together at the top round each frame and jubilee clipped ( 2 linked together on each to form a square 2”x 2” ) . The clips then hidden with a wrap of gorilla tape to waterproof upper edges..
Just a quick coin test to ensure the gaiters perform as planned .. all ok ! It’s quite satisfying as each completion stage needed a quick coin test to see it rock and hear the music… now even the neighbours are curious!
Just one final fitting … to slide on two new car heater hose rubbers on to the footrest iron rod each side and presto .. All done !
The total cost . Kept low as possible was about £230 over half of which was timber frame, plywood and aluminium 90degree angled finish trim just enough for the job using 2x 2.4 metre lengths ( normally £21ea bartered two for £35 at the timber yard who supplied and cut the plywood for me).
New bolts , extra paint, iron rod footrest, new rubber hose and a short piece of chrome T moulding , the naming wraps and a motorcycle rain cover for future protection, & misc. etc made up the rest .……. The gazebo just pushed it to around £250 but that’s for other family uses in the garden anyway now so can be ignored, I suppose?
Enjoy this last selection of photos along the way…. They may help explain odd tasks I had as a picture saves a lot of words and I am sure I have used plenty of them in the posts between end of April and start of June in this thread … ?
Not least I may have forgot to mention the odd part of the process of the restoration? An imagined impossible restore , I hope encourages others on here not to give up when they find a machine needing a bit of t.l.c. !!! Or quite major surgery as seen in some posts .
") until we all have arcade rooms setup how they should be and then Arcade SOS to get all machines working
until we all have arcade rooms setup how they should be and then Arcade SOS to get all machines working