You are using an out of date browser. It may not display this or other websites correctly.
You should upgrade or use an alternative browser.
You should upgrade or use an alternative browser.
Arduino In-Circuit Tester: Build Project
- Thread starter Judder
- Start date
dphirschler
Newbie
- Credits
- 9CR
Finally completed my build. It tool a while for those header pins to arrive from China!
I got the software on the Arduino. But I am having a problem with the keys. At the moment, only the Right key (and Reset) does anything. Also Right seems to move down through the menu as if it thinks I am pressing Down. I am pretty sure my shield needs a different DFR_Key file, but I don't know how to fix it. Can anybody help me?
Here is my Shield (DFRobot DF0009 v1.1):
https://www.amazon.com/gp/product/B006D903KE/ref=ppx_yo_dt_b_asin_title_o05_s00?ie=UTF8&psc=1
Thanks!
Darryl
dphirschler said:Finally completed my build. It tool a while for those header pins to arrive from China!
I got the software on the Arduino. But I am having a problem with the keys. At the moment, only the Right key (and Reset) does anything. Also Right seems to move down through the menu as if it thinks I am pressing Down. I am pretty sure my shield needs a different DFR_Key file, but I don't know how to fix it. Can anybody help me?
Here is my Shield (DFRobot DF0009 v1.1):
https://www.amazon.com/gp/product/B006D903KE/ref=ppx_yo_dt_b_asin_title_o05_s00?ie=UTF8&psc=1
Thanks!
Darryl
last post on this page:
http://www.ukvac.com/forum/arduino-incircuit-tester-build-project_topic349525_page13.html
Lurch6662020-12-13 04:40:11
Just in time for the next COVID lockdown, my PCB order arrived. These
are the same board, with a similar layout, but re-done in eagle so that I
could add additional labelling/text. Lucky me, they shipped MAT BLACK
for the main PCB's. Still awaiting my LCD/keypad, but looking forward
to assembly and tinkering over the next 28 days of imposed 'LOCKDOWN'.
Not completely sure on linking images .. but hopefully you can see the PCB stacks here.
Some routing changes (traces slightly larger, and less 90 degree bends), but mostly it was about pin labels (A/B on the ports, pin numbers, and text on the back detailing jumper positions). Hoping the mouser order will arrive before the holiday break, so that I can assemble and tinker.
Oh.. and I put the "pin 1 notch" on the POD header PCB's.. making it easier to align for the CPU socket. (Though I doubt it was all that difficult to begin with)
Oh.. and I put the "pin 1 notch" on the POD header PCB's.. making it easier to align for the CPU socket. (Though I doubt it was all that difficult to begin with)
Mouser managed delivery in less than 24 hrs (Christmas Eve no less)...so I managed to assemble the first set (all nicely color coded) yesterday.
Alas, I found some of the text on the bottom silk screen was messed up. Board will still (hopefully) be functional.
Waiting on the LCD/Keypad ..


Note that I could have shortened the board further to avoid collisions with the other arduino pins, had I routed that last trace "between" the pins, rather than around the exterior edge of the board. With that change, hopefully this would no longer interfere at all with the rest of the Mega's I/O pin header.
LabRat2020-12-29 02:10:40
Alas, I found some of the text on the bottom silk screen was messed up. Board will still (hopefully) be functional.
Waiting on the LCD/Keypad ..
Note that I could have shortened the board further to avoid collisions with the other arduino pins, had I routed that last trace "between" the pins, rather than around the exterior edge of the board. With that change, hopefully this would no longer interfere at all with the rest of the Mega's I/O pin header.
LabRat2020-12-29 02:10:40
HI! One more person testing this fantastic tool.
Right now I only have some faulty z80 boards to play (green beret bootleg, 99´the last war, choplifter boot ...) but before I start to learn how to make some game configuration files, i want to check the arduino, board and probe are ok.
When I conect the probe to a game board, and using a random configuration setup, the Bus idle give me the OK.
Bus Idle = OK
But the Bus check is giving me this error, or something like that:
Bus Check = E:GND 29 Hi 386
The error persist even with the tester shield disconected from the arduino.
Is this ok? I need a specific configuration to test the bus in a z80 board?
yotsuya2021-01-07 23:22:23
yotsuya said:HI! One more person testing this fantastic tool.
Right now I only have some faulty z80 boards to play (green beret bootleg, 99´the last war, choplifter boot ...) but before I start to learn how to make some game configuration files, i want to check the arduino, board and probe are ok.
When I conect the probe to a game board, and using a random configuration setup, the Bus idle give me the OK.
Bus Idle = OK
But the Bus check is giving me this error, or something like that:
Bus Check = E:GND 29 Hi 386
The error persist even with the tester shield disconected from the arduino.
Is this ok? I need a specific configuration to test the bus in a z80 board?
Welcome! Coincidentally, I just picked up this project again last week after a year, and I just started working with Z80 support (adding a config for Dragon's Lair / Space Ace, which is coming along nicely).
Among other things, the Bus Check verifies that:
- Vcc +5V (pin 11) is high
- GND (pin 29) is low
- RESET (pin 26) is high
- Address and data lines aren't stuck low
It's normal for the GND test to fail when the probe isn't connected, but if it still fails when plugged into the game PCB, I would check that:
- The probe head is jumpered for Z80 use (pin 29 is tied to GND)
- The ribbon cables are in the correct orientation
Reaching out to Paul Swan (unclear on best methods for contact- so I will post here). I have been dabbling in the ICT code base (my methods for learning a new piece of code is to go in and reorganize it to how my brain works). You already saw one pull request which was for a bug, but I have other changes where I'm starting to veer away from the original UI. Perhaps they are of interest, but I didn't think it appropriate to open a pull request out of the blue for "and here's how I like it to look" (to each their own). Two chunks of code that you might like (or not).
a. I added support for non-DFRobot keypad/shield (my shield has yet to arrive).
This includes a SELF_TEST function to display which keys are being pressed. Press SELECT to exit the function.
b. Tweaked the initial CONFIG menu so that you can see the values that are being changed, before they are committed. [Also includes animated space invaders on a splash screen, just for giggles and mostly to test that I was understanding the code structures].
c. Added an "Exit" menu item within the Game specific menus: this simply invokes a software reset as a quick and dirty way to jump back to the root menu. ) I can now go into and out of game menus without trying to figure out how to press the reset button hidden beneath the ICT shield.
"Pirate Rulez Apply" ... "Take what you want, leave the rest".
Will trying and capture a video snippet later this evening, or tomorrow.
a. I added support for non-DFRobot keypad/shield (my shield has yet to arrive).
This includes a SELF_TEST function to display which keys are being pressed. Press SELECT to exit the function.
b. Tweaked the initial CONFIG menu so that you can see the values that are being changed, before they are committed. [Also includes animated space invaders on a splash screen, just for giggles and mostly to test that I was understanding the code structures].
c. Added an "Exit" menu item within the Game specific menus: this simply invokes a software reset as a quick and dirty way to jump back to the root menu.
) I can now go into and out of game menus without trying to figure out how to press the reset button hidden beneath the ICT shield."Pirate Rulez Apply" ... "Take what you want, leave the rest".
Will trying and capture a video snippet later this evening, or tomorrow.
Youtube link capturing some of the small UI tweaks I put in place, as I was learning the structure of the Arduino Mega ICT project. Enjoy!
https://youtu.be/u5PXc6hq_20
https://youtu.be/u5PXc6hq_20
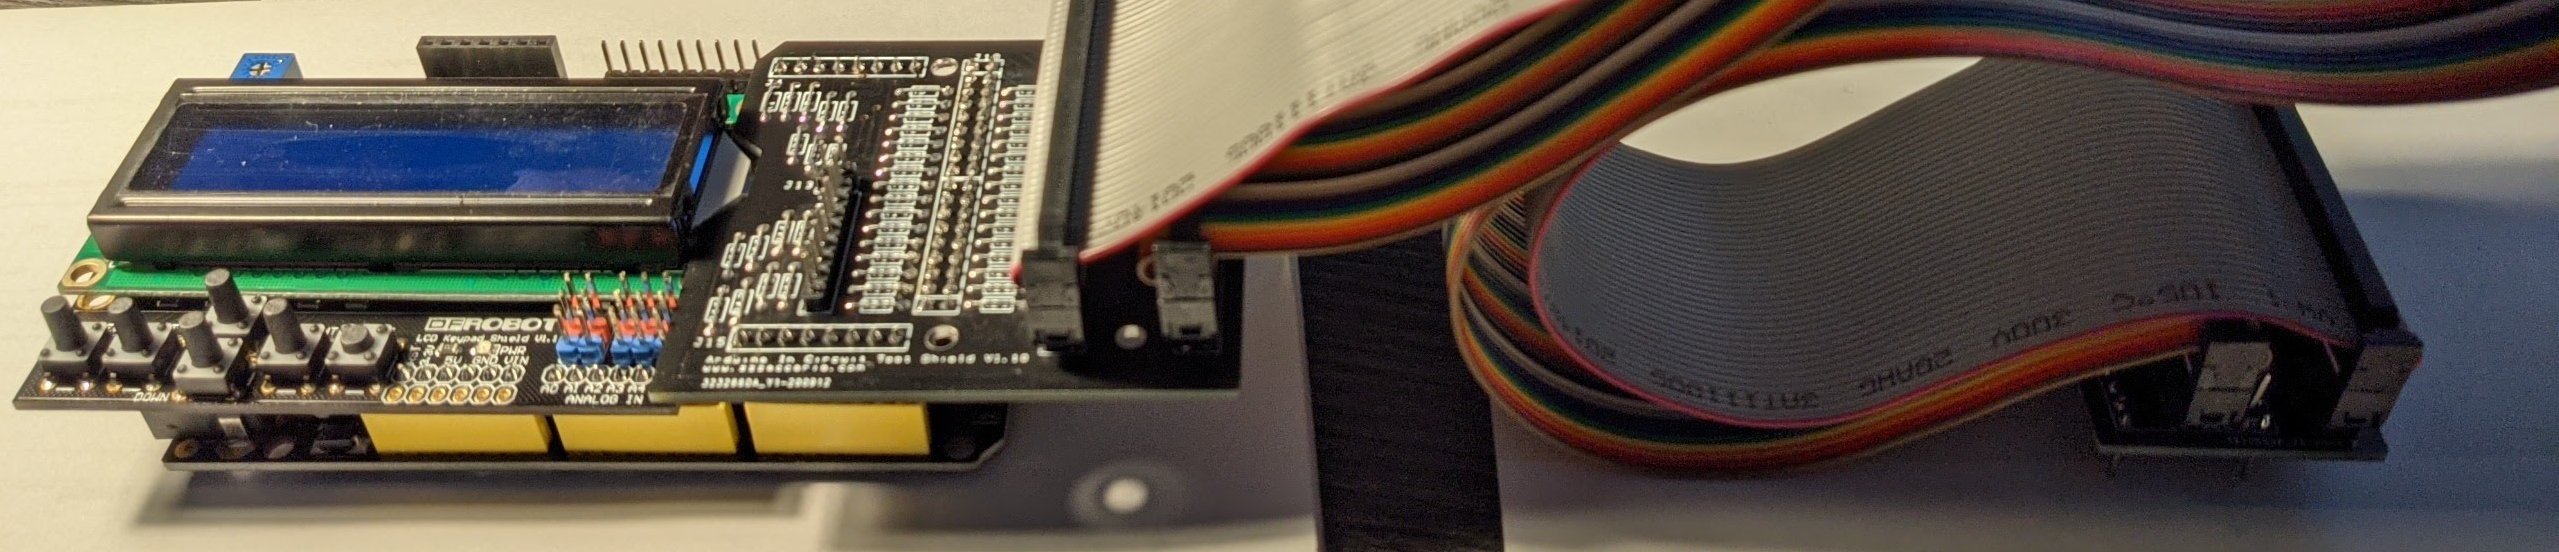
Of course.. right after I give up waiting and write the code to do my own GPIO based keypad... my keypad arrives from BangGood. While lamenting my inability to find my old 40 pin IDE cables, I stumbled on 6' of ribbon cable, plus exactly 4 press on IDC headers (from a former company "dumpster dive").
It was a tight fit, but with a little filing around that one resistor, I'm good to go!

Time for continuity checks, before trying in circuit.
It was a tight fit, but with a little filing around that one resistor, I'm good to go!
Time for continuity checks, before trying in circuit.
Hey, really good work here. I've got a repo of more supported games at https://github.com/Phillrb/Arduino-ICT-PVAP and would be happy to pull in your changes too as a further modification to the original version that Paul's repo hosts.
Anything that makes the Arduino ICT easier to use is a big win in my books. Give me a DM and I'll make you an admin to the repo.
Anything that makes the Arduino ICT easier to use is a big win in my books. Give me a DM and I'll make you an admin to the repo.
@Nes4Life. me? Repo admin? (bwaaa haha ha ha) I'm about as git literate as "The Swedish Chef reading Klingon". I've muddle through to being able to create a dev branch, push it to the server, and submit a pull request to the Originator. { won't go into details about the bug I introduced, but you can read about it when/if the next pull request goes through}
Is there a way for me to submit a pull request from my forked version of the ICT repo to your branch?
(Happy to accept pointers to wiki/howto etc.)
Alternatively I can fork from yours.. apply the patches, push to server, and then issue a pull request. It's a bit manually intensive, but realistically only an evening's worth of pushing/pulling bits.
spectroman
Newbie
- Credits
- 18CR
Hi,
where's the BOM of the 68k probe?
I'm looking for the reference of U3, U4 & U5.
Thanks
where's the BOM of the 68k probe?
I'm looking for the reference of U3, U4 & U5.
Thanks
Somewhere in this thread... (found by following google links for images of the 68000 header )
forum_posts.asp
"'The cap is just a 1uF ceramic 50V coupling one. The resistors are 10K pullups and I used 74HCT574 for the ICs'"
LabRat2021-02-03 17:54:24
)forum_posts.asp
"'The cap is just a 1uF ceramic 50V coupling one. The resistors are 10K pullups and I used 74HCT574 for the ICs'"
LabRat2021-02-03 17:54:24
spectroman
Newbie
- Credits
- 18CR
Thanks, order done

- Credits
- 763CR
I just refreshed my copy of the code from Paul's repo, and I'm getting a build error on:
[font="Courier New, Courier, mono"]arduino-mega-ict-masterlibrariesCZ80CpuCPunchOutGame.cpp:92:53: error: initializer fails to determine size of 's_romRegionSetA'[/font]
[font="Courier New, Courier, mono"] static const ROM_REGION s_romRegionSetA[] PROGMEM = *s_romRegionSetB;[/font]
[font="Courier New, Courier, mono"] ^~~~~~~~~~~~~~~~[/font]
Am I being thick or missing something?
Cheers, Sam