Atari System 2 Championship Sprint

muddymusic

The Repro Guy. Art and Parts supplier
Staff member
vacBacker
Feedback
52 (100%)
Credits
2,254CR
Man that's come a long way!
smiley32.gif


into_flat.jpg
 

bonehead

I'll get pix tonight
vacBacker
Feedback
50 (100%)
Credits
1,721CR
That is a brilliant restore!!!
Mine only needs new side art and a ar3.

I have 2 sets of pcbs so if I can get mine up and running I will be able to test them,
I then could have a spare set for sale.

Cheers,
Steve
 

strykr

Active member
vacBacker
Feedback
11 (100%)
Credits
1,347CR
Cheers fellas, :)

Forgot to add dont use evostick timebond adhesive, It sticks really well and does the job, it just doesnt brush or spread well, had to use loads of the stuff!

Hope you find an AR3 steve, would be awesome if we both got up n running.
 

Purity

The Oracle
vacBacker
Feedback
17 (100%)
Credits
2,999CR
Couple of questions to help me if that's ok?

How long did you leave the initial coating before applying the two parts together? 15 mins?

Did you brush or roller the adhesive on?

Did you use any wood strips between the cab and formica to get it in the right place before pushing together?

Did you use a roller to ensure that there were no lumps?

Purity2014-08-13 18:36:59
 

Purity

The Oracle
vacBacker
Feedback
17 (100%)
Credits
2,999CR
strykr said:
Forgot to add dont use evostick timebond adhesive, It sticks really well and does the job, it just doesnt brush or spread well, had to use loads of the stuff!

That's helpful. I've gone with Thixofix. The Eco version which is not toxic/harmful
 

strykr

Active member
vacBacker
Feedback
11 (100%)
Credits
1,347CR
Purity said:
Couple of questions to help me if that's ok?

How long did you leave the initial coating before applying the two parts together? 15 mins?

Did you brush or roller the adhesive on?

Did you use any wood strips between the cab and formica to get it in the right place before pushing together?

Did you use a roller to ensure that there were no lumps?
Ben, as above used that evostick stuff, and it was just total gloop, tried a brush, a roller and a spatula and none of them worked effectively! ended up just sort of slapping it on and smearing it about, by the time i'd done that to both sides and achieved good coverage I think about 10-15 mins must have passed. Then I used 4 strips of wood across the cab to rest it on and into position removing one at a time and using a J-roller to apply, there were certainly spots where the adhesive I had applied was thicker then others, but the formica is fairly thick, and with a bit of rollering you cant see any lumps, I picked the j roller up from ebay for a couple of quid and it worked well.

In an ideal world get a second pair of hands to help you lift it onto the cab and get into position, its fairly brittle and the system cab is wide and above 6 foot tall, so it was hairy getting it on without cracking it!
strykr2014-08-13 18:54:48
 

strykr

Active member
vacBacker
Feedback
11 (100%)
Credits
1,347CR
Pm me your address and i'll send you the one I used, Im unlikely to use it for a while, unless i can find a namco galaga cab thats in bits lol.
strykr2014-08-13 19:20:42
 

strykr

Active member
vacBacker
Feedback
11 (100%)
Credits
1,347CR
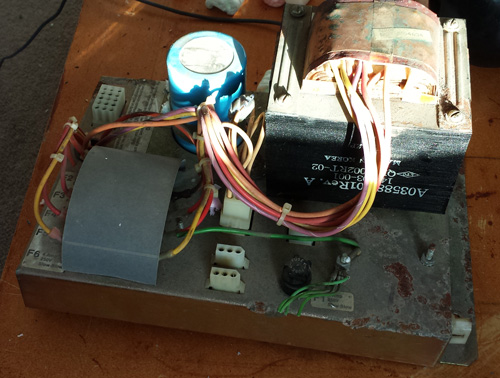
Well since august i've been trying to hunt down parts for this, struck lucky and picked up a full loom from a Klover, a couple of untested AR3 boards, and this finally arrived yesterday:
brick4.jpg


The CPU and video pcbs are back from Retroclinic all working, got to order some caps and fuses etc but then I can hopefully try and put this all together over the christmas break!
 

bonehead

I'll get pix tonight
vacBacker
Feedback
50 (100%)
Credits
1,721CR
Looks good. I have also picked up a power brick. Not sure if mine is the right one so will have to send you a pic to compare them.

Keep up the good work.
 

Bensonrad

STILL looking for an Outrun & Paperboy!
vacBacker
Feedback
68 (100%)
Credits
940CR
Its amazing how far you've gone with this cab, his brother still languishes in my games chalet awaiting the day it can get restored. :)
 

strykr

Active member
vacBacker
Feedback
11 (100%)
Credits
1,347CR
Steve, im not sure if this is the right one! But im certainly hoping, I think it is as close as i'm going to get! And Ben we'll get yours done over the summer :)
 

RGP

Meeter & Greeter
Feedback
5 (100%)
Credits
2,039CR
Nice!! Well done on tracking bits down.

Atari bricks are getting difficult to find - mostly I think they only made enough plus just a few extras as the transformer part is a fairly reliable thing.

As a tech project we should have a combined effort on making transformers - they're not incredibly difficult just have to be fairly precise and do a bit of maths.

Often the brick can be the most elusive part.

Looking forward to more progress.....
 

strykr

Active member
vacBacker
Feedback
11 (100%)
Credits
1,347CR
Well, the loom i have doesnt match either the champ sprint or paperboy schems.
smiley24.gif
which both seem to require different voltages, despite both being system 2 this is gonna be fun
smiley36.gif
 

Bensonrad

STILL looking for an Outrun & Paperboy!
vacBacker
Feedback
68 (100%)
Credits
940CR
There are some photo's on this link here, so you can see how far its come on. Pics might help you power brick/wiring etc.

https://www.flickr.com/photos/59660509@N06/sets/72157643001046514/

I'll go have a look see if I can ID anything in boxes.
 

Bensonrad

STILL looking for an Outrun & Paperboy!
vacBacker
Feedback
68 (100%)
Credits
940CR
Taken some pics of the power bits
https://www.flickr.com/photos/59660509@N06/

Mine has:
A03588-01 REV A
142003-001
QK9-002RRT-02
 

strykr

Active member
vacBacker
Feedback
11 (100%)
Credits
1,347CR
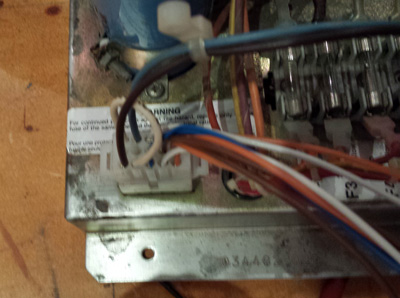
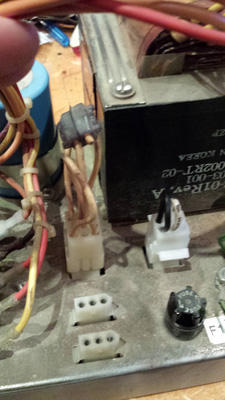
Having to wire this one from scratch and some parts arrived earlier in the week so finally got around to looking at the power brick. Although this is a champ sprint cab, it will be wired as a paperboy as
thats the power brick I have, both boards have the same voltages but
seem to have very different ways of getting there, so its a bit of a mission, but so far i've swapped the voltage selector over to 240v, and made up two of the missing molex connectors.

mol1.jpg


mol2.jpg


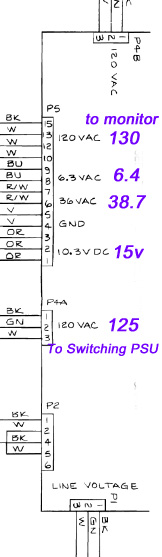
Here are the readings so far:

pb5.jpg


Can the arcade techs have a look and let me know if these are acceptable range wise? the 125 and 130 seem a little high?
Stopping for tonight and will try and get some more done tomorrow.
 
Top