Nichibutsu - Moon Alien Project

ataritoobin

Active member
Feedback
1 (100%)
Credits
199CR
Never thought I'd see that reproduced - pretty cool!

Interestingly, the t-molding on my Nichibutsu cabs have always had silver/orange or silver/brown, not white/orange.
 

Jon-A-Tron

Active member
Feedback
2 (100%)
Credits
228CR
Yes it's great to see. Jeff (jetusenet) over on KLOV did a great job getting this together. I don't take any credit in getting this made, just reporting on it.

I wasn't sure on the colours but Jeff said he had a sample back in December and colour matched. I guess with the Crazy Climber that is in the pictures which does look Orange/White. Maybe is had a silver coating that was worn off over the years.

Anyway, it's a lot better than the plane Orange or plane White I would have gone with had this not been reproduced. The 3 ridges in the centre is a nice addition and maybe the reason it is 3 times the price of other t-molding.
 

Screenburn

Newbie
Feedback
1 (100%)
Credits
4CR
Any progress on the Moon Alien? I'm pretty sure I have, or certainly had an original marquee and bezel for this game, and from memory the artwork restoration and colours look spot on, nice to see a lesser known game getting some love.
 

Jon-A-Tron

Active member
Feedback
2 (100%)
Credits
228CR
Slow and steady progress this month.

I'll be putting in an order for the t-molding later this month so looking forward to getting that and making progress on the cabinet. I've been putting off doing the cabinet because of the weather. I've only got a small garage to work in so I want to wait till its a bit warmer to put the cab outside on the drive and sand it all down ready for some white melamine.

Cap kit arrived from Ian Kellogg for the 20" Toei CM-R20 Monitor. Got in there just before he closed down for a bit. Think its back open end of March. Need to address the monitor at some point soon.

I believe I now have all the PCB's, electrical boards and power supplies required to run the game.

Moon Alien PCB (need to write new ROMs and reverse the hack that is on the board)

PSU Board

Credit Board (thanks to simonden for sending me this part
smiley20.gif
)

PCB Connectors (thanks simonden again)

pcbs.jpg


Need to find the pins/sockets for these connectors if anyone knows off-hand what they are?

connectors.jpg


(white connectors on white paper isn't great..i'll take a better picture later)

Also bought a Nintendo Joystick with a 2-way restrictor plate from JonathanClayton last week. Plan on using this as the joystick until I can source a Nichibutsu cocktail control panel I can rob the stick and buttons off..

If you still have that Bezel and/or Marquee then i'd be interested in buying it if it is for sale?

If not I'd at least like to get a really good scan of it if that is possible?

The repo's that pezley did are really good and i'm close to ordering some print-to-plexy from muddymusic.

I would really like to get this cabinet in a presentable state by May and maybe even get it to Revival..
 

Jon-A-Tron

Active member
Feedback
2 (100%)
Credits
228CR
Thanks to screenburn for agreeing to part with his bezel and marquee this restoration has taken a huge leap forward!

20180326_165831~2.jpg


Here's some better pics of the connectors i'm still looking for pins/sockets for. Anyone know where i can find them?

20180326_165151~2.jpg
 

simonden

Active member
vacBacker
Feedback
20 (100%)
Credits
1,041CR
JonTron said:
Here's some better pics of the connectors i'm still looking for pins/sockets for. Anyone know where i can find them?

Farnell sell them still - they are standard JST. I will dig out part numbers in a few days.
 

Jon-A-Tron

Active member
Feedback
2 (100%)
Credits
228CR
Ok, thanks.

Been working on the PCB tonight. Gave the whole board a good look over. Found chip at 6L with a leg sticking out and a leg missing. Popped it out, cleaned it up, gave it a new leg and popped it back in. Also re-connected the resistors R82-R86 that had all been cut out. All the traces look good and all the solder looks like it was done last week. Clean and shiny. Was going to go round and re-flow but doesn't need it.

EPROMS

Went to go and burn the EPROMS for Moon Alien or Moon Alien II. I have a few ROM files for these games but the all have weird ROM numbers. I'm used to seeing the ROM number correspond to the location the chip goes but these numbers are different.

On my Moon Alien romset I've got;
  • 1H
  • 1K (ok with these two)
  • ca1
  • ca2
  • prg2
  • prg3
  • prg5 (none of these correspond to a location I can put my finger on)
There is also a load of other files like galmidw.u and galx.u

On Moon Alien II there is;
  • md-1.a
  • md-2.b
  • md-3.d
  • md-4.g
  • md-5.h (c/c++ header file??)
  • md-6.f
And then K1 and H1 again.

Anyone know were all these EPROMs should go and in what order?

For Moon Alien II I was thinking the letter matched the daughter board spaces. a/b/(c missing)/d/(e missing)/f/g
 

R64

Newbie
Credits
2CR
Hey everyone, sorry I haven’t been able to contribute on this recently, as I’m focused on my games room build (!!).
It’s a bit of a yak shave, but, I might be able to get some better pics if the control panel, but I’ll need some help.

There is a chap here in Oz who sells the square buttons required for this control panel. He has lots of them, but they’re yellow (not an insurmountable problem), and he’s a bit averse to using the post office, and a little jaded by the local scene (read: curmudgeonly). So I am thinking of putting in a big order for these NOS buttons, and throwing a few bucks at him for the for some scans or HQ pics of the CPO in the deal. An offer he can’t refuse.

So

Who need these buttons? I’d be happy to package and post them anywhere to get it moving.
If anyone can chuck in a donation to help bribe the dude that would be super. If you’ll allow me to use the exchange rate as a margin, we should be able to build up enough to motivate this fellow, you’ll get the buttons and the scans.

Say, £3 per button, £15 towards domestic + international postage, + £10 bribe.

I’ll put in the same amount obviously. Apologies if this is off topic or against rules.
 

Jon-A-Tron

Active member
Feedback
2 (100%)
Credits
228CR
Sound like a plan Ryan. I'll have a few buttons and put in some 'leverage' cash. Wont be this month but i'll send you a message.

I still have the Moon Quasar panel which is the same as Moon Alien but with the silver and black inverted. I'm working on the scans and with Gimp image software, but its a long and painful learning curve.

Also working on the scans of the bezel and marquee that i'll upload to the dropbox when they are done. Handheld scanner i bought is ok but the scans are dark and 'wavy' due to it being scanned by hand. Complete images though.
 

Jon-A-Tron

Active member
Feedback
2 (100%)
Credits
228CR
It's been a while so due an update:

2018 was a rough year for me arcade wise. It started off great as I re-arraigned my game room, got 3 of my cabs working at the same time, things were coming together for Moon Alien, it was shaping up nicely. Then my driving cab developed a steering fault (which I now think is a pcb issue), my Pi2Jamma board started giving me problems and my MVS 1 slot developed RAM issues (which I tried to replace but messed up the board). I lost heart and took a step back from arcade stuff concentrating more on console stuff.

Revival was a highlight though and Space Fever was rock solid all weekend and still is. Hopefully it will be back this year.

On to Moon Alien.

I have renewed energy for the project again and have been working on some bits and pieces. I was lucky enough to find a Moon Alien cocktail on eBay last year for a good price. Monitor was no good but I only needed it for the parts as it was complete. With all the bits i'd been picking up previously everything was in an unknown state with the pcb from Norway being different roms and not being able to test the different boards like the psu and credit board due not having the wiring harness with the proper connectors. Getting the cocktail solved all of this. I even picked up a Moon Cresta pcb so I can play both in the same cab once its finished.
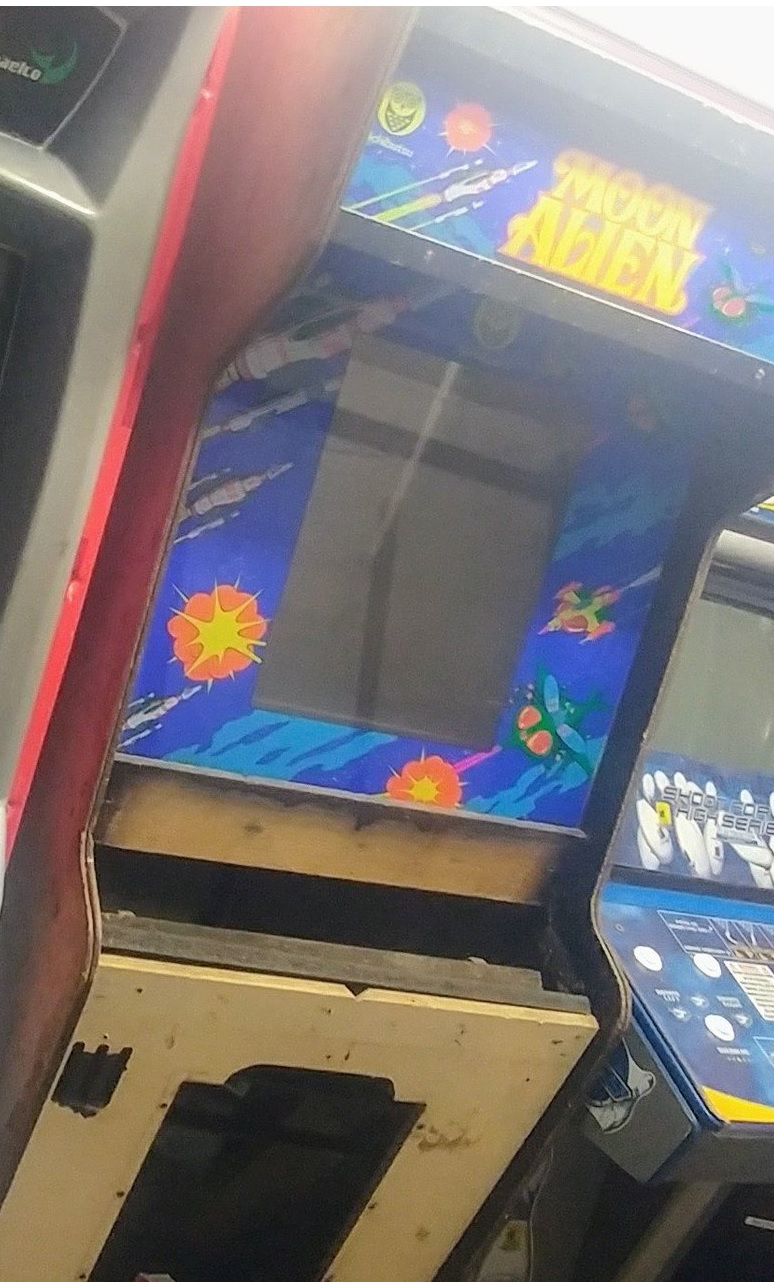
Side Art

I am resigned to the fact that the side art will not appear in time for this project. This cabinet will be a re-creation rather than a restoration from now on. With that I have been learning InkScape (because its free) and creating the side art to my best abilities. This is what will go on my cabinet, for now. If the original art turns up then I will re-do it. I did think of commissioning a proper artist to do the artwork but I cant afford that at this time Maybe in the future.

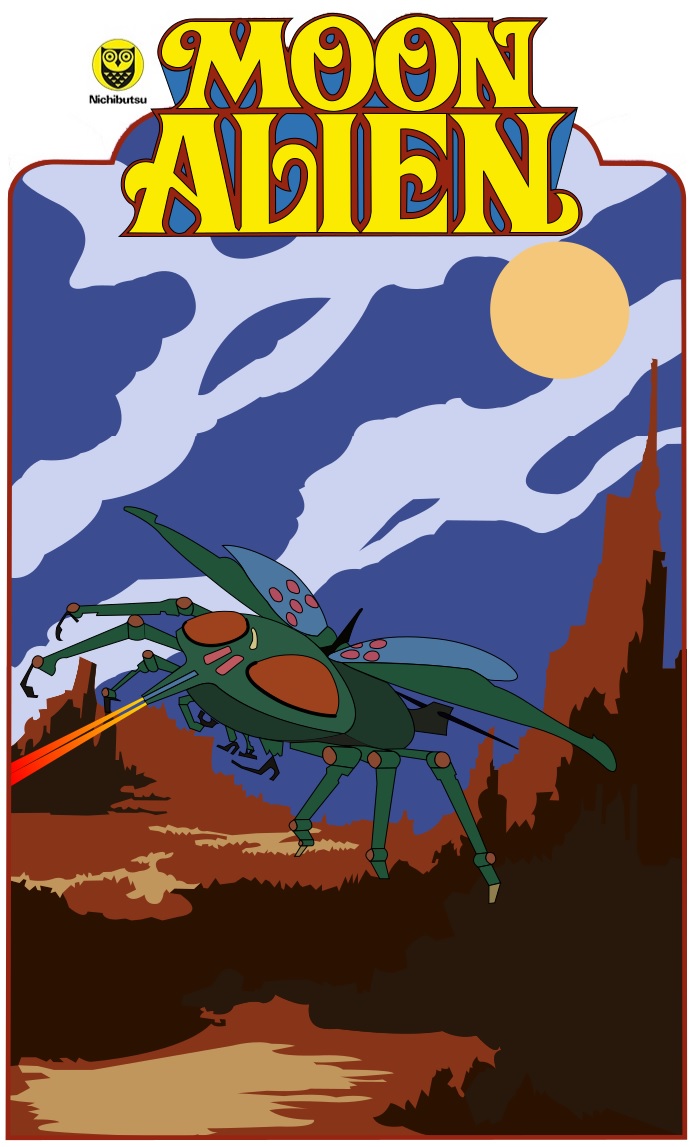
Not finished, but here's my side art vectorised so far.

MA_Side_Art_v1.jpg


Here's the flyer image.

Moon_Alien_Part_2_-_1980_-_Nichibutsu.jpg


Obviously some things more to add and some colour issues but happy with how my 1st venture into Vectorising images is coming along.

Control Panel

With the physical control panel for Moon Quasar in my hand the CP has been a lot better to reproduce. I have made the panel larger to fit the size of the cabinet and inverted the colours to match the panel as shown on the flyer. With Greys/Silvers becoming Black and visa-versa.

Again, colours aren't perfect and I don't know how to do the dot-gradient on the colour sections, but I think it is coming along great.

MA_Panel_v1.jpg


Here's the Moon Quasar Panel.

PanelScan_v3.jpg


The cocktail also provided me with a proper Nichibutsu Joystick and real Nichibutsu Red Square P1/P2 Start Buttons. Unfortunately the fire button was not the proper red button with raised white collar so that's still on the to-get list.

I also have the cocktail instructions which I will copy for the right side of the panel. I will have to make something up for the vertical part of the panel.

Cabinet

I change shifts this week and so will now have more time in the week to concentrate on the cabinet. With the days getting longer again and spring around the corner, I'm looking forward to working on it. I have the marquee and bezel in place as a nice reminder as to how close I am to getting this thing done.

cab1.jpg


Cheers,

JT
 

Jon-A-Tron

Active member
Feedback
2 (100%)
Credits
228CR
Also given myself a target finish date of mid May. I would like to take it to Revival this year. Would be great to see it within 5 miles of the original Nichibutsu UK factory.
 

Jon-A-Tron

Active member
Feedback
2 (100%)
Credits
228CR
Update.

Major setback on this project now. I have been working on the art for this cab for what seems like over a year now, on and off. My last big push was to get the control panel completed. That can be seen a few posts up. The side art was always the more difficult task but my recreation of it was coming along nicely and was something I would be happy with until the real thing came along.

Unfortunately my PC took a crap this weekend and I've had to re-install windows. I had been saving all my pictures and work to an external hard drive. Or so a thought. After the re-install I loaded everything back up and I would seem my working Inkscape files are gone. I only have the low res copies that I used to upload them here saved on my external hard drive. Seems like i'm back to square one.

At least I have gained a bit of knowledge on how to use Inkscape but knowing how long it will take to get back to where I was is not filling me with joy to rush back to it.

This project is therefor on-hold for the foreseeable future.

Maybe after the Pole Position is done I will get back into Inkscape.
 

Flinnster

The Dino King
vacBacker
Feedback
29 (100%)
Credits
2,562CR
Oh sh*t
smiley19.gif
smiley6.gif
Been there and lost source forever. I feel your pain
smiley3.gif


Hindsight is awesome for us all but 2 rules in life...


1- Save as you go


2- Backup, backup, backup
 

Jon-A-Tron

Active member
Feedback
2 (100%)
Credits
228CR
Yes. I saved all the time. My error was after creating a folder in the external drive to save the files to the program obviously reverted back to c: at some point and I didn't notice.

I spent a bit of time recovering photos and important files from the c:drive before reverting windows. The Inkscape files were not files I even thought about until it was too late.
 

Jon-A-Tron

Active member
Feedback
2 (100%)
Credits
228CR
So after 6 months of feeling sorry for myself and not wanting to do anything arcade related, I finally sat down and got to work on re-doing the side art.

Here it is in its first pass complete version. I still have details to add and some tidying up to do but, everything is in place and sort of where I want it. I certainly have used some 'artistic licence' with this so it is a bit of a mix between the flyer and the angled side art picture.

MA_Side_Art_v2.png
 

Alpha1

Do the Shake and 'VAC
Staff member
vacBacker
Feedback
85 (99%)
Credits
5,223CR
Is the laminate on the sides original? Just wondering if it's been stuck on and the white sides with art is hiding underneath.
 
Top