
You are using an out of date browser. It may not display this or other websites correctly.
You should upgrade or use an alternative browser.
You should upgrade or use an alternative browser.
Repoing Universal 4/8 way Joysticks + Buttons
- Thread starter Phils Arcade
- Start date

Could you not cut out the metal contacts yourself and then 3D print the housing?Okay, found a supply of leaf switches, though the cost is way more than I thought it would be.
Supplied by flippers.com.
View attachment 42267
What do you guys think, considering you will need 4 of them?

Could you not cut out the metal contacts yourself and then 3D print the housing?
I'm actually thinking something similar. Looking to possible laser or CNC out the contacts and make a mould, insert the contacts, and either use the mini injection moulder, or resin cast them. Probably resin cast as it's a lot less time for a small batch.
So day two of the weekend and managed a few hours in.
This was a lot, and I mean A LOT, of repetitive work.
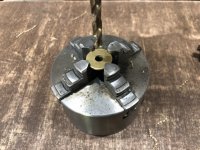
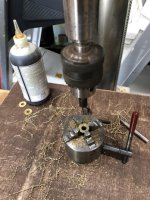
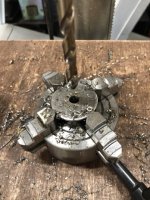
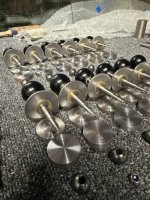
Took the 4 jaw mini lathe chuck and mounted it vertically on the drill press. It's really a job for the mill, but it needs an overhaul so that will be one for another day.
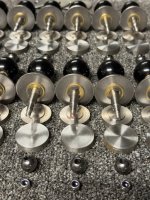
The joystick uses 2 brass spacers which I managed to get 50 of these, but with a very small hole diameter so first job to to drill these out to 8.8mm, then ream it out to a final 9mm, same as the shaft. Then add a small inner chamfer to the hole on each side. So that's 250 times, swapping in and out the spacers to get to the final part. Phew!


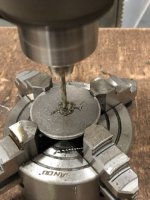
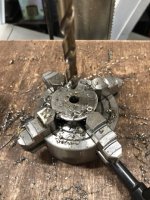
Next we move onto the BIG washer. This is stainless steel and a nice chunky 2.5mm thick. The original is 2mm, but this just feels so much more solid. Again this was a repeated process. Drill pilot hole, work up to 8.8mm and ream out to a final 9mm, then chamfer both sides. So glad that that part is finished.
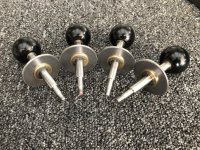
Once everything was cleaned up, it was time to start assembling. This is the main shaft now complete.
Think I'll have a wee rest now and a glass or two of whiskey to settle for the night.
Next up will be the bearing and bushing assembly. This'll be fun.
This was a lot, and I mean A LOT, of repetitive work.
Took the 4 jaw mini lathe chuck and mounted it vertically on the drill press. It's really a job for the mill, but it needs an overhaul so that will be one for another day.
The joystick uses 2 brass spacers which I managed to get 50 of these, but with a very small hole diameter so first job to to drill these out to 8.8mm, then ream it out to a final 9mm, same as the shaft. Then add a small inner chamfer to the hole on each side. So that's 250 times, swapping in and out the spacers to get to the final part. Phew!
Next we move onto the BIG washer. This is stainless steel and a nice chunky 2.5mm thick. The original is 2mm, but this just feels so much more solid. Again this was a repeated process. Drill pilot hole, work up to 8.8mm and ream out to a final 9mm, then chamfer both sides. So glad that that part is finished.
Once everything was cleaned up, it was time to start assembling. This is the main shaft now complete.
Think I'll have a wee rest now and a glass or two of whiskey to settle for the night.
Next up will be the bearing and bushing assembly. This'll be fun.
Attachments
Just an update on putting your name down, costs, taking monies and a few random words.
Random bit
I have this progress build on a couple of places, and each are asking the same questions, either on the thread, or via private messages.
First up, I'm doing this in my spare time and I'm not an engineering firm, as such it may take a little bit longer,.
I've my own workshop used for making parts I can't source, or to weld broken sections of a machine, etc... It's not the most hi-tech, far from it, but it does suit what I need it to do.
I am in the process of building out a new workshop, mainly used for repairing cabs and will be updating a number of machines once built, which will make creating things like this a lot easier, thus quicker.
Putting your name down, cost
I've a list of people that have expressed an interest across the different sites, now totalling almost 30. I know from past experience that many people asked to put their name down, but never actually want one when the time comes. Maybe they are no longer interested, machine has since been sold, or they have already found the parts they were after. So I'm doing an initial batch of 15 joysticks. Once these are sold, I'll start on a second batch and so forth. Once everyone has theirs, I'll offer parts so people that want to refurbish their joysticks can do so.
I'm NOT taking any money at the minute. I don't say I'm going to do something, take a bunch of cash, and never deliver, like some others that many in the community are aware of. I'll continue to post the progress, along with photos so you can all see the progress being made and not just a scam. Once these are complete then I'll offer them out.
The cost. This is a tricky one. I was looking to get the joystick made, with whatever variety people wanted, for around £100 - £130 plus shipping. This is a lot less than sending it out to be made by an engineering firm, or those online fabrication sites. I've enquired in the past with quotes coming back close to £350 each. Small batches just don't warrant the work for them.
I was hoping that the cost of the leaf switches wouldn't be too expensive, but this doesn't seem to be the case. That one switch at Flippers.com in at $40 was a shock. That's $120 just for switches, plus shipping, if you purchased from them. Almost the cost of the entire joystick. Maybe I am selling way too cheap, lol.
To that end, I'll probably end up repoing those as well so might end up pushing the cost up slightly, maybe by an extra £15 or so, to cover the time and materials needed. Just letting you know now.
My end goal
Once the workshop has been completed, hopefully before the end of this year, and the new, well new to me, tooling has been setup, I've about 30 or so cabs to get refurbished.
On top of that I'm looking to be able to add small batch engineering work for those in the community that need it.
And as I've asked many times in the past, if you have a Universal joystick, please take photos of it if you can, see how it's made and I'll document the differences.
Thank you all for your support so far.
Phil
Random bit
I have this progress build on a couple of places, and each are asking the same questions, either on the thread, or via private messages.
First up, I'm doing this in my spare time and I'm not an engineering firm, as such it may take a little bit longer,.
I've my own workshop used for making parts I can't source, or to weld broken sections of a machine, etc... It's not the most hi-tech, far from it, but it does suit what I need it to do.
I am in the process of building out a new workshop, mainly used for repairing cabs and will be updating a number of machines once built, which will make creating things like this a lot easier, thus quicker.
Putting your name down, cost
I've a list of people that have expressed an interest across the different sites, now totalling almost 30. I know from past experience that many people asked to put their name down, but never actually want one when the time comes. Maybe they are no longer interested, machine has since been sold, or they have already found the parts they were after. So I'm doing an initial batch of 15 joysticks. Once these are sold, I'll start on a second batch and so forth. Once everyone has theirs, I'll offer parts so people that want to refurbish their joysticks can do so.
I'm NOT taking any money at the minute. I don't say I'm going to do something, take a bunch of cash, and never deliver, like some others that many in the community are aware of. I'll continue to post the progress, along with photos so you can all see the progress being made and not just a scam. Once these are complete then I'll offer them out.
The cost. This is a tricky one. I was looking to get the joystick made, with whatever variety people wanted, for around £100 - £130 plus shipping. This is a lot less than sending it out to be made by an engineering firm, or those online fabrication sites. I've enquired in the past with quotes coming back close to £350 each. Small batches just don't warrant the work for them.
I was hoping that the cost of the leaf switches wouldn't be too expensive, but this doesn't seem to be the case. That one switch at Flippers.com in at $40 was a shock. That's $120 just for switches, plus shipping, if you purchased from them. Almost the cost of the entire joystick. Maybe I am selling way too cheap, lol.
To that end, I'll probably end up repoing those as well so might end up pushing the cost up slightly, maybe by an extra £15 or so, to cover the time and materials needed. Just letting you know now.
My end goal
Once the workshop has been completed, hopefully before the end of this year, and the new, well new to me, tooling has been setup, I've about 30 or so cabs to get refurbished.
On top of that I'm looking to be able to add small batch engineering work for those in the community that need it.
And as I've asked many times in the past, if you have a Universal joystick, please take photos of it if you can, see how it's made and I'll document the differences.
Thank you all for your support so far.
Phil
So I managed to order some of the Universal buttons from Flippers.com which are advertised as NOS.
These have arrived and the quality seems to be very cheap. Was wondering if others that have the original buttons on their machines please check.
Also can someone take a couple of photos of how these are mounted on their cabs as well.
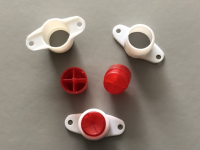
I'm looking to make reproduction versions of these at some point, and want to get as many details as possible.
I'm also looking for as many of the original manuals and technical data sheets for the Universal cabs as well. Problem is shipping from the States can be quite expensive so costs per manual would need to be quite low. If any of our European friends have any, please get in contact.
Thanks again to all that have helped so far.
These have arrived and the quality seems to be very cheap. Was wondering if others that have the original buttons on their machines please check.
Also can someone take a couple of photos of how these are mounted on their cabs as well.
I'm looking to make reproduction versions of these at some point, and want to get as many details as possible.
I'm also looking for as many of the original manuals and technical data sheets for the Universal cabs as well. Problem is shipping from the States can be quite expensive so costs per manual would need to be quite low. If any of our European friends have any, please get in contact.
Thanks again to all that have helped so far.
They look like std flipper buttons mount inside cabinet and press against a single leaf contact set to actuate flippers on pinball?
Yeah, but the quality feels all wrong. I've ordered some others to see if they're the same.
I've managed to track down a couple more of the buttons and these have now been delivered as well.
These are a lot more like what I'd expect them to look and feel like, which are a marked improvement over the first batch that was delivered.


The quality of the plastic is a lot stronger and thicker and feels a lot more like what I thought they'd should be.
You can even see the difference in the red colour, much more like the ones used in the Universal control panels.

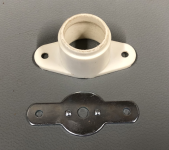
The button housing also feels to be of better, stronger material. Also ordered the metal backing plate that the protruding portion of the button goes through in order to make contact with the leaf switch.
Looking at how the switch, housing and backing plate goes together, it may be possible to make a small disc that has a couple of low voltage LEDs, allowing the button to be lit from underneath, which may be of interest to those that have this style in their cabs.
These are a lot more like what I'd expect them to look and feel like, which are a marked improvement over the first batch that was delivered.
The quality of the plastic is a lot stronger and thicker and feels a lot more like what I thought they'd should be.
You can even see the difference in the red colour, much more like the ones used in the Universal control panels.
The button housing also feels to be of better, stronger material. Also ordered the metal backing plate that the protruding portion of the button goes through in order to make contact with the leaf switch.
Looking at how the switch, housing and backing plate goes together, it may be possible to make a small disc that has a couple of low voltage LEDs, allowing the button to be lit from underneath, which may be of interest to those that have this style in their cabs.
A look at the plastic Universal joystick
Here we have the all elusive plastic moulded joystick, in all its broken down parts.

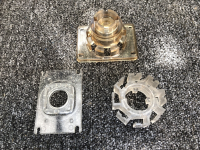
The two plastic flat discs are the dust cover and leaf swift striker. Both have the UNIVERSAL logo in raised letters on them.
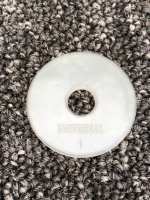
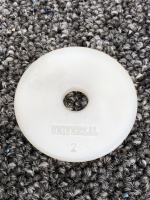
The joystick shaft is another variation out there. This seems to have the knob moulded onto the shaft, as it doesn't want to unscrew or pull off. Don't want to force it too much.
The knob is also a different shape, and again, with the UNIVERSAL logo in raised letters across the top. A bit hard to make out in the photo.


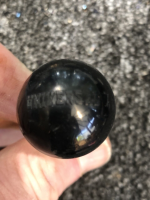
If there's enough interest, I might try and reproduce this style as well.
Would also love to know which games this style of joystick was used in.
Here we have the all elusive plastic moulded joystick, in all its broken down parts.
The two plastic flat discs are the dust cover and leaf swift striker. Both have the UNIVERSAL logo in raised letters on them.
The joystick shaft is another variation out there. This seems to have the knob moulded onto the shaft, as it doesn't want to unscrew or pull off. Don't want to force it too much.
The knob is also a different shape, and again, with the UNIVERSAL logo in raised letters across the top. A bit hard to make out in the photo.
If there's enough interest, I might try and reproduce this style as well.
Would also love to know which games this style of joystick was used in.
So with house renovations, now onto my third, getting the workshop build going again, at least now I have walls, a roof and some doors, lol, and taking delivery of a number of project cabs, I'm now getting back to these joysticks.
Part of the issue was needing to get the bench mill overhauled as I had bought this of Facebook marketplace locally but in a non-working, rusty, order. I'll cover that in my workshop build thread later.
But needless to say it is now nice and clean and working again. So I'll be able to get started on these.
Two things needing done will be for the bearing and bearing housing. I need to make a jig that will hold the bearing securely in place as I drill a hole for the bottom of the joystick shaft to pass through, and the bearing housing needs the bearing shape centred into the upper and lower halves of the housing, and the three mounting holes drilled out.
So will starting on the bearing jig this weekend, and if everything works out, can start on the bearings themselves.
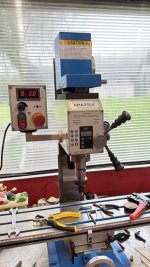

Part of the issue was needing to get the bench mill overhauled as I had bought this of Facebook marketplace locally but in a non-working, rusty, order. I'll cover that in my workshop build thread later.
But needless to say it is now nice and clean and working again. So I'll be able to get started on these.
Two things needing done will be for the bearing and bearing housing. I need to make a jig that will hold the bearing securely in place as I drill a hole for the bottom of the joystick shaft to pass through, and the bearing housing needs the bearing shape centred into the upper and lower halves of the housing, and the three mounting holes drilled out.
So will starting on the bearing jig this weekend, and if everything works out, can start on the bearings themselves.
Wish I had the space for a workshop full of equipment, its just so good to be able to make most things you need
Seems it doesn't matter how much space you create, it eventually gets filled, lol.
So, over the weekend was kept really busy doing some more renovation work on the wee girls house. Pulling walls and ceilings down, building new stud walls and running cabling. All the usual fun stuff.
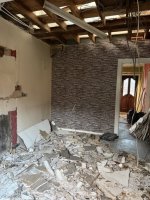

As there's no lighting there at the minute, and with the nights getting darker earlier, time was spent up at the workshop, doing some joystick work.
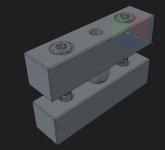
Trying to get my idea of how to safely drill a hole in a round object without causing extreme pain was first laid out in FreeCAD. This allowed me to get an idea of what it was going to look like, check tolerances, and depths of cut, before starting. Once in hand it was time to Get a list of cutting operations, and start making the bearing jig.
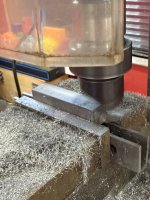
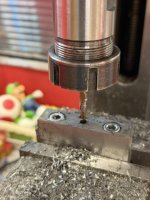
Once the jig was made, it was time to test it out. I did make a small boo boo, when I didn't quite align two of the holes up properly, but wanted to at least do an initial test, and hopefully fix it without have to make the top section again.
I had the option of using ordinary steel bearing, and once drilled, harden it, or use hardened stainless steel bearings. Nice thing about stainless, is it doesn't rust, but you do need carbide drill bits to drill through it. Ended up going for the stainless steel.
So with jig in hand, or should I say, the vice, load up the ball bearing and clamp down the top half, allowing it to clamp the bearing in place. Using plenty of cutting fluid, slowly brought the carbide drill bit down and started drilling. Going too slow or fast can create excess heat, and you end up hardening the metal even more.
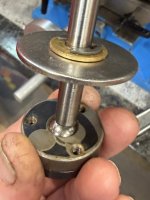
Once through the other side time to open it up and see the result. Quick test fit on the joystick to ensure it fits, and moves freely in the bearing housing. Still needs a bit of cleaning up, then create a few more.
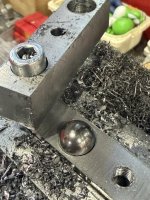
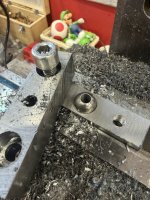
As there's no lighting there at the minute, and with the nights getting darker earlier, time was spent up at the workshop, doing some joystick work.
Trying to get my idea of how to safely drill a hole in a round object without causing extreme pain was first laid out in FreeCAD. This allowed me to get an idea of what it was going to look like, check tolerances, and depths of cut, before starting. Once in hand it was time to Get a list of cutting operations, and start making the bearing jig.
Once the jig was made, it was time to test it out. I did make a small boo boo, when I didn't quite align two of the holes up properly, but wanted to at least do an initial test, and hopefully fix it without have to make the top section again.
I had the option of using ordinary steel bearing, and once drilled, harden it, or use hardened stainless steel bearings. Nice thing about stainless, is it doesn't rust, but you do need carbide drill bits to drill through it. Ended up going for the stainless steel.
So with jig in hand, or should I say, the vice, load up the ball bearing and clamp down the top half, allowing it to clamp the bearing in place. Using plenty of cutting fluid, slowly brought the carbide drill bit down and started drilling. Going too slow or fast can create excess heat, and you end up hardening the metal even more.
Once through the other side time to open it up and see the result. Quick test fit on the joystick to ensure it fits, and moves freely in the bearing housing. Still needs a bit of cleaning up, then create a few more.
Great ‘jig job’ improvisation , seems to work and keep hole central … 👍
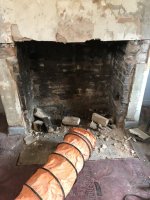
As for the house .. you are not alone, we too yesterday got the coal fire grate “repossessed” leaving a huge hole and a room full of dust plus a front garden full of house parts (bricks,cement,grate tiles and a big bag of soot)
Happily got 2 guys in to install a multi fuel wood burner , and chimney liner, but lose the free hot water which the fire used to heat.
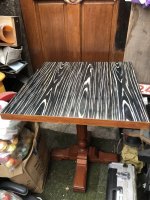
Not quite the upheaval you have in the house but it drove the wife and I to doing a pinball repair myself and she refurbished a cafe table for daughters new house …sanded and fablon type overlay .
“Motivation”… good thing it’s a nice day !
As for the house .. you are not alone, we too yesterday got the coal fire grate “repossessed” leaving a huge hole and a room full of dust plus a front garden full of house parts (bricks,cement,grate tiles and a big bag of soot)
Happily got 2 guys in to install a multi fuel wood burner , and chimney liner, but lose the free hot water which the fire used to heat.
Not quite the upheaval you have in the house but it drove the wife and I to doing a pinball repair myself and she refurbished a cafe table for daughters new house …sanded and fablon type overlay .
“Motivation”… good thing it’s a nice day !
Attachments


Last edited:
Now that is something that most don't do these days, buying a house the needs work and doing it yourself or Family/friends helping, most just want a new house, move straight in with everything done and huge mortgage it's lovely to see that Phil
Made me think when I used to watch home under the hammer and house near me for auction and it says because there is no functioning kitchen or bathroom you can't get a mortgage on it, it's like they don't want 1st time buyers able to get cheap properties, what does it matter as long as the house is okay structurally with decent roof, even if it's completely stripped inside, and one near me still sold for like 160k like that, they can be living with parents close by and doing the house up, don't need to live in it straight away
This is what many did in the good ol days like my parents, they sold the first house after my dad had made it look decent and they bought bigger one few roads away that didn't even have central heating, they only needed to borrow like a grand but had issue getting money from the bank, me Gran lent them the money and they paid her back and my dad slowly did the house up, only had odd people in to do things he couldn't but 95% he did himself so they were mortgage free when we were probably 10 years old and they were in late 20s early 30s which takes a huge pressure off you
Made me think when I used to watch home under the hammer and house near me for auction and it says because there is no functioning kitchen or bathroom you can't get a mortgage on it, it's like they don't want 1st time buyers able to get cheap properties, what does it matter as long as the house is okay structurally with decent roof, even if it's completely stripped inside, and one near me still sold for like 160k like that, they can be living with parents close by and doing the house up, don't need to live in it straight away
This is what many did in the good ol days like my parents, they sold the first house after my dad had made it look decent and they bought bigger one few roads away that didn't even have central heating, they only needed to borrow like a grand but had issue getting money from the bank, me Gran lent them the money and they paid her back and my dad slowly did the house up, only had odd people in to do things he couldn't but 95% he did himself so they were mortgage free when we were probably 10 years old and they were in late 20s early 30s which takes a huge pressure off you

I am sure that you probably have ... but ... if you run some solid shielded CAT6E or CAT7 (or even just conduit with enough room for soft bends therein) ... then, trust me, in years to come, someone will be so grateful that you did. 🙏
So, over the weekend was kept really busy doing some more renovation work on the wee girls house. Pulling walls and ceilings down, building new stud walls and running cabling. All the usual fun stuff.
View attachment 65341 View attachment 65342
As there's no lighting there at the minute, and with the nights getting darker earlier, time was spent up at the workshop, doing some joystick work.
Trying to get my idea of how to safely drill a hole in a round object without causing extreme pain was first laid out in FreeCAD. This allowed me to get an idea of what it was going to look like, check tolerances, and depths of cut, before starting. Once in hand it was time to Get a list of cutting operations, and start making the bearing jig.
View attachment 65343 View attachment 65344 View attachment 65345
Once the jig was made, it was time to test it out. I did make a small boo boo, when I didn't quite align two of the holes up properly, but wanted to at least do an initial test, and hopefully fix it without have to make the top section again.
I had the option of using ordinary steel bearing, and once drilled, harden it, or use hardened stainless steel bearings. Nice thing about stainless, is it doesn't rust, but you do need carbide drill bits to drill through it. Ended up going for the stainless steel.
So with jig in hand, or should I say, the vice, load up the ball bearing and clamp down the top half, allowing it to clamp the bearing in place. Using plenty of cutting fluid, slowly brought the carbide drill bit down and started drilling. Going too slow or fast can create excess heat, and you end up hardening the metal even more.
Once through the other side time to open it up and see the result. Quick test fit on the joystick to ensure it fits, and moves freely in the bearing housing. Still needs a bit of cleaning up, then create a few more.
View attachment 65346 View attachment 65347 View attachment 65348
I am sure that you probably have ... but ... if you run some solid shielded CAT6E or CAT7 (or even just conduit with enough room for soft bends therein) ... then, trust me, in years to come, someone will be so grateful that you did. 🙏
When I renovated our own house quite a few year ago, I installed CAT6e. Used it until WIFI was fast enough, now never use it. Every room fitted with ethernet sockets, just taking up space on my wall, lol. A good mesh network works great for everyone on it, though I do have cabling running up to the BIG shed and the workshop, so that is a plus.
I totally agree, Wi-Fi is great for ease of use for all the easy stuff and the (expensive initial outlay for the) quality you've got with your mesh is also even more brilliant (if one can afford it) but I only mentioned the cabling because you had the walls open and thought ... you know ... it is just always handy in the future.
That being said, Wi-Fi uses a *lot* of power and is terrible for even casual online gaming ... but other than that ... it's magic! 🪄 🏆
Many (high end) speaker manufacturers use it for their speaker terminals (shielding means easier proximity to power lines? I dunno) but you can also run power through it, not just for PoE devices, but you can also power (lower/similar to PoE voltages) devices, or send control signals such as might be sent over internally wired stuff that you wish to separate out. Basically ... simply having the conduit available gives you options that you didn't have previously.
That being said, Wi-Fi uses a *lot* of power and is terrible for even casual online gaming ... but other than that ... it's magic! 🪄 🏆
... even Wi-Fi 6 / 7 (whatever the standard is now) with MIMO has never been reliable enough for work, play, and *especially* for media consumption.
So, network cables are a pre-requisite in everything I do ... network-wise ... where I live. I can always rely on the connection made there without wondering, as opposed to wondering whether or not the Wi-Fi being a dick.
Plus, it's easier for simplifying (and separating from the main NW) things like home automation, etc. or just ensure that one can watch a full fat Blu-Ray without worrying whether or not the Wi-Fi either being battered by everyone or down for some reason.
Wi-Fi is just too complex for me to really get my head around, too. No lie, some devices just flat out refuse to connect to some Wi-Fi, there's the worry about doing a good enough password, what is everyone ACTUALLY doing on it? Etc ... etc ... etc. That's before we get to setting up ma + pa's Wi-Fi ... y'know?
Plus ... with the Wi-Fi off no-one can snoop on my movements!
EDIT: Forgot to mention ... Ethernet cable is not just useful for networking.When I renovated our own house quite a few year ago, I installed CAT6e. Used it until WIFI was fast enough, now never use it. Every room fitted with ethernet sockets, just taking up space on my wall, lol. A good mesh network works great for everyone on it, though I do have cabling running up to the BIG shed and the workshop, so that is a plus.
Many (high end) speaker manufacturers use it for their speaker terminals (shielding means easier proximity to power lines? I dunno) but you can also run power through it, not just for PoE devices, but you can also power (lower/similar to PoE voltages) devices, or send control signals such as might be sent over internally wired stuff that you wish to separate out. Basically ... simply having the conduit available gives you options that you didn't have previously.
Last edited:
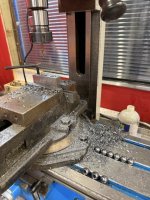
So back at it to get the bearings out of the way. I managed to sort out the slight booboo on the top section, by removing 1/4" of the surface, and regrinding it flat again.
If I have to do another batch of these bearings again, I think I'll redo the jig to make it easier to get a quick production going. With the clamping being so tight, I thought I might get away with just the one bolt holding it in place. Unfortunately not. The bearing inside must have slipped causing the carbide bit to snap, ugh! Luckily I had another just just made sure to tighten both bolts.
I think I might end up knurling the tops of the bolt heads. This is where you create an embedded pattern, such as a crosshatch pattern in order to better grip it. Easier for quickly tightening/loosening before needs nay tools. With oily fingers on a smooth surface, it's too slippery to grip.
With these now done, it's onto the bearing housing. This'll be fun. The two halves have to be shaped in such a way that they clip into each other, and rounded internally to hold the bearing. Loose enough to allow the bearing to move, but not too tight where the bearing ends up binding on the housing, causing it to stick.
We also have 3 holes at 120 degrees apart, on each side to get drilled out, one allows the bolts to pass through, and the other is slightly smaller and threaded on order to grip the bolt and hold the two halves together. Once this is complete, that'll be the full joystick assembly finished. Next up will be the frame, top and bottom and the leaf switches. Still plenty to do, but getting less each day.

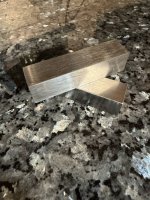
So tomorrow will be to get the workshops cleaned up after all that drilling and making the jig. Way too much mess and cutting fluid. This weekend I'll start looking at how best to get the bearing housing halves created. You can see in the pictures, both half blanks are now made, so it's the hard part to get sorted.
Just to let you all know. Once I get to selling these, the proceeds generated will mostly go back into the workshop again. I'd like to upgrade some of this equipment to make it easier and quicker to repo these type of parts in the future. I've a number of projects in the pipeline, such as Atari button cones and switches, Major Havoc roller assembly, Missile Command trackball assembly and ball, etc... Also a number of other joysticks. If there's something that you'd like to see, let me know, and if enough interest, I'll look into it.
Thanks everyone so far for your support.
Phil
If I have to do another batch of these bearings again, I think I'll redo the jig to make it easier to get a quick production going. With the clamping being so tight, I thought I might get away with just the one bolt holding it in place. Unfortunately not. The bearing inside must have slipped causing the carbide bit to snap, ugh! Luckily I had another just just made sure to tighten both bolts.
I think I might end up knurling the tops of the bolt heads. This is where you create an embedded pattern, such as a crosshatch pattern in order to better grip it. Easier for quickly tightening/loosening before needs nay tools. With oily fingers on a smooth surface, it's too slippery to grip.
With these now done, it's onto the bearing housing. This'll be fun. The two halves have to be shaped in such a way that they clip into each other, and rounded internally to hold the bearing. Loose enough to allow the bearing to move, but not too tight where the bearing ends up binding on the housing, causing it to stick.
We also have 3 holes at 120 degrees apart, on each side to get drilled out, one allows the bolts to pass through, and the other is slightly smaller and threaded on order to grip the bolt and hold the two halves together. Once this is complete, that'll be the full joystick assembly finished. Next up will be the frame, top and bottom and the leaf switches. Still plenty to do, but getting less each day.
So tomorrow will be to get the workshops cleaned up after all that drilling and making the jig. Way too much mess and cutting fluid. This weekend I'll start looking at how best to get the bearing housing halves created. You can see in the pictures, both half blanks are now made, so it's the hard part to get sorted.
Just to let you all know. Once I get to selling these, the proceeds generated will mostly go back into the workshop again. I'd like to upgrade some of this equipment to make it easier and quicker to repo these type of parts in the future. I've a number of projects in the pipeline, such as Atari button cones and switches, Major Havoc roller assembly, Missile Command trackball assembly and ball, etc... Also a number of other joysticks. If there's something that you'd like to see, let me know, and if enough interest, I'll look into it.
Thanks everyone so far for your support.
Phil
Last edited: