Sega G-LOC Air Battle Deluxe restoration project

Mariobros3

User
Credits
124CR
;)

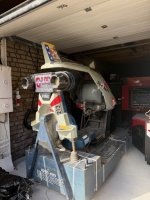
I recently acquired two Sega G-LOC Air Battle cabinets: an Upright and a Deluxe. This restoration project will focus on the Deluxe version, released in 1990.

The cabinet serial number is 327630.

The first inspection has revealed extensive dirt and corrosion, evidence of previous rodent activity, and unfortunately a broken CRT neck. However, the G-LOC game PCB appears complete and, beneath the dirt, shows no obvious damage at this stage.

I am keeping the complete chronological restoration log, with all the photographs and Sega part numbers I can identify, on the French Gamoover forum:

https://www.gamoover.net/Forums/index.php?topic=45923.0

Rather than duplicating the entire restoration log here, I will share the major milestones and any specific technical questions that may benefit from the UKVAC community’s experience.

I would, of course, be very happy to discuss the project here and hear from other G-LOC owners.

IMG_6204.jpegIMG_6205 2.jpeg
 

tb2000

Active member
Feedback
4 (100%)
Credits
3,503CR
Very nice! Shame the crt's broken. Looks to be the original Sanwa monitor. Rather than trying to find a replacement crt, you'd probably be just as well to put in a complete WG K7000 or Hantarex MTC900/E or 9000 (or 9000/A) monitor, though you'd need to change the 100v isolation transformer for a 120v or 128v one. Or put in a Hantarex Polo (or WG K7200 series) and you can ignore the iso (as it takes mains voltage).
 

Mariobros3

User
Credits
124CR
Very nice! Shame the crt's broken. Looks to be the original Sanwa monitor. Rather than trying to find a replacement crt, you'd probably be just as well to put in a complete WG K7000 or Hantarex MTC900/E or 9000 (or 9000/A) monitor, though you'd need to change the 100v isolation transformer for a 120v or 128v one. Or put in a Hantarex Polo (or WG K7200 series) and you can ignore the iso (as it takes mains voltage).
Thanks, you were right about the monitor being the original Sanwa unit.

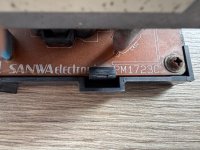
I have now removed it and found the following identifications:

  • CRT: Toshiba 510UEB22(W)
  • Monitor chassis: Sanwa Electronic PM1723C
Unfortunately, the neck of the CRT is broken, so the tube has lost its vacuum and is beyond recovery.

I have carefully removed the remaining glass and internal connections from the CRT socket. Fortunately, the socket, the neckboard and the main Sanwa chassis do not appear to have suffered any physical damage.

They are extremely dirty and show some oxidation, however, so they will be carefully cleaned and inspected before I can determine whether they are electrically serviceable.

Thank you as well for the replacement monitor suggestions. I will look into the different options once the cabinet has been completely stripped and its electrical system has been assessed.

For anyone interested, I am also documenting the dismantling and restoration in much greater detail in my WIP thread on Gamoover.

IMG_6340.jpeg

IMG_6365.jpeg
 

Mariobros3

User
Credits
124CR
;)

WIP Continuation

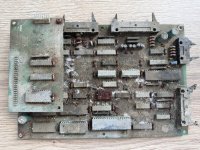
I have now removed the motion-system drive board from the bottom of the cabinet.

The assembly is identified as:

839-0340 — DRIVE BOARD G-LOC
839-0340-01 — DRIVE BOARD G-LOC

Unfortunately, it is in extremely poor condition. Both boards are covered with heavy dirt, white deposits and visible corrosion around several components, sockets, connectors and fixing points. I have also found more wires cut close to the connectors.

One mounting point was completely seized, so I had to cut one of the plastic PCB supports with a Dremel to remove the assembly without damaging the board itself.

I have never encountered a board in this condition before.

Do you think this assembly still has a realistic chance of being saved ?

IMG_6412.jpeg
 

tb2000

Active member
Feedback
4 (100%)
Credits
3,503CR
It's in a pretty bad state to say the least! First thing to do obviously is give it good clean. I'd guess it's not a multilayer pcb so shouldn't have any problems with broken traces on internal layers, though i'd bet there's a few broken traces here and there on top and/or underneath. I'd hope that the environmental seal on the various chips on there hasn't been broken but you never know. You'll certainly have to change all the sockets for the socketed chips and clean the legs of the chips. Any standard logic chips should be able to be changed out easily. Hopefully there's not any PALs on there (wouldn't surprise me if there is though). There'll probably be multiple corroded and broken legs on the chips, some may be able to be saved but if the corrosion has gone beyond the plastic casing into the chip it'll be harder to save.
 

John Bennett

Senior Member
vacBacker
Feedback
10 (100%)
Credits
5,249CR
If that works, I'll buy a hat and then eat it.
Sadly as said, it's often the case the corrosion has got inside the ICs.

These sorts of boards are usually a Z80 system (CPU/ROM/RAM/PALs), pulse feedback encoder chips and a PWM driver IC. Sounds like Berty/Luke had a good go at sourcing bits for one and couldn't manage it though :(. The sort of thing you could do most of in a <£1 microcontroller these days, but that's a homemade PCB. I'm not sure of the comms protocol to GLOC too - it's not the simple 4-wire binary speed code they used in Afterburner/Outrun. Can't say I've ever looked in detail though.
 

Mariobros3

User
Credits
124CR
Thanks everyone.

Yes, rodent urine is unfortunately a very plausible explanation for the extent of the corrosion.

I have now carried out an initial clean and separated the daughterboard from the main board. The component side remains in very poor condition, but the solder side is surprisingly well preserved, which gives me slightly more hope.

I will investigate whether the original board can be repaired, while also looking into OpenMotionGLOC as a possible alternative.

I will post further updates as the work progresses.

[EDIT] One more question: does anyone have a clear photograph or know the exact EPR number of the ROM fitted to this G-LOC Drive Board? The label on mine is unfortunately no longer readable.

IMG_6419.jpeg


IMG_6425.jpeg
 
Last edited:

John Bennett

Senior Member
vacBacker
Feedback
10 (100%)
Credits
5,249CR
You could probably find all of that from other boards, but it looks like it's got a lot of rotten tracks.
Did they use the GLOC drive board in anything else? (it's way more advanced that Outrun/SpaceHarrier/Afterburner*).
 

Mariobros3

User
Credits
124CR
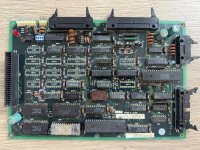
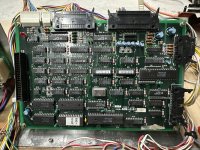
I have now compared it directly with the 839-0161 Drive Board fitted to my Galaxy Force II Deluxe.

The two boards appear to use the same base PCB, with the same layout, connectors and component references. The Galaxy Force version is more fully populated, while the G-LOC version leaves several logic positions empty and uses an additional daughterboard.

I cannot yet say whether the 839-0161 could be converted for use in G-LOC by changing the EPROM, PALs, daughterboard and/or configuration links. It may be possible and is certainly worth investigating.
IMG_1961.jpeg
 

John Bennett

Senior Member
vacBacker
Feedback
10 (100%)
Credits
5,249CR
Maybe you’ll get lucky and it’s just the program ROM to swap (or even the Galaxy Force just works, other than needing the G-LOC sub board). Depends how flexible/modular they made the design.
Ultimately it’s a lot of chips to not do that much.
 

Mariobros3

User
Credits
124CR
Yes, that is an interesting possibility.

However, the 839-0161 belongs to my Galaxy Force II Deluxe and will remain with that machine. I may eventually use it for a careful and completely reversible test, as well as a reference for comparing tracks and components.

My priority is still to find another original G-LOC Drive Board, or otherwise use an alternative solution if the damaged board cannot be repaired.
 

tb2000

Active member
Feedback
4 (100%)
Credits
3,503CR
Yeah could be swappable with little effort if you found another one that's from another game. Slightly different situation, but I remember a few years ago helping a local op I know well sort out his Namco Final Furlong 2 twin cab (it used to be at Flambards (opened in 1976, they closed down in November 2024)). The G-MEN board in one side went wrong so it woudn't go into the game, in Final Furlong 2 the pcb isn't as populated as the one found in a couple of the other games. I found a Gunmen Wars boardset for sale (which also uses the G-MEN board for a digital camera that takes a picture of the player's face and displays it in game), swapped the board into the Final Furlong 2 set and it worked perfectly. I'd suspect some of the circuitry on it just sat dormant in the Final Furlong 2. Later on I found a pair of working G-MEN boards for sale and bought them, used one I think as one went wrong in the same cab again but have still got another one spare somewhere, not that it's needed now!
 

Mariobros3

User
Credits
124CR
A small update to the restoration:

I have now removed and dismantled one of the two Sega 400-5117 DC Motor Driver units. The enclosure, fan and circuit board were heavily contaminated, but a first careful clean has already made the board much easier to inspect.

More photographs have been added to the restoration thread.
 

John Bennett

Senior Member
vacBacker
Feedback
10 (100%)
Credits
5,249CR
This board at least would be easily repro-able, that NEC chip is the same one that is used on the various Sega Trackball I/O boards, it's basically a mouse/trackball IC.
It's definitely repro-able, but depends if you want to spend at least a couple of man-weeks solid doing it (if you're creating schematics and doing it properly).
I probably would if it was mine, as I find copying PCBs track-for-track like a theraputic art-form :D, but it's a rather rare PCB sadly, so not many would benefit.
 

Shoryu-stu

Active member
Credits
333CR
;)

WIP Continuation

I have now removed the motion-system drive board from the bottom of the cabinet.

The assembly is identified as:

839-0340 — DRIVE BOARD G-LOC
839-0340-01 — DRIVE BOARD G-LOC

Unfortunately, it is in extremely poor condition. Both boards are covered with heavy dirt, white deposits and visible corrosion around several components, sockets, connectors and fixing points. I have also found more wires cut close to the connectors.

One mounting point was completely seized, so I had to cut one of the plastic PCB supports with a Dremel to remove the assembly without damaging the board itself.

I have never encountered a board in this condition before.

Do you think this assembly still has a realistic chance of being saved ?

View attachment 64340
You sure the time team didnt dig that up?!!:D
 
Top