You are using an out of date browser. It may not display this or other websites correctly.
You should upgrade or use an alternative browser.
You should upgrade or use an alternative browser.
Sega Naomi jamma
- Thread starter Pharo
- Start date
I gather they fit like this.
Cheers Brian
Should have big washers that cover the whole thing before nut, you got those?
Its the one thing I dont miss about having Naomis.Will send a pic of an ambulance at my door after I'm lying on the floor back gone and monitor lying on top of me.😂
Well that was a struggle but got there in the end 🤣,had to take the monitor back off after thinking I had it perfect as the bezel wouldn't fit as the monitor was to far out so took the the metal spacer off the back so it sat on the frame and it looks fine now.
A couple of questions now hope I can explain it right, there is 3 earth cables if looking at the cab one on the right which I connected hopefully in the right place one on the left which is 300mm long and one coming off the control panel with a connector on it.
Also still can't find where to plug in the degause cable that comes from the monitor I think I'm having a blonde moment.
Still got the monitor back casing to hopefully the bolts I need get delivered today 😄


Does the bezel fit the monitor perfectly, there are 2 usual ones Sanwa and Nano and one is curvier than the other, and 2 sets of the metal spacer, but the other one is thicker, can remember which one was for which monitor.
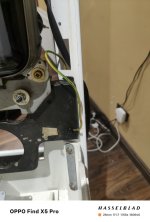
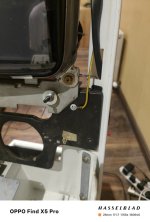
Not 100% sure on earth cables, there is usually one that comes out of the base and bolts to one of the bolts attaching the legs, and the one that attaches the monitor frame to the bottom right mounting nut but that one is usually quite short. Photo below about the degauss button (Demag in picture) shows the control panel ground attaching to some other connector in the metal panel that likely ties it to ground on the metal panel.
The degauss cable I think you may be missing the loom that it would attach to as the degauss button is on the bottom part of that metal panel under the monitor controls, I think there is some pins coming our on the right side of it (Looking from the front) and that would attach to a loom that would part go to the original JVS I/O and have a connector for the degauss cable to plug in to., and also a connector to original sound card for volume adjustment.
Circled red in this picture.
Yeah that’s the tricky part because cab is intended to be wired for JVS, so things won’t sync up well converting it to Jamma not without doing some adjustments.Does the bezel fit the monitor perfectly, there are 2 usual ones Sanwa and Nano and one is curvier than the other, and 2 sets of the metal spacer, but the other one is thicker, can remember which one was for which monitor.
Not 100% sure on earth cables, there is usually one that comes out of the base and bolts to one of the bolts attaching the legs, and the one that attaches the monitor frame to the bottom right mounting nut but that one is usually quite short. Photo below about the degauss button (Demag in picture) shows the control panel ground attaching to some other connector in the metal panel that likely ties it to ground on the metal panel.
The degauss cable I think you may be missing the loom that it would attach to as the degauss button is on the bottom part of that metal panel under the monitor controls, I think there is some pins coming our on the right side of it (Looking from the front) and that would attach to a loom that would part go to the original JVS I/O and have a connector for the degauss cable to plug in to., and also a connector to original sound card for volume adjustment.
Circled red in this picture.
View attachment 44550
I guess push button could added to degauss cable to replicate the function.
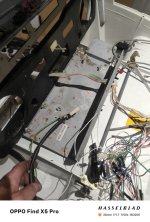
That Earth connector on the control panel would go into female 2-way AMP UP that’s mounted on that metal panel with the service & test buttons.Here's the pics I took hopefully explains it better.
Female 2-way AMP UP would have two Earth wires coming out back to be connected somewhere on the cab (guessing it would be on the legs)
That Earth connector on the control panel would go into female 2-way AMP UP that’s mounted on that metal panel with the service & test buttons.
Female 2-way AMP UP would have two Earth wires coming out back to be connected somewhere on the cab (guessing it would be on the legs)
It goes to the metal panel itself under the control panel, and another cable comes up the left leg (or is bolted inside the left leg near the control panel) to bolt to the metal panel to continue the earth path.

The control panel you wont be able to do anything about as the connectors/loom is missing from the metal bracket.
I wouldnt worry about it too much it wont effect operation, its more a safety thing in a public space in case mains voltage somehow ended up getting shorted to the metal control panel.
I wouldnt worry about it too much it wont effect operation, its more a safety thing in a public space in case mains voltage somehow ended up getting shorted to the metal control panel.
Cheers that's what I was hoping for,I soldered the cut wires and fed them back up the legs so all I need to do now I think is get a decent jamma/cga-vga converter as I've been told the one in the cab is rubbish and get a better psu as I've been told that is also crap,then I will have to do a bit of reading to see how to wire up a new jamma loom 🤣

Interesting find, yeah this would either grant a credit or access to the service menu to set it to free play.I just noticed a small button on the underside of the cp would this be used for crediting a game.
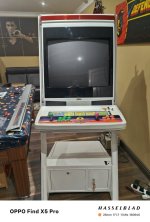
Glad to see it coming together!. Keep us posted on its development 😀Well that's the cab put all back together bar the sides so thanks to everyone who helped me with this just need to get a jamma loom and a better cga-vga converter then I'll be ready to ask more questions 🤣
Thanks again Brian
Question are you going to remove all the current CP wiring in place and wire the Jamma loom directly to CP buttons/sticks?