sega scud ffb problem

bbz149

Active member
vacBacker
Feedback
26 (100%)
Credits
1,608CR
neil1637 said:
Guys come on, get outta here. I'm new, ok, I admit this, but "IN THE DISHWASHER" come on..........

I though some very gentle rubbing with a cotton bud dampened with IPA at the most. But you are right there is some crusty white stuff on the board that doesn't look too healthy.

Even then I have no idea about electricity. So apologies for all the questions but with the unit unplugged can I still get shocked from removing these boards, wires, etc? Or certain parts like the capacitors, etc?

I read some shocking stories about monitors!

Please help.

Neil.
Yeah I've done it many times before. I use Foam cleaner and a brush and just do a rinse. You have to leave the board somewhere warm for a few days though
smiley4.gif
You wont get a shock removing the boards with the Power of and the only high Voltage is the Power going into the Cabs main Transformer, the Monitor Chassis and the Lead that goes into the Monitor Tube
 

VaNDAL_UK

User
Feedback
2 (100%)
Credits
46CR
Yes dishwasher!

As serious as a heart attack!

You'll get all the

smiley19.gif
never do that balh blah
smiley19.gif
the dish washer salts will kill kittens blah blah..
smiley29.gif


Seriously!

1: remove battery's from boards
2: brush off debris
3: rack & stack in dishwasher
4: put on a medium heat with what ever the Mrs bought
5: switch on and wait for the magic.

What will happen..

1: any paper sticker most likely will be gone.
2: the board will come out outstandingly clean!
3: dry off the board E.G leave in a warm place for 2 -3 days. blast it off with a hair drier for about an half hour to an hour for a big board.

I've done this for over 15 years. Done sever boards, Neo Geo MVS, Sega Model 2, laptop boards, anything really.

Just make sure on-board battery's or unplugged / soldered caps are discharged. and dry it off 1000%

VaNDAL_UK2014-07-17 10:11:21
 

Mr20to5

Active member
vacBacker
Feedback
1 (100%)
Credits
1,366CR
Cheers guys.

Vandal you mention unplugging the batteries or discharging them and the caps. Sorry to sound dumb but what and erm where are these in that photo.

I really appreciate everyone's help. It's my first cab and just need baby step instructions if possible.

Thanks in advance, Neil.
 

bbz149

Active member
vacBacker
Feedback
26 (100%)
Credits
1,608CR
neil1637 said:
Cheers guys.

Vandal you mention unplugging the batteries or discharging them and the caps. Sorry to sound dumb but what and erm where are these in that photo.

I really appreciate everyone's help. It's my first cab and just need baby step instructions if possible.

Thanks in advance, Neil.
There are no Battery's on the Scud Servo and Drive boards!
Forgot to mention the dish washer salts
smiley9.gif
but I have none in the Washer as its in the Tabs which I don't use when cleaning a boards
bbz1492014-07-17 11:35:26
 

VaNDAL_UK

User
Feedback
2 (100%)
Credits
46CR
That was just in general.

If the machine has been switched off for a few hours you can unplug that board and scrub it down in the sink with soap and hot water or bung it in a dish washer.

Unplug it, wash it, dry it, test it.

If you can take a close up photo of the area where the crusty stuff was we might be able to see if there has been any corrosion.

Isoprop will be good for evaporating the residual water after cleaning.
 

Mr20to5

Active member
vacBacker
Feedback
1 (100%)
Credits
1,366CR
Thanks guys,

One day I wont be so green and it will al be done to your advice!! Unitl then.....
smiley11.gif


Ok, so the plan is to unplug and clean with toothbrush, I just can't bring myself to the dishwasher stage yet and it's full of salts anyway!!

I'll then dry it with a hairdryer and leave it in my sunny conservatory with my fingers crossed
smiley3.gif


I kind of want to do this with all the boards under the footplate as they are filthy/dusty but maybe that's a job for another day/week/month......
smiley9.gif


As for the detailed photo, I will try and post a close up, I have to put the resolution on my phone really low to get it under the allowed KB to post it up but I will try my best once I get the board out.

Thanks again I really, really, really appreciate this.

Neil
 

Mr20to5

Active member
vacBacker
Feedback
1 (100%)
Credits
1,366CR
Okay everyone. Time for my next installment, I trust we are sitting comfortably. Good news and bad I'm afraid. Let's start with the good:

I took out this board, which I think is the servo board. The photo really doesn't show just how dirty it was.

20140718_202030.jpg


Favouring the more controlled and self educating cotton bud method, I set to work. Look how shiny she is!

20140719_151659.jpg


The bit that had some corrosion cleaned up nice with hopefully no lasting damage.

20140719_160921.jpg


Now for the not so good. After it was dried and refitted the FFB still does not work. Same drive board error on start up. However I now think I have located this board, way at the back under the pedals. Bit more difficult to see/get to, but whilst the machine was switched on I saw the led screens. The left set displayed 02 and the right had a number I couldn't see followed by a 3. Here's the best photo I could get.

20140719_151854.jpg


So advice please. I feel I should give this board a good clean too and reconnect, as a start. Is there any risk in doing this, either to the board or myself? Still paranoid about this electricity leaking on to me.

Also an earlier post mentioned electricity being in the transformer, is that the metal cube to the right of the drive board? Will this keep electricity in it when the machine is off? Can I touch it?

Please help.

Neil
 

Vamino

Insert coin(s)
vacBacker
Feedback
23 (100%)
Credits
2,698CR
Hi,

Next I would do what the other guys have suggested previously, reseat the connectors on the control board. Giving it a clean would be a good idea as well. Don't worry, as long as it's powered off it's perfectly safe to unplug/reconnect those cables.

If possible, I'd also make sure the cables are firmly connected to the steering wheel as the error points to no power getting to the motor. But, it can be a number of things at this point which generates that error.

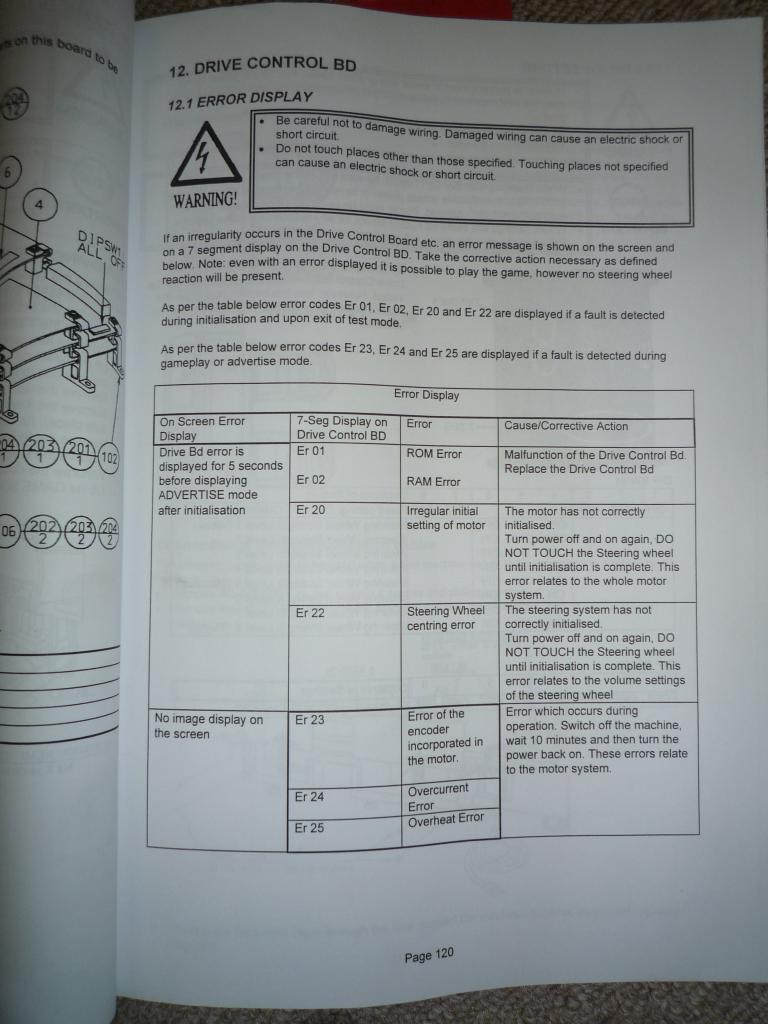
The error code in your pic reads: ER-20

scud_drive_codes.jpg


Cheers.
 

Mr20to5

Active member
vacBacker
Feedback
1 (100%)
Credits
1,366CR
Hi and thanks for the reply.

First problem is how best to get to this board. It is right at the back under the pedals. But the pedals seem held in by an upright piece that has lots of electrical danger signs on it, and that seems bolted to the frame. Hmmmm. Could I just take the metal part only of the pedals off? Seems four simple bolts only?

There is also a metal cube type thingy next to the board under the pedals. Can I ask what this is?

Oh so many questions.

Thanks again.

Neil
 

bbz149

Active member
vacBacker
Feedback
26 (100%)
Credits
1,608CR
O2 is Ram error, Drive Control board
smiley5.gif
Just by cleaning a board its not going to magically make it work unless its a bad connection on the socketed Rom! That was prob where a drink was spilt on it due to where those boards are mounted and not corrosion, I had the same thing on my F355 Cab. So its looking like the board I said all along the one you just cleaned

Metal Cube thing
smiley5.gif
You talking about a Transformer?

Ill check how many drive boards I got m8 to see if I can spare one

bbz1492014-07-20 15:30:13
 

Mr20to5

Active member
vacBacker
Feedback
1 (100%)
Credits
1,366CR
Bbz149,

I think it is error 20 not 02. The way the board was mounted made me read it the wrong way but reading it correctly, I think, means it says ER 02.

So from Previous Post I was looking at checking the connectors on the board that displays this error code but I can't get to it.

Also could it be a problem somewhere behind the wheel? Clearly you will have guessed that I have no clue as to what wizardry lies behind that! !!

As for the metal box, yes the transformer, will that leak electricity if I touch it?
smiley5.gif


Neil
 

bbz149

Active member
vacBacker
Feedback
26 (100%)
Credits
1,608CR
I'm sure its read this way round! So does it say 02 Er? Always thought they said ER then a number
smiley5.gif
And no the Transformer does not hold any charge when disconnected

board_zps14b5b7aa.jpg


bbz1492014-07-20 19:49:58
 

Mr20to5

Active member
vacBacker
Feedback
1 (100%)
Credits
1,366CR
Sorry. I feel I have caused confusion and delay!

The board says ER 20. I think it should be read from the opposite end of the machine due to how it's been fitted.

If I could get to it I would take a better photo, but from earlier post I'm not sure how best to get to it.

Oh if only I wasn't such a noob!
smiley9.gif
smiley19.gif
 

ZedEx48K

8-Bit
Feedback
2 (100%)
Credits
1,423CR
The pedal base isn't too hard to remove, once the backplate is off there are 2 screws at the top and then just the bolts at the side next the the U framed part, and out they pop, also give or take with the wiring loom the lot does come out together on the mounting board.
 

Mr20to5

Active member
vacBacker
Feedback
1 (100%)
Credits
1,366CR
Hi everyone, back again.

?

I feel like I am the complete "noob" here as I am asking soooooooooooooooooo many questions.  I hope I'm not "outstaying" my welcome with all this free advice I keep taking with no "giving" in return?

?

So if it makes you all feel slightly better, I really appreciate it and it has been invaluable so far.
smiley32.gif


?

So, next I intend to take the pedal mechanism of, follwoing the instructions given above, again, back to my disproportionate fear of leaking electricity...........  with the machine off and unplugged, in removing the back plate to get the pedal set up off, are there any risks from the chassis frame or any leads, etc that may lie behind this back plate?
Edited after reading this back. All I need to know is directly it by the machine off and unplugged overnight, what bits if any could hurt me?

?

I will then remove, clean, reseat the connectors on the board with the LED's on it at the back and reconnect.

?

Also, the error code displayed "ER 20", just to make it clear, would indicate nothing getting to the motor, which I'm guessing is directly behind the wheel, so is it worthwhile taking the steering wheel off and checking the conenctions behind there?

?

If so, you know what the next questions will be.................
smiley2.gif


?

Also if there is nothing obvious anywhere, is there a way of diagnosing which board may be at fault, ie with some electrical gadgetry, which I admittedly do not have, but may be able to borrow?
I would hate to do all this for a simple fuse to have blown somewhere.

?

Thanks again.

?

Neil.

?

 
neil16372014-07-22 21:40:25
 

Mr20to5

Active member
vacBacker
Feedback
1 (100%)
Credits
1,366CR
Good day all,

Just wanted to round things up as this thread has gone on for a bit and has gone a bit repetitiive, mainly due to my ineptness!!
smiley9.gif


Since getting hold of my racer I always wanted to clean her up, I love restoring things and thought this would be a fine project, one day.....

The fault that has developed has made me get inside the machine and discover all the wizardry and electrical gremlins that live inside, which is a whole new and steep learning experience. It also showed me just how dirty, dusty, grubby it was and how much of a difference I could make armed with little more than some dampened cotton buds and a wee brush!!

So, putting the force feedback fault to one side, I intend to give the machine a good clean throughout, starting at the base, one board at a time and play/test it as I go.

For this I need to ask only one more question, which means I can leave you all well alone and stop pestering you with inane questions every day!! Who knows I might even find the loose wire, faulty fuse, dodgy connection, duff board along the way.

So, thank you all for your advice and one final question please if I may....

With the machine off and unplugged overnight, when I start sticking my hands and screwdrivers inside, what parts, if any, will still hold residual electricity? ie; which bits do I need to observe some care over when dismantling?

If you answer me this I promise to go away and not bother you again
smiley19.gif
 

VaNDAL_UK

User
Feedback
2 (100%)
Credits
46CR
Other than the monitor you will be fine.

I saw a servo board on ebay for £35 if you get no where.

Take lot of pictures of the placement of the boards and the connection going to them, try to get the colours of the wires as well.

By the way keep asking questions add pic's.

I just did a Sega Rally no knowing what was what in the tray, was very difficult working out how the loom whet back in. but pictures helped a lot. VaNDAL_UK2014-07-23 15:05:31
 

Vamino

Insert coin(s)
vacBacker
Feedback
23 (100%)
Credits
2,698CR
Hi Neil,

Don't worry about asking questions mate, we have all been there!
smiley36.gif


People do want to help, but what can happen is that one person posts some advice, then another person posts advice and then yet another person posts advice.....everyone posts advice which confuses matters before the basics have been tried....IE: unplug/reseat cables, check connectors for corrosion, check voltages are correct etc. When you have tried the basics, then people can give more suggestions.
So, try what the guys have suggested then ask more questions and show pics etc, it always helps the next guy that comes along asking about the same thing.
smiley1.gif


I'm still pretty new to the wonders of owning and arcade machine (or 4
smiley36.gif
), and with some help have learned everything as I go along, I do work in the breakfix area of IT so use some of my experience gained from my work, but generally it's all about trial and error when diagnosing/faultfinding, looking for what the problem could be whilst eliminating what the problem isn't.

As bbz said, cleaning boards will not miraculously fix a fault, but from experience, if after initial testing you first clean the important parts that generate heat/power then it can save a lot of grief/money in the long run. Everyone is different as to how they tackle things, but as soon as I get a new cab I clean out the PSU with an airduster and non-static paintbrush and also check/adjust the voltages as necessary, I also check/clean fans on the game boards (I'm talking about model 2 + 3/Naomi/Chihiro games etc) and I also reseat and check that the connector are connected properly. You can also do a quick check to see if there are any signs of split liquids that can/have caused corrosion.

Dust is the no1 killer of electronics, especially fibres from nylon underpants can cause havoc with electronics. Most machines have been standing for years in the same spot and have rarely been cleaned internally unless the boards fail, just because something is working today it doesn't mean it will continue to stand up to being enclosed in a metal case with busted fans with everything caked in dust whilst slowly cooking itself to a crisp. Moving the cabs can dislodge large deposits of crud (Especially in a PSU) and that can be bad news if things are not cleaned. But.....you CAN damage things by removing and cleaning them if you are not careful, but if you use antistatic precautions, let the boards cool down are gentle trying not to flex the boards you greatly reduce the risk.

One final thing, if you intend to keep tha cab, then I'd try and get some spare parts for it.
Drive board/servo boards are great to have at hand as it makes faultfinding so much easier, to find a fault on a Daytona 2 cab I rescued I ended up spending quite a bit of money on spares which helped a lot. So try and get some working spares if you can, if you are patient they do crop up for sale for reasonable prices.

Well, there are more experience people on this forum who will give much better advice than me, so I'll end my babbling there.

Have fun restoring your cab, Scud race is a great cab.
smiley20.gif


Cheers.
 
Top