Space Harrier /OutRun DX Motor OpenBoard Project

John Bennett

Senior Member
vacBacker
Feedback
10 (100%)
Credits
4,998CR
They are - thanks! Sorted the resistor value earlier.

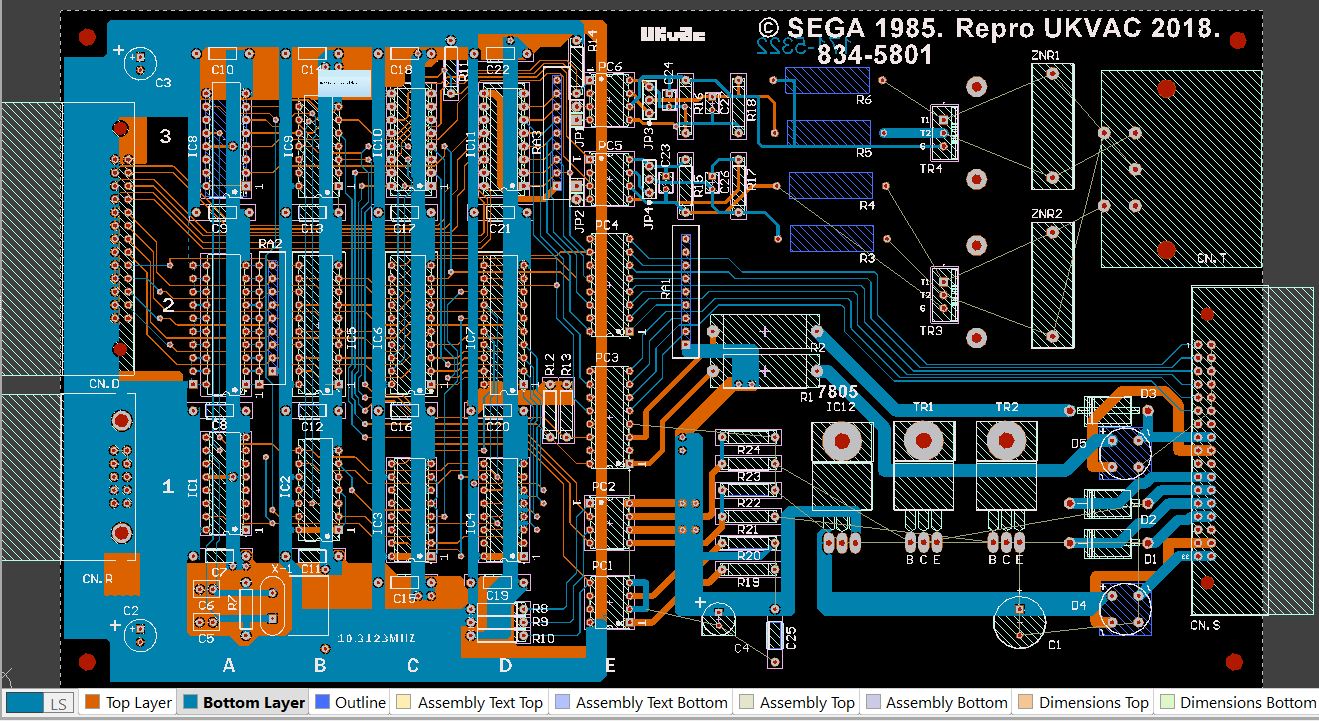
I apologise for any distress about the additional jumpers to route, but it the easiest way to let you have alternatives to the TLP511, whilst stil looking almost authentic.
 

John Bennett

Senior Member
vacBacker
Feedback
10 (100%)
Credits
4,998CR
OK, I think that's the lot placed
smiley1.gif

pcb_4_6_18.JPG


Tin - rather than just using tracks, you can draw filled polygon shapes, then right click and assign them to a net. Sega have done something similar to this for a lot of the power nets (you can see they have complicated shapes, so we're replicating it.
Not as hard as it sounds - click on the button then draw the vertices and right click when done and it fills it in. Then right click to set the layer and the net.
 

tin

Active member
vacBacker
Feedback
3 (100%)
Credits
655CR
Cool that makes sense now, I was thinking down the line of poly caps? Could not get it! I'll give it a go, see what sort of mess I make!
 

John Bennett

Senior Member
vacBacker
Feedback
10 (100%)
Credits
4,998CR
Today's request...
smiley36.gif


Is anyone able to get some photos of the plugs that go to the board? (please).
If possible with a ruler next to them measuring the depth?

I ask as it would be nice to put in connectors like in the graphic, with levers that grab around the plugs, but I need to know the depth of the plugs. They're deeper when the ribbon cable is looped back onto the plug via a second retainer.

E.g.
Ribbon_cables_with_IDC_connectors.jpg


I'm trying to get a Bill of Materials together, but I'll chip in with the routing if needed.John Bennett2018-06-06 22:28:55
 

tin

Active member
vacBacker
Feedback
3 (100%)
Credits
655CR
I've tried to re route the problematic ACZERO and !ACZERO around under IC9 but now the software is throwing errors. If I could successfully do the routing, it does now match up. Can someone take a look at what I've done and see if you can force the software to accept it? I think I need a course ????
 

John Bennett

Senior Member
vacBacker
Feedback
10 (100%)
Credits
4,998CR
tin said:
I've tried to re route the problematic ACZERO and !ACZERO around under IC9 but now the software is throwing errors. If I could successfully do the routing, it does now match up. Can someone take a look at what I've done and see if you can force the software to accept it? I think I need a course ????

I think you need to delete the old tracks and re-route them. I can see ACZERO tracks going to !ACZERO pads and vice versa.
 

John Bennett

Senior Member
vacBacker
Feedback
10 (100%)
Credits
4,998CR
NaokiS said:
Don't have my nice calipers at the moment so here's what I have.

https://imgur.com/a/PO2IKak

If it's the other type that SEGA used where the tabs lock outwards then I'll have to do that another time

Is that a Sega connector?
I just had it in my head that the games probably had the ribbon looped back with a retainer, so we'd need long reach headers.

It's easy enough to just fit 2.5mm headers with no retainer, but it doesn't look as slick.
 

NaokiS

Active member
Feedback
1 (100%)
Credits
116CR
John Bennett said:
NaokiS said:
Don't have my nice calipers at the moment so here's what I have.

https://imgur.com/a/PO2IKak

If it's the other type that SEGA used where the tabs lock outwards then I'll have to do that another time

Is that a Sega connector?
I just had it in my head that the games probably had the ribbon looped back with a retainer, so we'd need long reach headers.

It's easy enough to just fit 2.5mm headers with no retainer, but it doesn't look as slick.

Sega "IDC-Looking" connectors are almost certainly JST-RA or AMP-?? Connectors. And acutally looking at the board it's AMP and not the JST-RA. Not sure what the connector is called but BRB

EDIT: Should point out that these are not ribbon connectors but wire connectors

EDIT2: ARGH. Right. The AC Inlet on the motor side and power connector for the logic on the lef (the 10 pin) IS wire to wire and are AMP connectors. The Yamachi connector is IDC Locking and is for IDC ribbon cable

NaokiS2018-06-06 23:08:27
 

John Bennett

Senior Member
vacBacker
Feedback
10 (100%)
Credits
4,998CR
Doh, a lot of it's in the photos, dunno why I missed that.
I'll see if I can find part numbers. The worst case is bare-pin 2.54mm right-angle headers, but would be nice to get it right.
 

tin

Active member
vacBacker
Feedback
3 (100%)
Credits
655CR
John Bennett said:
I
think you need to delete the old tracks and re-route them. I can see
ACZERO tracks going to !ACZERO pads and vice versa.

Yeah that was the problem I could not solve. I think I have done it now :)

tin2018-06-07 09:26:35
 

NaokiS

Active member
Feedback
1 (100%)
Credits
116CR
John Bennett said:
Doh, a lot of it's in the photos, dunno why I missed that.
I'll see if I can find part numbers. The worst case is bare-pin 2.54mm right-angle headers, but would be nice to get it right.

As for those connectors, the original AMP style are long obsolete so the only two ways are to make replacements or just double hight right angle header pins as the original just will not fit RA IDC boxes (JST-RA does however)
 

John Bennett

Senior Member
vacBacker
Feedback
10 (100%)
Credits
4,998CR
I suppose if you can transplant the header if you're original board is knackered and I'll just source a bare-pin socket.

You guys'll have to slow down, It's nearly finished and I'm only halfway through the BOM
smiley3.gif


PCB_7_6_2018.JPG


As I'll sort out an initial test board, if we've made mistakes we'll have a chance to sort it before ordering a batch.
 

Outrun2

Colonel Outrun
Feedback
5 (100%)
Credits
1,145CR
Just reading the discussion about ribbon cable (or not) and thought I'd share a couple of rare photos I have of an OutRun PCB linked to the motor board - using a ribbon cable.

This was saved from the one and only ebay listing I've seen over the years for a deluxe motor board.

Wondered if they might help..

42669932321_f704760a52_c.jpg


42621211272_5b1f46ab34_c.jpg


I don't have a cab, but have saved a ton of OutRun stuff over the years
smiley9.gif
 

karlcdoe

Active member
vacBacker
Feedback
7 (100%)
Credits
875CR
Bit late now perhaps but here are the two control connectors:

cpu -> drive pcb: (note this is not the original cable, I replaced it for the hell of it during repair as for some reason being a resourceful fellow I had a few new ones in a box, some ribbon cable and the tool used in a vice to clamp them...)

SH_CPU_CN.jpg


drive pcb <-> clutch/24v power/etc:

SH_Clutch_PWR_CN.jpg


The +5vdc power supply from the switch mode is using 'standard' sega locking connectors, not sure what they are but think someonw struglged to source identical usnits but found something usable but not locking and put it in the connector kits that were for sale for power drift/outrun, etc here.

karlcdoe2018-06-08 13:40:16
 
Top