Space Harrier /OutRun DX Motor OpenBoard Project

John Bennett

Senior Member
vacBacker
Feedback
10 (100%)
Credits
5,003CR
ColinD said:
This is really nice work.

At some point Chris White ported the Motor Test / Startup code to run on the Arduino on the Cannonboard (so we had a stand alone unit which would run the test code) and later it migrated back into Cannonball itself so if motion was enabled it ran automatically.  

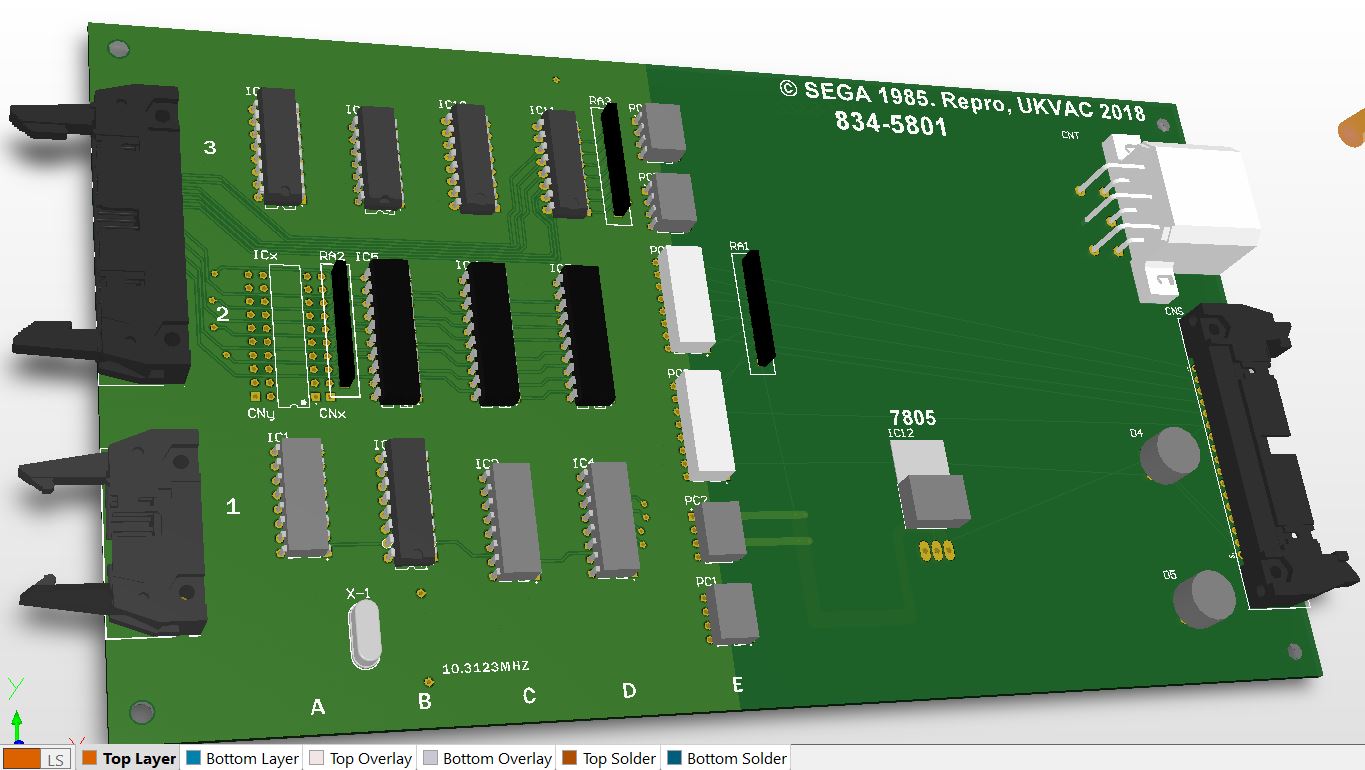
I think the drive board drives until it sees the end of travel switches, so will stop automatically.  Usually the game pcb will drive in between these limits (using the Pot to track position) once its ran the calibration at startup (end of travel, middle position and pot range iirc) but ultimately if something goes wrong with the control signal, it will stop movement for safety.

Control Values 1 > 8 > 15 make sense and this is what we observed too - Iirc, the board sees 00 if unplugged and 'possibly' when not commanded to move.

Cheers, Col?

?
dj_yt said:
Yes as Colin mentions I've fully decompiled the OutRun 68000 motor code.

I don't think you'll necessarily need it for this project if you're aiming for a 1:1 hardware replica, but if I can be of any help from a software point of view, just let me know.
I apologise, I didn't twig what the Cannonball project was yesterday. Did you get anywhere near to finishing it?
If it makes it any easier for putting a PC into these cabs, then would there be any use in an adapted/integrated version of this at some point (WAY down the line when this is done and dusted - any more distractions for me are banned
smiley36.gif
). Or maybe it's fine with the 4-bit digital interface?

It also had me thinking - I can make TV pictures with FPGAs - would a USB 2.0 to 15kHz external video generator unit be a useful project ? (again waaay down the line and maybe a bit too ambitious
smiley36.gif
).
 

dj_yt

Active member
Feedback
3 (100%)
Credits
787CR
It depends what you mean by finished exactly. CannonBall could easily be considered finished given that it's a perfect (arguably better given it runs in widescreen at 60fps) implementation of OutRun than the original codebase. I haven't worked on it much in recent years due to starting a family, and focusing on other projects and hobbies. But that doesn't mean I've lost interest in it as such.

In terms of running it on a PC connected to hardware, Colin made a nifty interface called CannonBoard that connected a PC in place of the PCB.

http://reassembler.blogspot.co.uk/search/label/cannonboard

We never really released it as a useable thing. It was more of a project.

I like the idea of your USB to 15Khz video generator. Technically, I have no idea how that would work myself!
smiley36.gif


dj_yt2018-05-23 13:22:34
 

tin

Active member
vacBacker
Feedback
3 (100%)
Credits
655CR
I had a quick scan of the material on the cannon board yesterday, I presume it would (in part) plug into the board we're trying to recreate here?
 

dj_yt

Active member
Feedback
3 (100%)
Credits
787CR
Yes, if you're proposed motor PCB is pin compatible with the original hardware, I can't think of a reason you couldn't connect the two together and completely replace the OutRun innards!
 

NaokiS

Active member
Feedback
1 (100%)
Credits
116CR
tin said:
I had a quick scan of the material on the cannon board yesterday, I presume it would (in part) plug into the board we're trying to recreate here?

I dont know enough tech to say yes 100% but likely so. I was thinking earlier today about making a USB version or something so that using the same Space harrier protocol you can move the cab within the limits. Probably USB HID for inputs and Serial for sending commands back
 

tin

Active member
vacBacker
Feedback
3 (100%)
Credits
655CR
NaokiS said:
I dont know enough tech to say yes 100% but likely so. I was thinking earlier today about making a USB version or something so that using the same Space harrier protocol you can move the cab within the limits. Probably USB HID for inputs and Serial for sending commands back

Would be interesting to see if it's possible to add to an otherwise replica board!
 

NaokiS

Active member
Feedback
1 (100%)
Credits
116CR
tin said:
NaokiS said:
I dont know enough tech to say yes 100% but likely so. I was thinking earlier today about making a USB version or something so that using the same Space harrier protocol you can move the cab within the limits. Probably USB HID for inputs and Serial for sending commands back

Would be interesting to see if it's possible to add to an otherwise replica board!

It might be added or become just an adaptor so even originals can benefit from this new age USB jiggeryNaokiS2018-05-23 13:49:49
 

John Bennett

Senior Member
vacBacker
Feedback
10 (100%)
Credits
5,003CR
dj_yt said:
It depends what you mean by finished exactly. CannonBall could easily be considered finished given that it's a perfect (arguably better given it runs in widescreen at 60fps) implementation of OutRun than the original codebase. I haven't worked on it much in recent years due to starting a family, and focusing on other projects and hobbies. But that doesn't mean I've lost interest in it as such.?

In terms of running it on a PC connected to hardware, Colin made a nifty interface called CannonBoard that connected a PC in place of the PCB.

http://reassembler.blogspot.co.uk/search/label/cannonboard

We never really released it as a useable thing. It was more of a project.?

I like the idea of your USB to 15Khz video generator. Technically, I have no idea how that would work myself! 
smiley36.gif
Very nice. Sorry, probably sounded a bit too doubtful when I asked if it was 'near finished'.

Regarding the VGA, there are little USB to VGA units you can buy that I guess appear as extra video cards in windows, but I was thinking maybe someone could make a mame driver to just punt the bytes out of the USB (about 13MB a second?) to the board, which would then turn it into video. The PC code bits are rather out of my comfort zone though. Ambitious, like I said
smiley36.gif
( you'd have to minimise the lag to a single frame ideally).
 

John Bennett

Senior Member
vacBacker
Feedback
10 (100%)
Credits
5,003CR
NaokiS said:
tin said:
NaokiS said:
I dont know enough tech to say yes 100% but likely so. I was thinking earlier today about making a USB version or something so that using the same Space harrier protocol you can move the cab within the limits. Probably USB HID for inputs and Serial for sending commands back

Would be interesting to see if it's possible to add to an otherwise replica board!

It might be added or become just an adaptor so even originals can benefit from this new age USB jiggery

It's a good question. In my view, it's probably nicest to keep this first board simple and authentic (and get it done), then do modernised variants and/or adaptor PCBs.
With the schematics made and the board mostly laid out, it should be much simpler to create spin-off designs.John Bennett2018-05-23 14:15:01
 

NaokiS

Active member
Feedback
1 (100%)
Credits
116CR
John Bennett said:
dj_yt said:
It depends what you mean by finished exactly. CannonBall could easily be considered finished given that it's a perfect (arguably better given it runs in widescreen at 60fps) implementation of OutRun than the original codebase. I haven't worked on it much in recent years due to starting a family, and focusing on other projects and hobbies. But that doesn't mean I've lost interest in it as such.?

In terms of running it on a PC connected to hardware, Colin made a nifty interface called CannonBoard that connected a PC in place of the PCB.

http://reassembler.blogspot.co.uk/search/label/cannonboard

We never really released it as a useable thing. It was more of a project.?

I like the idea of your USB to 15Khz video generator. Technically, I have no idea how that would work myself! 
smiley36.gif
Very nice. Sorry, probably sounded a bit too doubtful when I asked if it was 'near finished'.

Regarding the VGA, there are little USB to VGA units you can buy that I guess appear as extra video cards in windows, but I was thinking maybe someone could make a mame driver to just punt the bytes out of the USB (about 13MB a second?) to the board, which would then turn it into video. The PC code bits are rather out of my comfort zone though. Ambitious, like I said
smiley36.gif
( you'd have to minimise the lag to a single frame ideally).

I doubt USB2 is fast enough for what you're asking, USB 3+ though might work
 

tin

Active member
vacBacker
Feedback
3 (100%)
Credits
655CR
John Bennett said:
It's a good question. In my view, it's probably nicest to keep this first board simple and authentic (and get it done), then do modernised variants and/or adaptor PCBs.
With the schematics made and the board mostly laid out, it should be much simpler to create spin-off designs.

Agree entirely with this approach. If we shoot for a replica first, and make it a success, then other stuff could be added later, depending on what making this replica teaches us!
 

NaokiS

Active member
Feedback
1 (100%)
Credits
116CR
tin said:
John Bennett said:
It's a good question. In my view, it's probably nicest to keep this first board simple and authentic (and get it done), then do modernised variants and/or adaptor PCBs.
With the schematics made and the board mostly laid out, it should be much simpler to create spin-off designs.

Agree entirely with this approach. If we shoot for a replica first, and make it a success, then other stuff could be added later, depending on what making this replica teaches us!

Only mentioned as I'm designing almost the exact same thing for my Sega Touring Car cab so it can interface all the controls to PC and output the lamps and data to the FFB boards
 

John Bennett

Senior Member
vacBacker
Feedback
10 (100%)
Credits
5,003CR
Getting there gradually.
Many components and nets are down. Holidays and the desire to understand the opto-triac circuit 100% will slow progress a little, but getting there...
I'll also try to spend some time playing with Slack so we can get the channel running soon.
PCB24_5.JPG
 

John Bennett

Senior Member
vacBacker
Feedback
10 (100%)
Credits
5,003CR
Well, after many hours looking at Triac circuits and drawing things out, I've realised that pins 2,3 and 4 of the TLP 511's are NOT joined together (photos back that up). Pesky schematic scans.
Which is good as I couldn't fathom out how it worked.

It actually makes total sense when you realise it's being used in a very typical way - the circuit switches the two opto-thyristors at once (they're in series) and the top one turns the triac on for the mains positive cycle and the bottom one for the negative cycle.
I'm rather glad it makes sense now, as I want to put in an optional alternative to the TLP as they're the hardest thing to source. Should be able to retro-fit a proper board too, hopefully (maybe via DIL8 adaptor).John Bennett2018-05-27 11:38:03
 

JohnUK

User
Credits
33CR
so glad there are people like you in the community able to bring these discontinued parts back to life. I’m completely lost by most of what you say but top job anyways.
 

John Bennett

Senior Member
vacBacker
Feedback
10 (100%)
Credits
5,003CR
The more kind words, the more we've got to make sure we see it through
smiley36.gif
.
Rather just than my nerdy WIP on here, we can do a manual to explain the operation and how to test the board. Should be valid for the original too.

As simple as the board is, it's been quite interesting how they've managed a bi-directional, speed adjustable motor controller using a single power switching device - not something I can find other examples of via Google.
 

tin

Active member
vacBacker
Feedback
3 (100%)
Credits
655CR
Ah yeah, 2 & 4 connected together but 3 not? There's loads of these could-be-junctions in the schematic! Not sure what that does but I almost completely followed your explanation. This is great for learning too!
 

John Bennett

Senior Member
vacBacker
Feedback
10 (100%)
Credits
5,003CR
Yep, 3 goes to the transistor buffer.
I should've twigged earlier as pin 3 is the pulsed control signal.

Pin 1 goes to 5V when the isolated power supplies are healthy.
Current flows through the top photodiode and out of pin 2.
It then goes into pin 4, through the lower photodiode and out through pin 3 to the transistor buffer.

I think you could do it with a single bi-directional modern photodiac device, rather than this dual (obsolete) device.
 

John Bennett

Senior Member
vacBacker
Feedback
10 (100%)
Credits
5,003CR
A question for anyone with access to a board, please
smiley1.gif


There's one or two 'snubber' modules fitted next to the triacs (ZNR1 and 2).
Is there any part numbers or markings?

I'm expecting to have to pin out these for alternatives, but would be nice to know the original values. Schematic scans are too rough to read the values unfortunately.
 

tin

Active member
vacBacker
Feedback
3 (100%)
Credits
655CR
I didn't purposely get a shot of one when I was taking random photos, and I'm away now, but this looks like it might be enough?

IMG_2168.JPG
 
Top